
The TP-Link TL-ER620 supports IPsec, L2TP and PPTP. Under Services, you can set Dynamic DNS and UPnP, while the System Tools is useful for upgrading the firmware, enabling the SNMP, checking the Diagnostics and more.
Note: After a restart, it takes almost 3 minutes to get access to the Internet back up to the client devices, but when using the SDN, I noticed that it takes a minute less.
Dual-WAN Configuration and Test
In standalone mode, I saw that it was possible to enable Load Balancing, but I was unable to set a ratio between the two Internet connection.
TP-Link does mention that I could Enable the Bandwidth Based Balance Routing on ports, but it seems that it’s done automatically (1:1) since I saw no other settings in this mode. Which is why I decided to switch to the Omada SDN and check if there are more options there. I was already using the OC200 alongside the TL-SG2210P Ethernet switch and the EAP660 HD WiFi 6 access point, so all I had to do was check the Gateway section to see that the TL-ER7206 was waiting to be adopted.
After the Provisioning and (automatic) Configuring process was done, I checked to see if the settings from the standalone site were indeed ported to the SDN and they were. So, I went to the Settings > Wired Network and Internet where I immediately saw that the Load Balancing was indeed more clearly laid out. You can see that I chose WAN and WAN/LAN1 as the two WAN ports and, as for the Load Balancing Weight, it’s set by default as 1:1. Which makes sense since most people prefer to have both links equally involved.
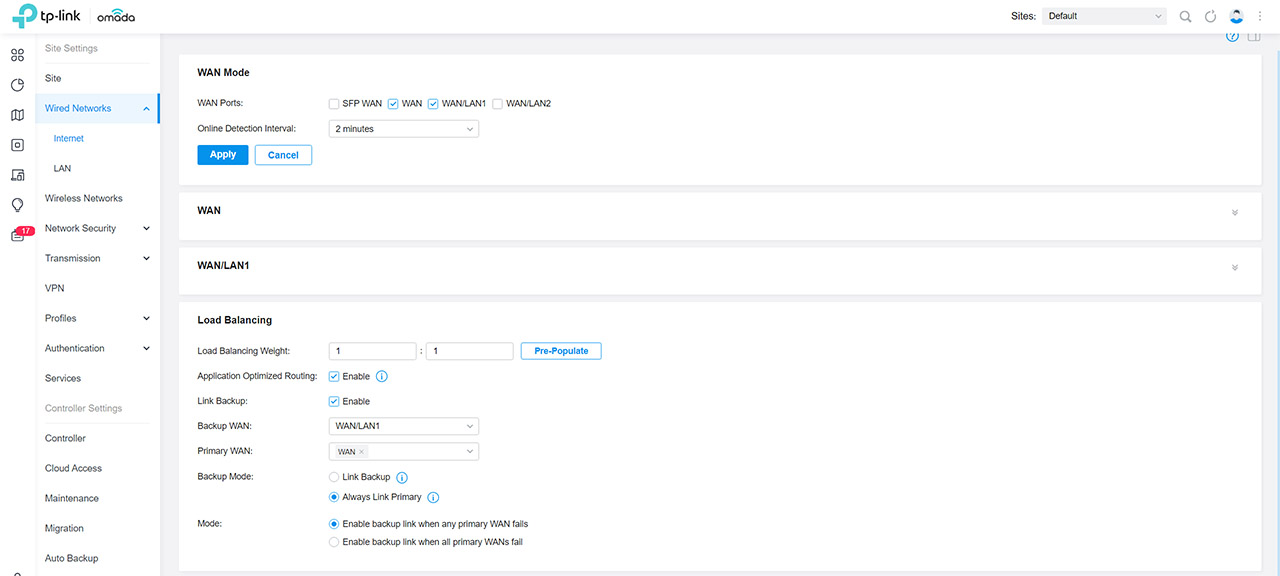
But you can also select the weight to be 1:2, 1:3 and so on, if one link has less bandwidth available than the other. Also, it’s very important to have the Primary and the Backup WAN already set, especially for the Link Backup option. The idea is that in case the Primary WAN fails, the TP-Link TL-ER7206 will start the secondary connection immediately. You will see this option next to the Mode, where you can Enable the backup link when any primary WAN fails or when all primary WANs fail (can be more than one).
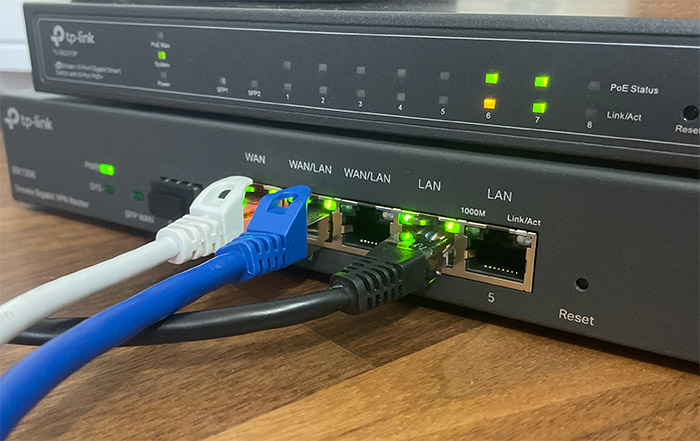
As expected, I had to check just how quick the switch from one WAN to the second was, so, being inspired by SmallNetBuilder.com, I ran two concurrent Ping tests to 8.8.8.8 and 1.1.1.1, and I disconnected the cable from the primary WAN port.
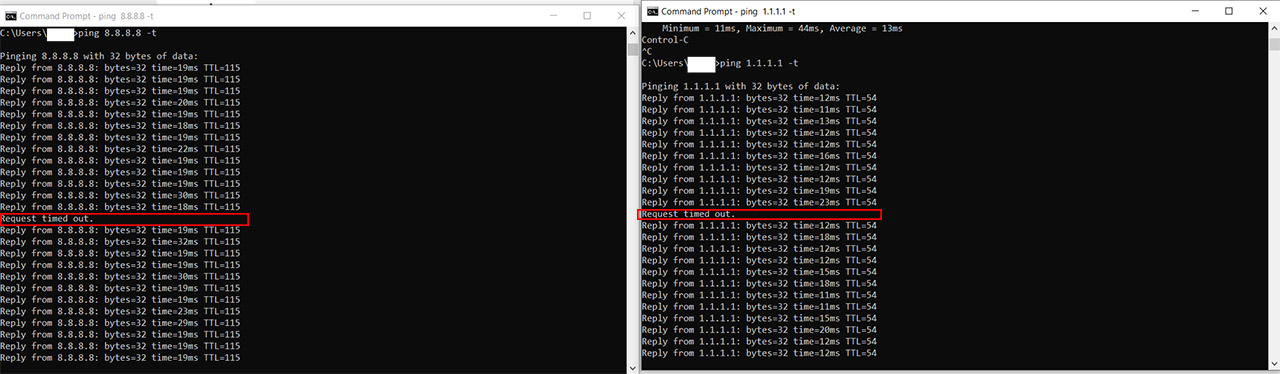
As you can see from the screenshot, there is a “Request time out” – a single packet drop – then the connection went back to normal. I redid the test several times to make sure that I see the same behavior every time, so yes, you’re going to lose one packet when the Internet connection switches from one WAN port to the other.
The VPN Configuration and Tests
To set up a VPN Policy (using the Omada SDN), you need to go to Settings > VPN and click on Create New VPN Policy. Then, give the new VPN connection a name, Purpose (Site-to-Site or Client-to-Site) and the VPN Type. The TP-Link TL-ER7206 supports L2TP, PPTP, IPsec and OpenVPN, and for the first two, you can choose the Encryption (don’t leave these connections unprotected), as well as the Service Port and Protocol if you decide to use the OpenVPN.
Next, you can choose the Local Networks to which the VPN policy will apply to, the Pre-Shared Key and the WAN port. What’s interesting is that you can choose the IP Pool directly from this section and it will automatically be allocated, which is simpler than on other devices.
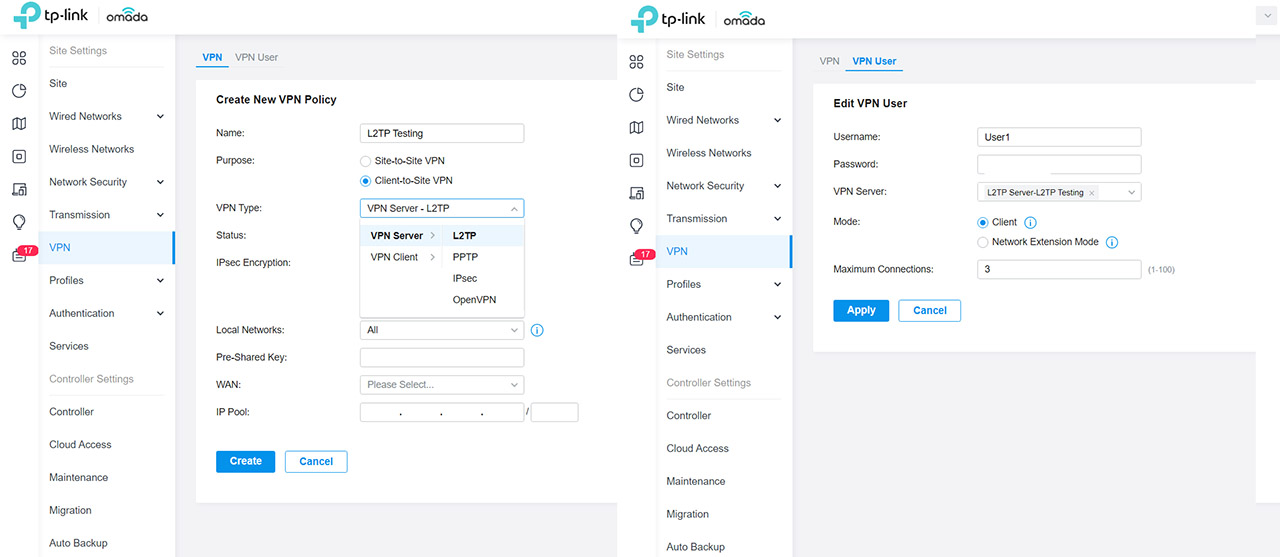
The VPN User is very simple to set up since all you need to do is to enter a Username and Password, choose the VPN Server (from those that you have already created) and the Mode. It can be Client or Network Extension Mode (if you want to connect clients only from the configured subnet). You can also choose the Maximum number of Connection, but other than that, that’s about it, so I decided to check out if I could successfully connect using an iPhone.
After setting up an L2TP and PPtP VPN Policy and Client, you need to go to Settings > General > VPN & Device Management from the iPhone and then to tap on Add VPN Configuration. From the Type, it possible to choose either IPSec or L2TP, depending on the tunnel you wish to connect to, then you can choose any Description you want (I used Lotto due to an auto-correct from L2TP!) and the Server.
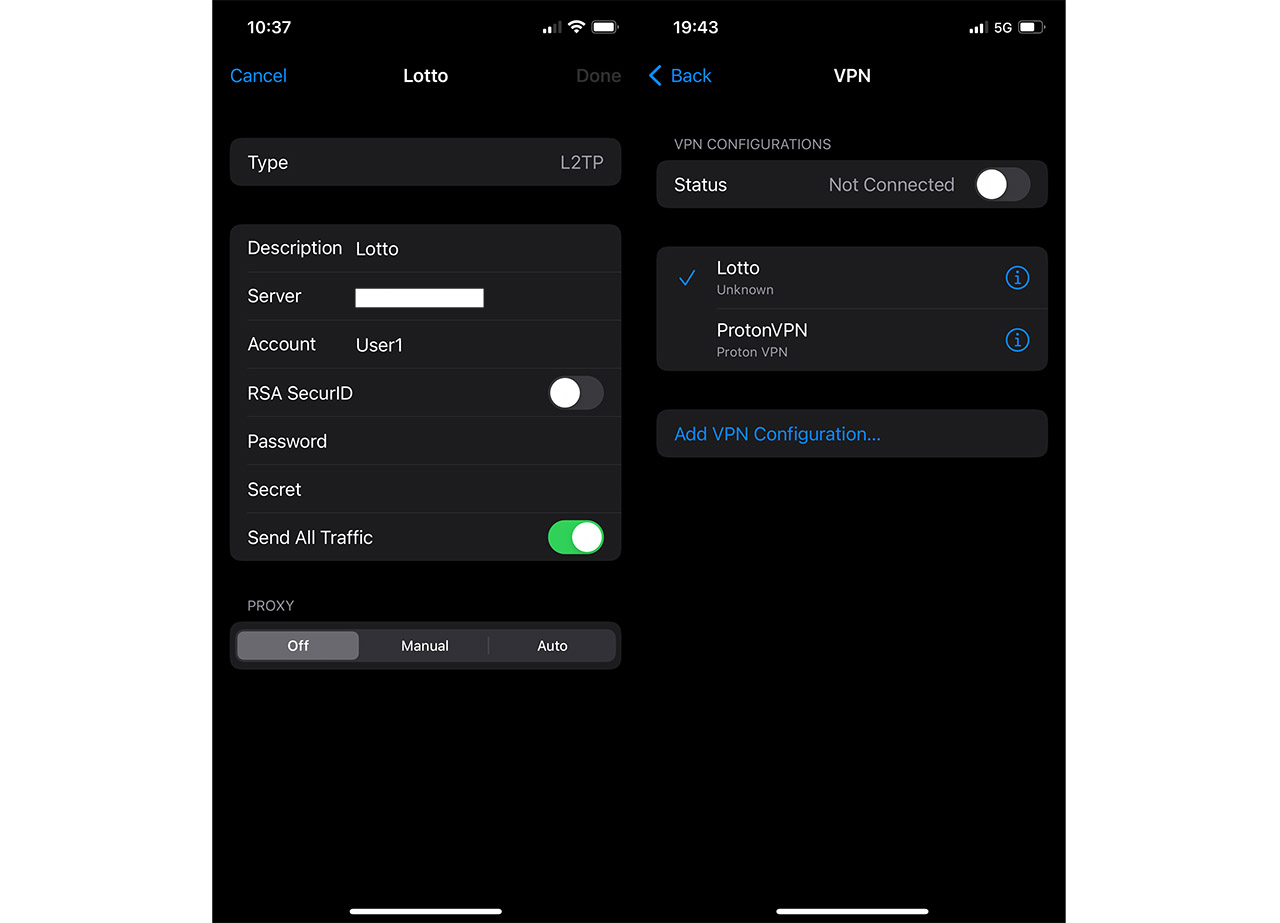
You can identify the Server IP address from the Omada SND: go to the TL-ER7206 and click on it to open the dedicated settings on the right side; afterwards, under Details, click on the active WAN connection and copy the IP Address. Under Server, enter the VPN Client credentials (that you previously set), including the Secret (the same as password) and click on Done. You should now be able to connect to the router via a VPN connection.
I also decided to check out the throughput between two devices connected to the router, one acting as the server (with a direct connection to the TP-Link TL-ER7206 via cable) and the other as the client device (the same iPhone 12). I have tested this client device before at it showed an average of 750Mbps up and 590Mbps downstream. This was done using the TP-Link EAP660 HD AP and the TL-SG2210P switch to power it on.
| Client to Server | Server to Client | |
| L2TP | 17Mbps | 14Mbps |
| PPTP | 19Mbps | 12Mbps |
After using the L2TP connection, I measured an average of 17Mbps upstream and 14Mbps downstream. Next, I checked out the PPTP speed performance (using an Intel 8265-equipped laptop since the iPhone no longer supports PPTP) and it was just as limited since I saw an average of 19Mbps upstream and 12Mbps downstream. This is a client device that I tested before with the EAP660 HD, so, at the distance that I tested it (5 feet), I usually see approx 531Mbps up and 285Mbps downstream.
INFO: Since I run this test with pretty much all routers that I write about, I decided to check the LAN-to-LAN performance of the TP-Link TL-ER7206 as well. And it was 945Mbps upstream and 887Mbps downstream, which is in line with most other networking gateways out there.
Security-related Features (Omada)
The security features on the Omada SDN can be found under Settings > Network Security and there’s the Access Control List which has a section dedicated to the Gateway. It allows the creation of rules for blocking or allowing traffic based on a multitude of Protocols, including TCP, UDP, TCMP, GGP, AH, AX.25, EtherIP, L2TP and more.
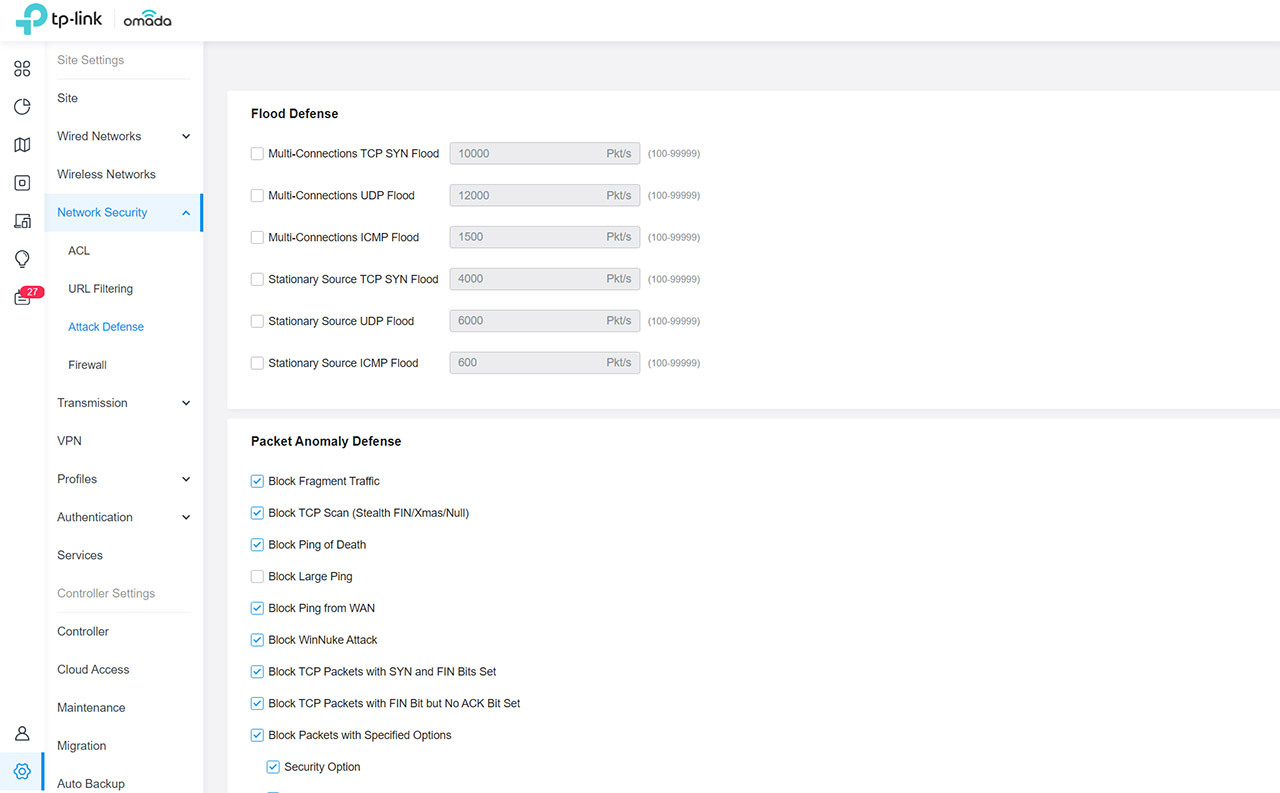
Then, there’s the URL Filtering for Gateways which will allow you to block specific domains and under the Attack Defense, there are two sets of options, the Flood Defense suite and the Packet Anomaly Defense suite, both fairly comprehensive for a security gateway.
Lastly, I saw the Firewall that offers the option to enable Broadcast Ping, to Receive or Send Redirects, as well as the SYN Cookies. There is also the possibility to set State Timeouts for the ICMP, the TCP Close, Close Wait, FIN Wait, UDP Stream and more.
Conclusion
The TP-Link TL-ER7206 is one of the least expensive multi-WAN gateway available on the market and it will work great alongside other Omada networking devices. But can it truly be considered an alternative to the inexpensive Ubiquiti gateways or even the now-EOL Cisco RV345? It depends on the size of your network and if you’re willing to switch to TP-Link hardware. Software-wise, both the stand-alone mode and the Omada SDN are very easy to navigate, configure and monitor, and I do have to admit that the manufacturer was clearly inspired by the UniFi controller, which I suppose many will see as a plus.
At the same time, it’s not yet as matured as other SDNs and perhaps some very advanced settings are missing, but even in its current form, I think it will be more than enough for most SMBs. Especially due to all those WAN ports (including the WAN SFP slot) which offer so much room configuration, so, as a conclusion, I do think that the TP-Link TL-ER7206 is a fun and easy-to-use gateway.
TP-Link TL-ER7206
-
Pros
- Has multiple WAN ports
- SPF WAN port
- Has a comprehensive standalone mode
- Works with the Omada SDN
- Easy to configure and monitor
Cons
- Unimpressive VPN (L2TP and PPTP) transfer rates
- Can't be mounted on the wall
- No USB port
Mark is a graduate in Computer Science, having gathered valuable experience over the years working in IT as a programmer. Mark is also the main tech writer for MBReviews.com, covering not only his passion, the networking devices, but also other cool electronic gadgets that you may find useful for your every day life.