
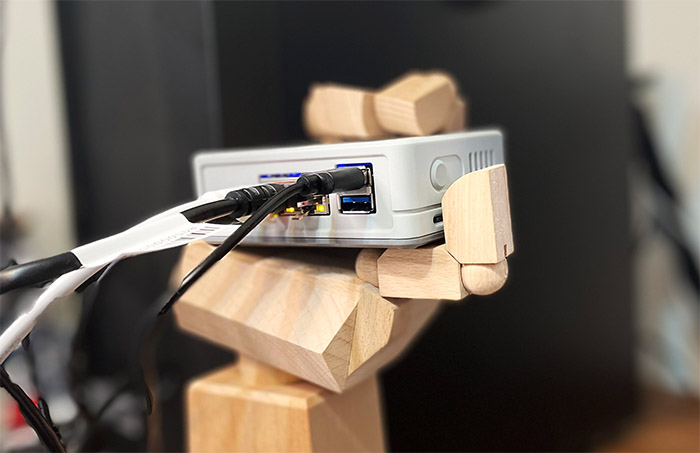
I have recently tested the Seeed Mini Router to see if the manufacturer has managed to develop a proper Raspberry Pi router and it seems that this small device can also run the Home Assistant software. This way, you can gain the means to rely on an open source, privacy-focused home automation software to handle your IoT devices which are notoriously lacking in terms of security. But, I know that people will immediately say that you should not bother draining the resources of an OpenWRT router, since most are too underpowered to handle such a load. The Mini Router is a bit different than most other routers on the market since it’s actually a variant of Raspberry Pi (it’s CM), so there are more resources available, technically ensuring that the Home Assistant can run in a stable manner from within the OpenWRT.
I took a quick glance over the installation process and it seems only a bit more complicated than installing packages on a Synology router (such as the RT2600AC), but I do have some concerns in regards to the software experience. Seeed required a few months until the device managed to reach a fairly stable Gigabit throughput which shows that things are in the process of becoming more polished, but it’s not quite there yet.
I have encountered quite a few bugs that I have eventually managed to fix, but they can scare off the casual users (that aren’t prepared to do some serious troubleshooting). Even so, I find what Seeed is trying to accomplish very interesting and, since I am a fan of open-source software, let’s check out how well the Home Assistant integrates with OpenWRT on the Seeed Mini Router.
Note: You can also read some of the best practices for keeping a smart home secure (with Q/As from experts in the field).
Installing Home Assistant
The advantage that the Seeed Mini Router has over other types of Raspberry Pi routers is that it comes with a pre-installed version of OpenWRT, so you don’t have to deal with the installation process which is by no means easy. At the same time this is also a disadvantage because it’s not that easy to flash your own version of OpenWRT or other type of software, despite having the physical microSD card slot available. That being said, to gain access to the GUI, you simply need to power on the Seeed Mini Router, connect it to the Internet and your PC, and, by entering 192.168.2.1 in the URL, you should be gaining access to the web GUI (LuCI).
As expected, you also can easily use SSH and, in my case, I like to use PuTTy for easy access. You can check out a bit more info about how the OpenWRT is structured in the full review of the Seeed Mini Router, so we are going to quickly go to the Docker.
1. Pull the image into a Container

This particular platform will allow you to run (as well as develop) applications within a Container and the interesting thing is that you can have multiple containers running their own software (including libraries and configuration files) in an isolated state, although you still get the chance to make them, communicate with each other using well-defined channels. In order to install Home Assistant, you need to click on Docker > Images and enter homeassistant/home-assistant:stable under the Pull Image section. Click Pull and you should see the download process in a blue screen (not the scary one).
2. Fixing the ‘Not enough space’ problem
What was unpleasant though is that I had to remove Snort to hopefully have enough space for the Home Assistant, so we don’t really get as many resources as I would have thought. It was still not enough because the installation would still fail, so I had to manually expand the size of the drive in order to be able to install any larger applications. Since this is not an easy process and it took me several tries to get it right, I dedicated an entire article to ‘How to increase the size of a Raspberry Pi CM module (eMMC)’.
The idea is that you will need to open the case, use a jumper wire, use a Linux machine to install GParted, gain access to the drive and finally make use of all that Unallocated space. I really hope that Seeed will expand the storage availability out of the factory because I am sure many users will be intimidated by the entire process. For those that aren’t, well, enjoy tinkering with your device. I know I did.
3. Add the Home Assistant image to a Container
- After pulling the Home Assistant image, you will be able to see it under Images overview.
- Go to Docker > Containers and ‘Create new docker container’.
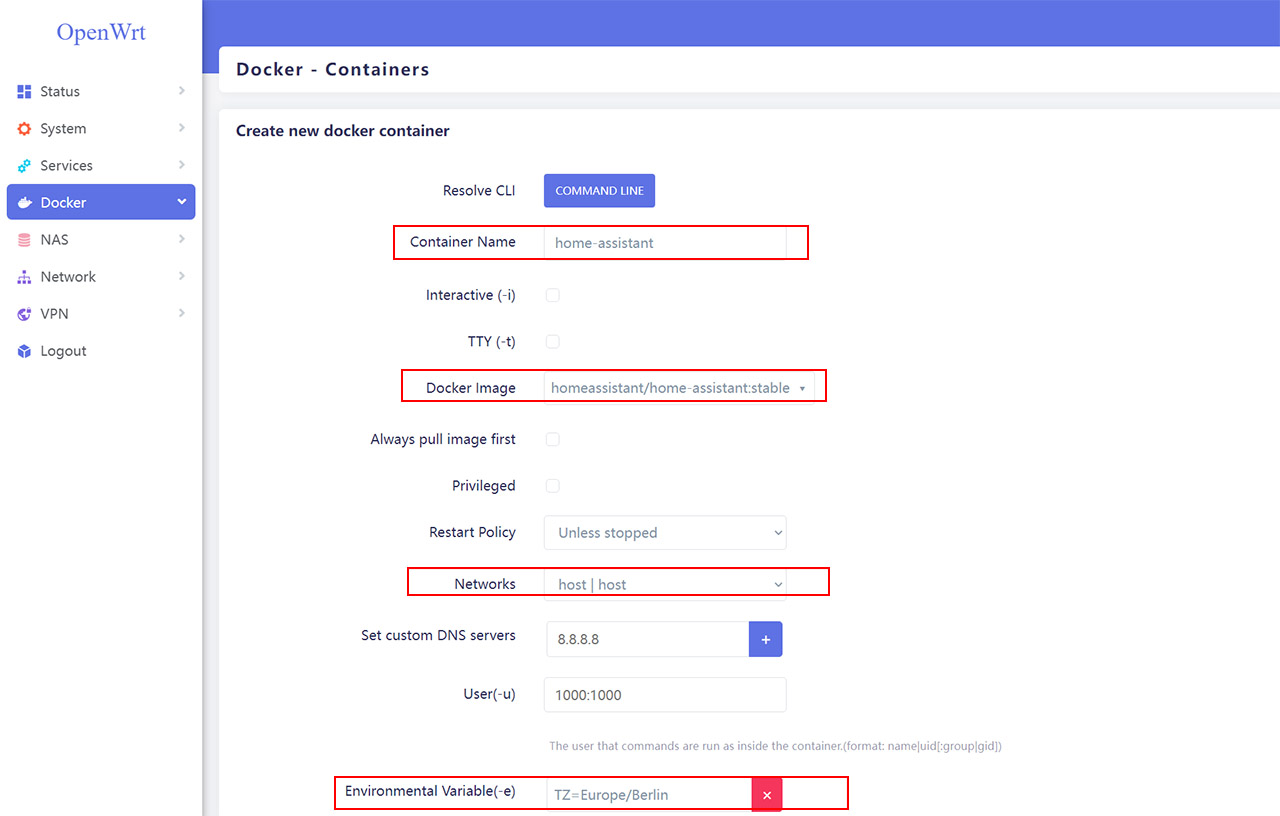
The data that you will need to enter is the Container Name (you can use home-assistant), select the ‘homeassistant/home-assistant:stable’ image from the Docker Image list, select Host|Host for Networks and next to the Environmental Variable, you should select the Time Zone where you’re located. Everything else can be left as default (just make sure that the Bind Mount is set to: /root/hassio:/config). Click Submit.
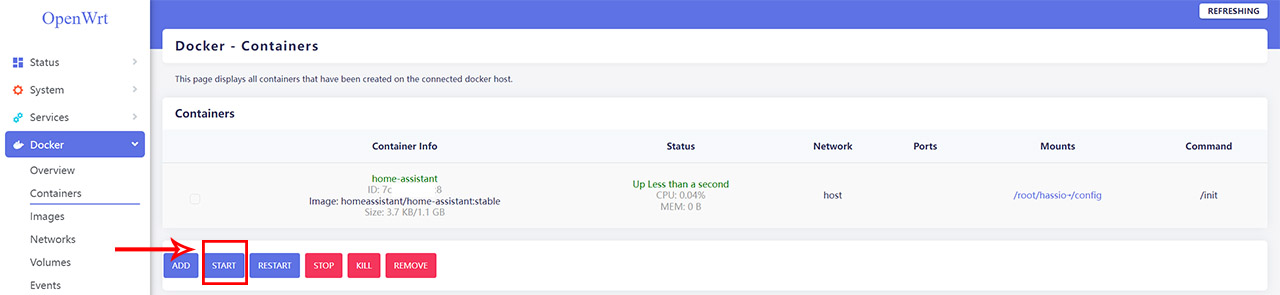
- Start the Home Assistant Container
Simply click on Start and the name should go from red to green if everything went as expected.
Configuring the Home Assistant
1. Access the Home Assistant user interface
If the Seeed Mini Router is set as the main router, then you should enter 192.168.2.1:8123 to access the Home Assistant GUI. But if it’s connected to your router and the connection is DHCP, then check for the IP address of the Mini Router and simply add :8123 at the end (in my case, it was 192.168.50.249:8123 since I got it connected to an Asus RT-AX82U router).
2. Create an user account
This is pretty straight forward, just enter the Name, Username and Password, but I found it a bit weird (and funny at the same time) that the Name section would take me to the username after every letter.
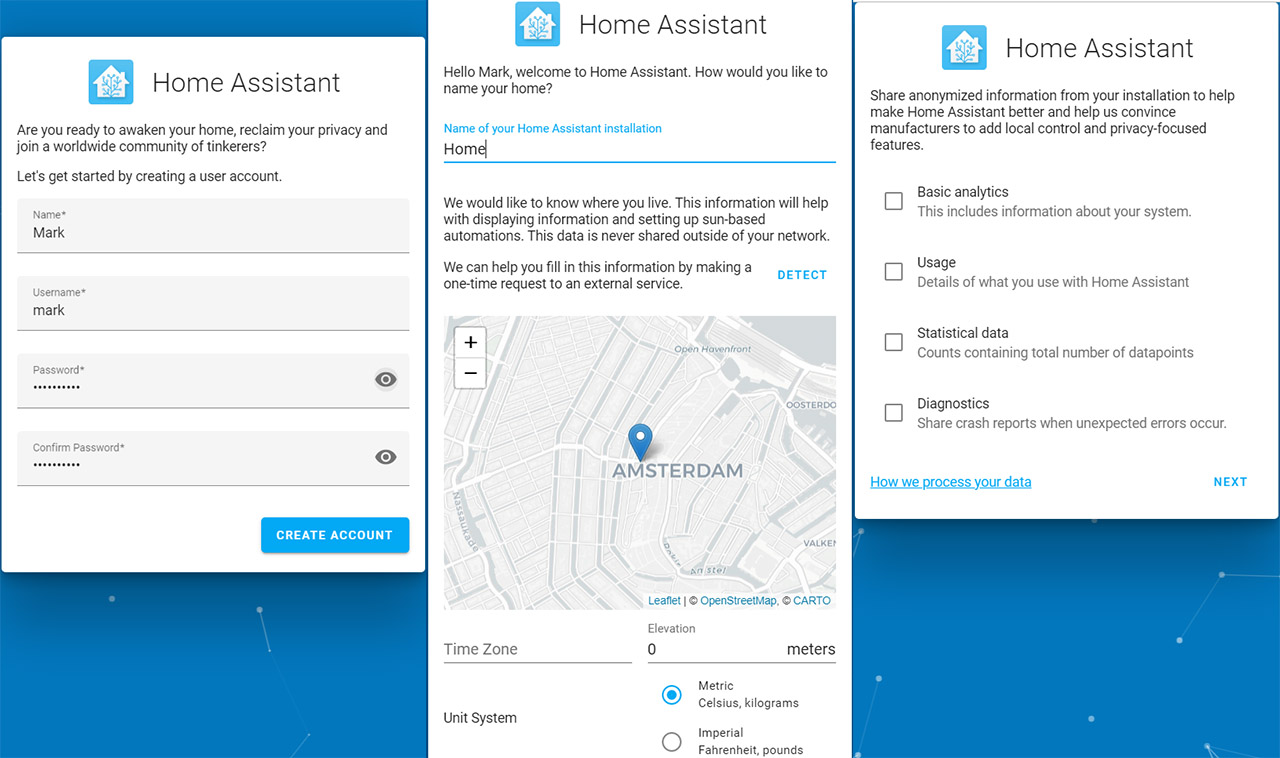
3. Select your location (optional)
You can select your Time Zone, location, the Metric/Imperial system and currency for the data feed that will be shown to you by the Home Assistant GUI.
4. Choose which data will be collected
Despite being open-source, the developers of Home Assistant do need some data to perfect the way the software will work in the future. You don’t really have to choose anything, but you can also select the type of data that’s going to be used. I had a look at the Analytics page and it seems that everything is securely stored in the CloudFlare Key-Value store and only the aggregated data is made publicly available.
5. Start adding new devices and apps (optional)
I chose not to do this step since it’s just an auto-detection of the programs and apps that are running in the network. It only saw the router in any case, so I decided to just do it manually later.
Exploring the interface
The UI is simple and modern-looking, with the menu on the left and the Overview page will show the weather, as well as whether there’s an update available.
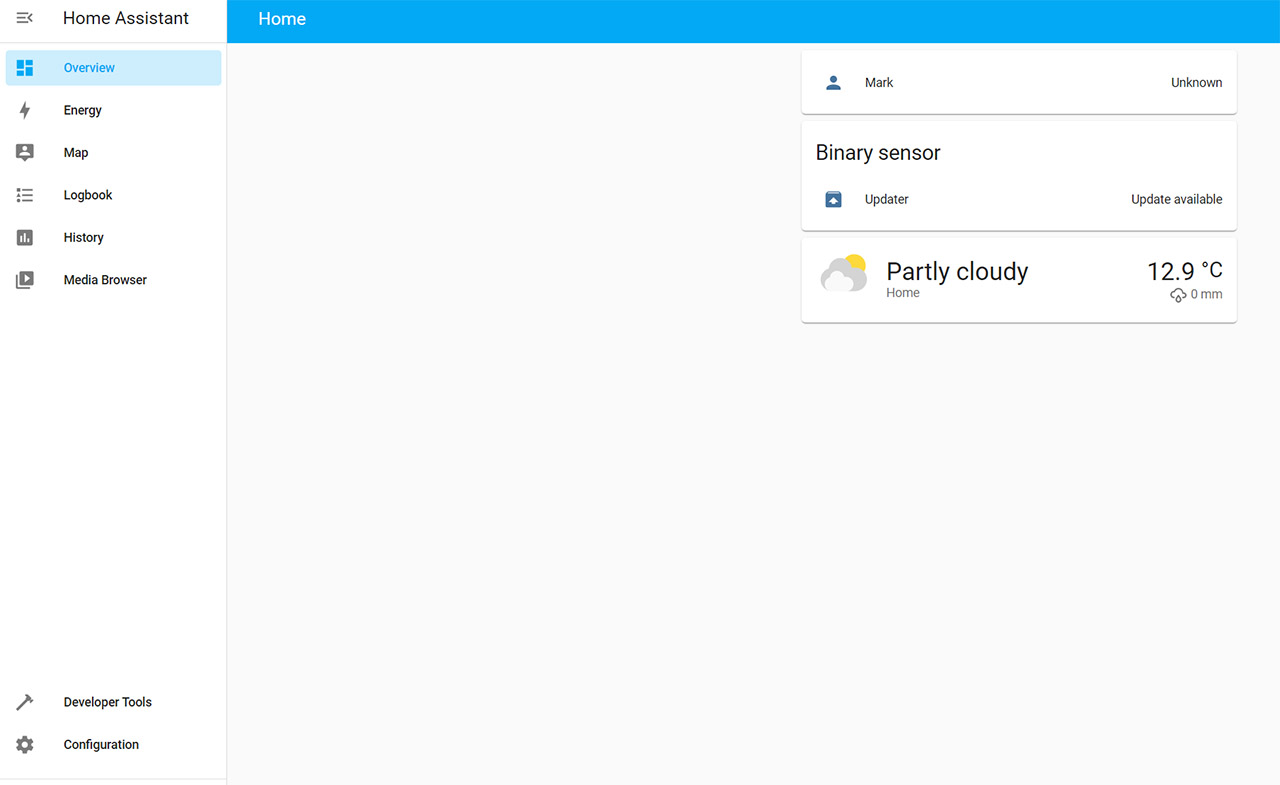
Next there are some other general options, such as Energy (you can use this tool to keep track of the house energy usage, so it is a surprisingly useful addition), the Map, Logbook, History and Media Browser (accesses external drives). Going a bit lower in the menu and you’ll see two options, one is the Developers Tools which makes sense since this is an Open Source software and will allow you to make modifications, as well as check how everything works together – quite a different world than those invasive closed smart home assistants.
Then, there’s the Configuration and here is where things get really interesting. First, there’s the option to integrate with Alexa and Google Home via Cloud which is useful to globally control multiple types of devices and not having to go through multiple interfaces (the Home Assistant will keep everything tightly together). Then, there’s the area that interests us the most, the Devices and Services. Here, you can add smart apps, smart devices, integrate entities and group everything by Areas. Next, there’s the Automation and Scenes (kind of like IFTTT and there is the possibility to create custom scripts). The Blueprints are community-created automation scripts that you can use and not have to create something from scratch (you got to love the open-source communities).
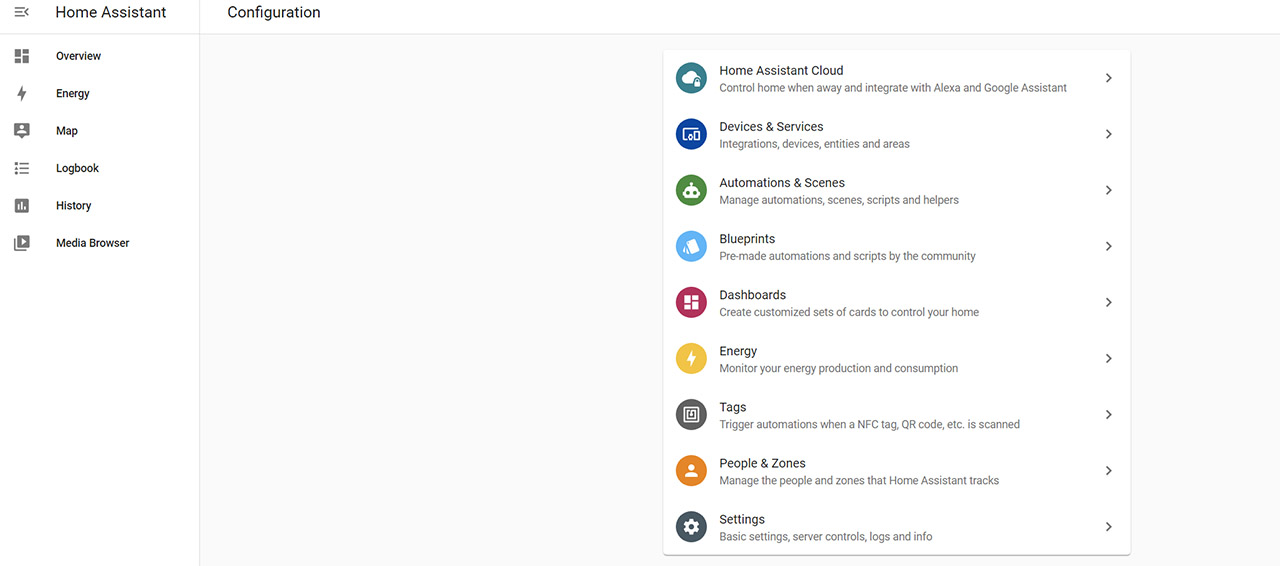
There are also the Dashboards for creating customized cards for controlling your home, the already mentioned Energy section which is now far more complex and includes Solar Panels, Gas Consumption and more. And there’s the possibility to use NFC tags and QR codes for starting a specific automation function. Lastly, there’s the option to control who gets access to your Home Assistant and what they can do, as well as set up some basic aspects of the software.
Adding an IoT app to the Home Assistant (Smart Life)
I have been using a few smart devices from iLinktek, Gosund and the latest Onforu (mostly light-related devices, but also a smart plug), all using the Smart Life app, so I decided to add this application under the Home Assistant. There are a few prerequisites: you need to have the smart devices already added to the Smart Life app and you will have to create an account on the Tuya IoT Platform. That’s because the app credentials will not work on the Tuya IoT platform, so you need to create a Project.
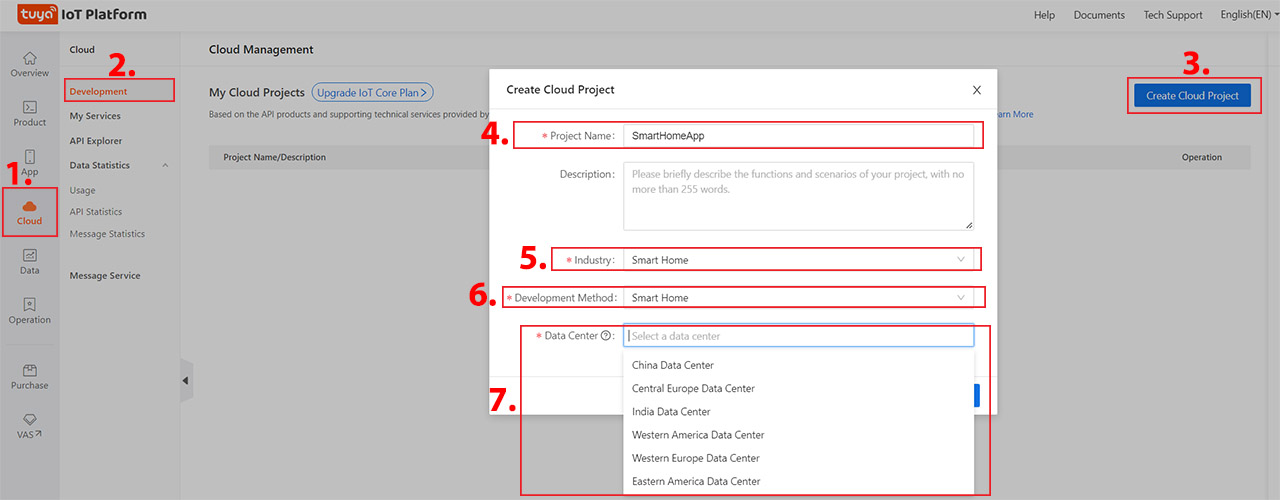
1. Log into the platform and you should be greeted by the GUI.
2. Go to Cloud > Development and click on the ‘Create Cloud Project’ button from the right side of the window.
3. Set the Project Name (whichever you like), select the Industry (Smart Home), the Development Method as Smart Home and, as for Data Center, choose the one closer to where you are located.
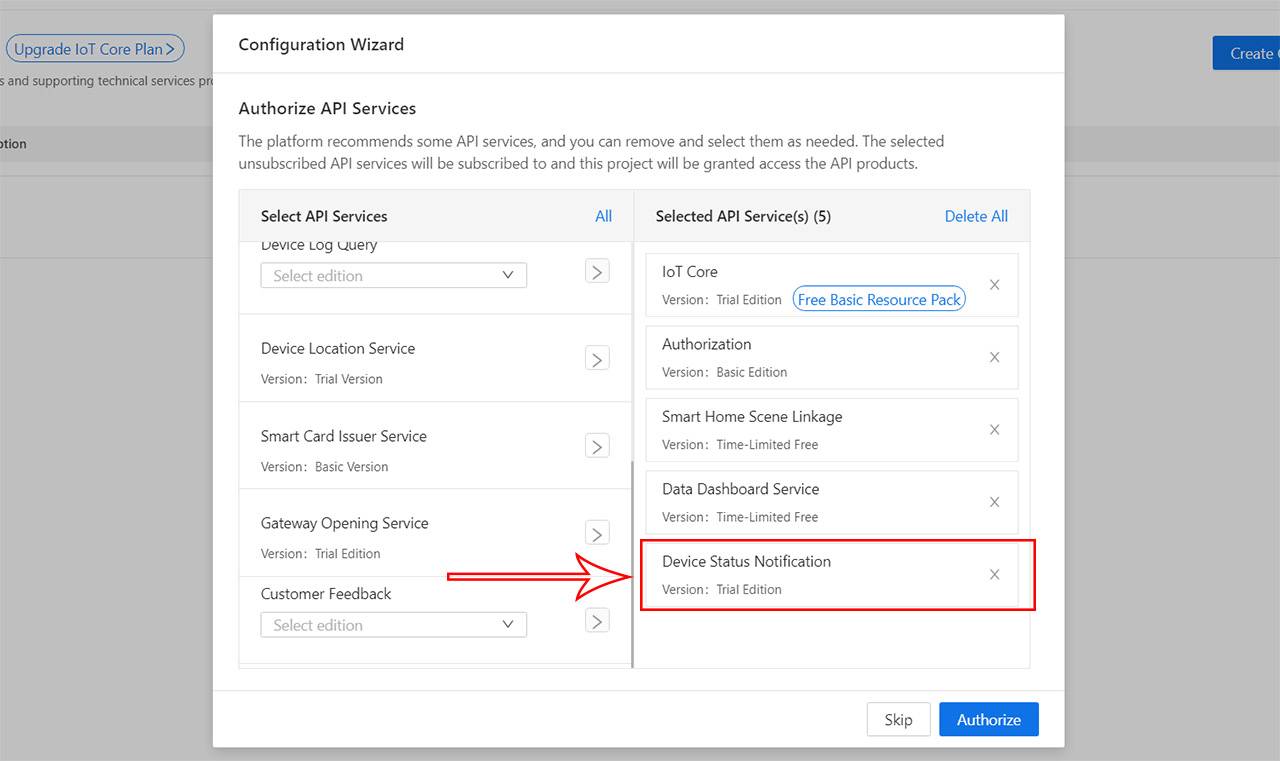
4. The Configuration Wizard will now ask which API Services to Authorize and you need to make sure that you push the ‘Device Status Notification’ to the right section. Click Authorize.
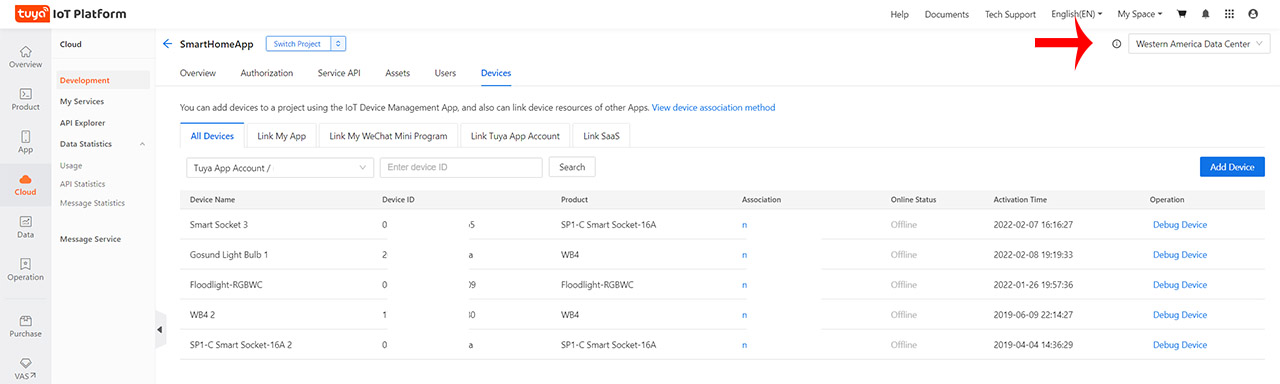
5. While Still being under Cloud-Development section, click on Devices and you should be able to see the Link Tuya Account tab. Click on the ‘Add App Account button’.
6. A QR code will appear in the middle and you will need to scan it on the app: open the Smart Home app, click on the Profile icon (bottom right) and at the top right corner, there’s going to be an icon resembling a square with a line in the middle – click it to open the camera and scan the QR code.
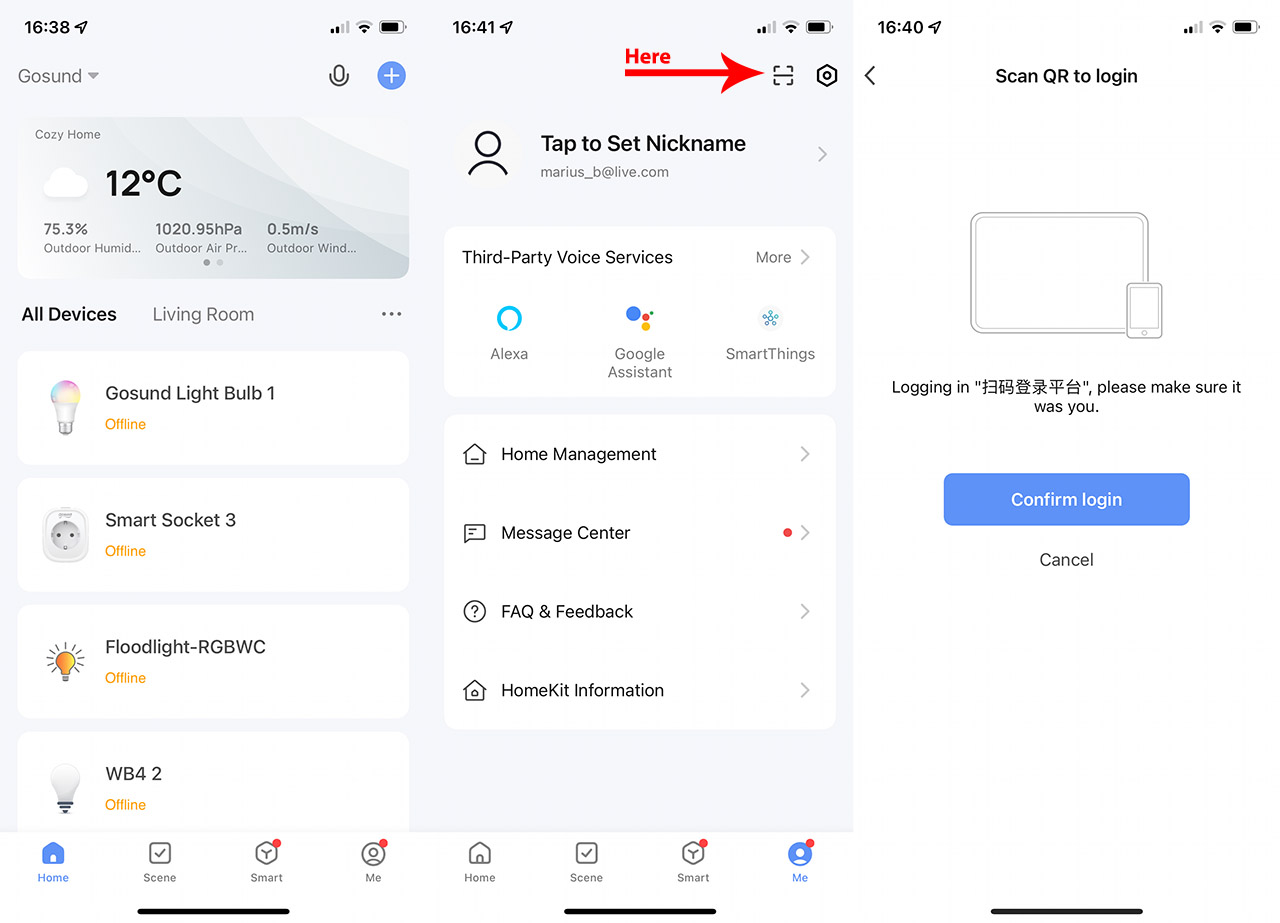
7. If everything went fine, then you should see the devices from the app appear in the ‘All Devices’ section. If that doesn’t happen, then you will need to change the Data Center and try again. To do so, click on the top right corner and select a different Data Center. Afterwards, redo the steps to add the app (click on Link Tuya App Account and scan QR code again). When you match the correct Data Center, the All Devices section should be populated.
8. From the Authorization tab, copy the ID and the password, and head back to the Home Assistant interface.

9. Here, click on Configuration > Devices and Services > Add Integration (check bottom right corner for the button) > Search for Tuya.
10. Select the Country (needs to be in the same Time Zone as the previously chosen Data Center), enter the ID and Secret password that you copied from the Authorization tab and lastly, enter the email and the password from the Tuya platform. Click Submit.
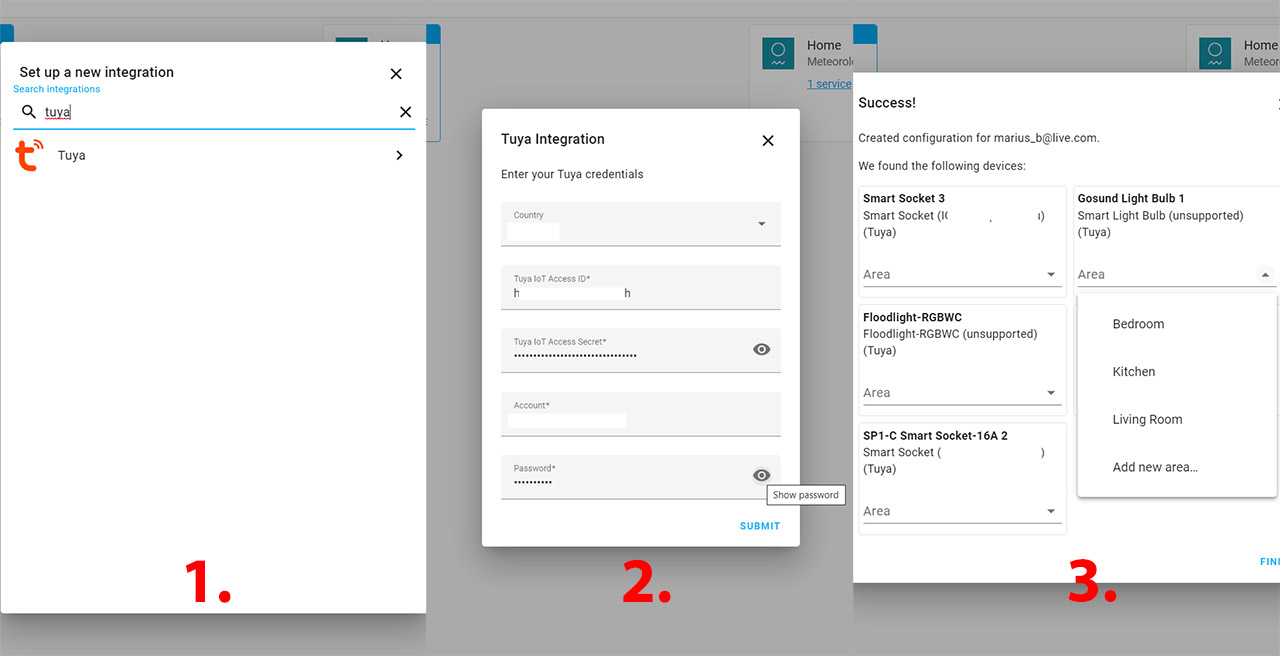
11. If everything went fine, you should see a window that says Success and all the smart devices from the app.
How to control the smart devices that you added
After I have connected the Home Assistant to the Tuya platform, both the smart plugs and the smart LED bulbs appeared to the Dashboard automatically. Those that were connected and online already had some functions available, so I was able to turn on or off a Gosund smart plug.
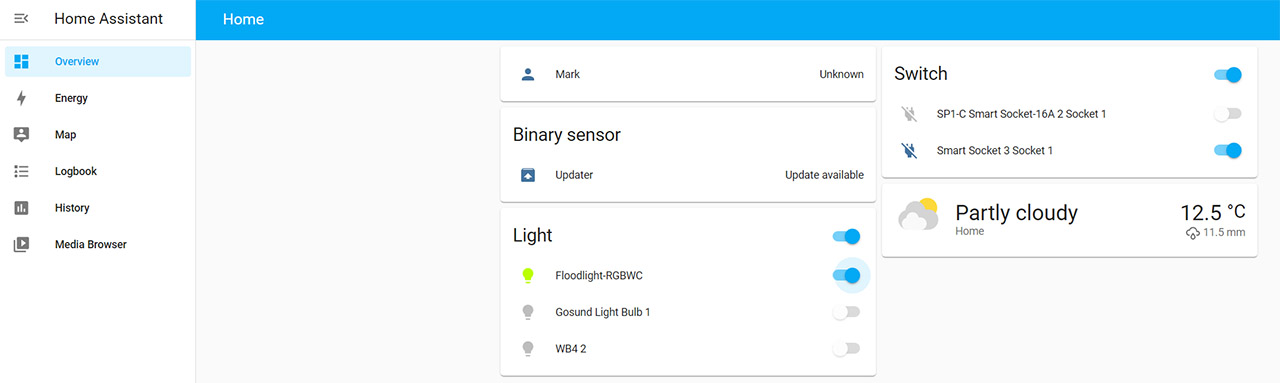
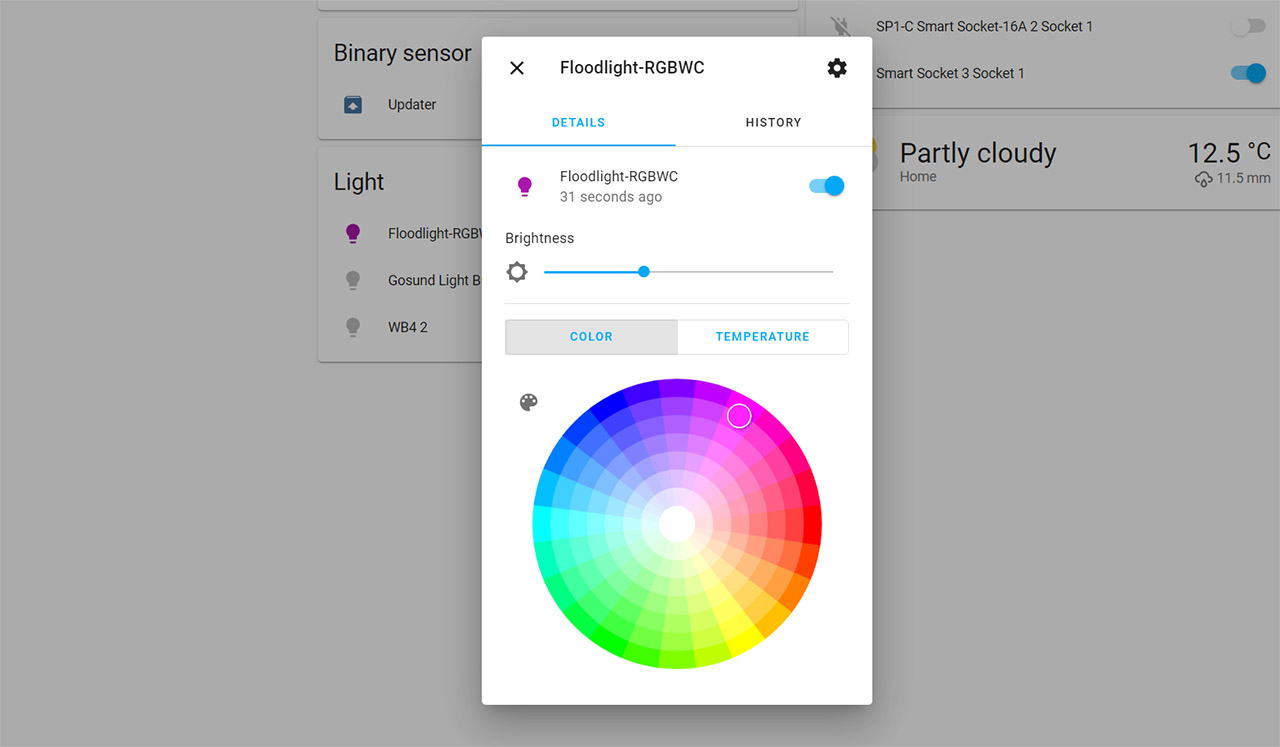
I also had an Onforu smart LED floodlight available and it was immediately visible in the Dashboard as well. And, unlike the On/Off functions available for the smart plug, the LED light had the option to adjust the Brightness, to change the Color, the Temperature and to also check the access History (this last one can be used with all connected smart devices). It’s true that some features have been lost, such as custom scenes and the ability to speak through a mike and have the light change its color based on the sound frequency, but the basic options, the ones that you’ll use the most are here.
Without the need to access the multitudes of app, every smart device is now on a single platform and easily configurable. What you see in the Overview is a set of cards that have been automatically generated and you can create a new Dashboard by going to Configuration > Dashboards and the default one should be called Overview. Simply create a new Dashboard and set it as the default one instead.
Conclusion
The Seeed Mini Router tries to be a lot of things at the same time. It wants to replace your router (and it can reach 1Gbps via Ethernet cable) and now it also wants to function as your central home automation system using the open-source Home Assistant. And I think they pulled it off. There are some aspects that the Seeed needs to adjust (to increase the available space in their Mini Router), but overall, the entire configuration process is pretty much straight-forward (there are some comprehensive guides on their official website). The Home Assistant was designed to be a centralized platform for all your smart devices and it works wonderfully well, so, if you needed another reason to use a Raspberry Pi, well here it is.
Mark is a graduate in Computer Science, having gathered valuable experience over the years working in IT as a programmer. Mark is also the main tech writer for MBReviews.com, covering not only his passion, the networking devices, but also other cool electronic gadgets that you may find useful for your every day life.