
The Reolink Argus PT 2K is an upgraded version of the original Argus PT and yes, these two devices do have the same design, so the improvements are entirely on the inside. Indeed, over the last two years, Reolink has been busy adding the smart motion detection to its entire series and the Argus PT 2K has also moved from 1080p to 1440p.
| Reolink Argus PT 2K | |
|---|---|
| Reolink.com | Check Product |
| Amazon.com | Check Offer |
There’s also a bump to the supported storage from 64GB to 128GB which can make a difference. The battery has been cut by 500mAh to 6,000mAh and the motorized tilt and pan movements are still available from the mobile app. So, in a sense, the Reolink Argus PT 2K doesn’t differ that much from the Argus Pro 3, even though the latter does have color night vision. But with the former, you do gain the option to move the camera around and I did like that both cameras support the option to rely on a small solar panel for charging up the battery. And it’s useful considering that neither have detachable batteries.
Furthermore, similarly to the RLC-842 that I tested recently, Reolink has added the support for the Amazon Alexa and Google Assistant on the Argus PT 2K, so you do get the option to adjust the camera’s behavior and position using one of the smart assistants. That being said, I am very curious to see how well the camera works in a home environment (especially since it’s a WiFi camera), so let’s put it to the test and see if it can indeed be a reliable security asset for your home.
Design and Build Quality
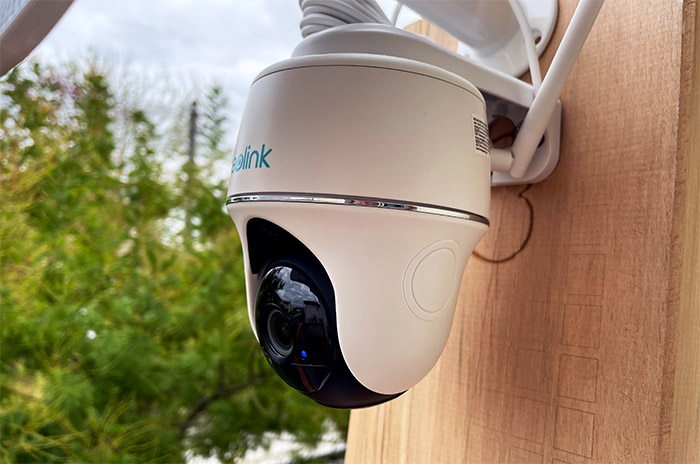
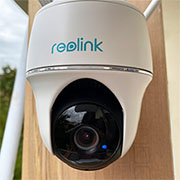
The security cameras that have Pan and Tilt motors are always a bit oddly designed and that’s because the manufacturer needs to include all these additional components while keeping the case as compact as possible. Even so, the camera most likely ends up big and heavy. Obviously, the Reolink Argus PT 2K is not a small camera, considering that it measures 4.4 x 3.8 x 3.8 inches (11.2 x 9.8 x 9.8cm) and it gets a little bit larger if we take into account the stand and the antenna. But it has managed to remain fairly balanced in terms of weight (16.5oz or 460g) and that’s because the device is made of plastic. And there are two sides for this decision.
First, the cost can be more affordable and secondly, if Reolink used the same metallic alloy as on the other outdoor cameras, the Reolink Argus PT would have become the equivalent of a bowling ball hanging from the ceiling or the wall. The good news is that despite being made of plastic, the camera does have some protection against the elements, but it’s less effective than on the RLC-842A, the RLC-811A or even the Argus 3 Pro. That’s because the enclosure is IP64-rated, so it is dust-proof and some water splashing towards the device should not harm it.
The protection against powerful water jets is not guaranteed, so it’s best to not put the camera completely in the open – and it’s not only about storms, lightning is the number one enemy of outdoors electronics. In terms of temperature, the Reolink Argus PT 2K should remain operational when it’s between 14° to 131° F (or -10 to 55° C), so it’s not going to work that well in areas with harsh winters (unfortunately, they’re starting to not be a thing anymore). The case of the camera is divided into three parts, there’s the bottom area which is the widest section and it’s where the manufacturer added the battery and the motor for panning the camera. Then, there’s a silver ring (also made of plastic) which marks the division with the upper area where there’s a support with the tilt motor and the sphere with the lens.
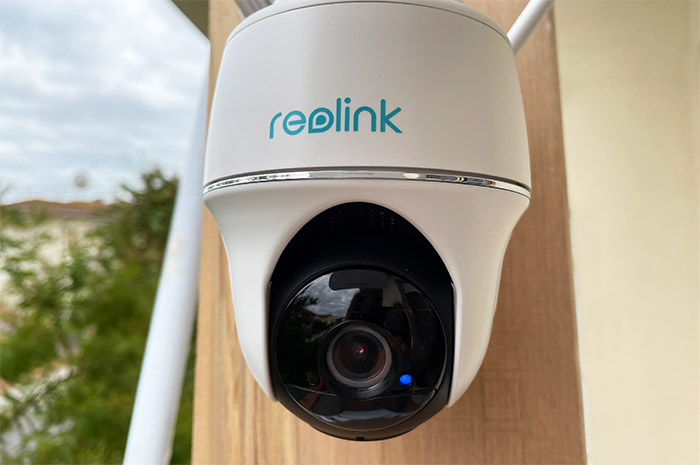
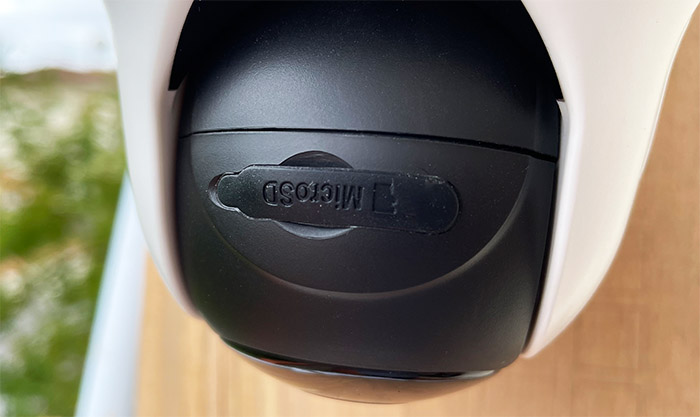
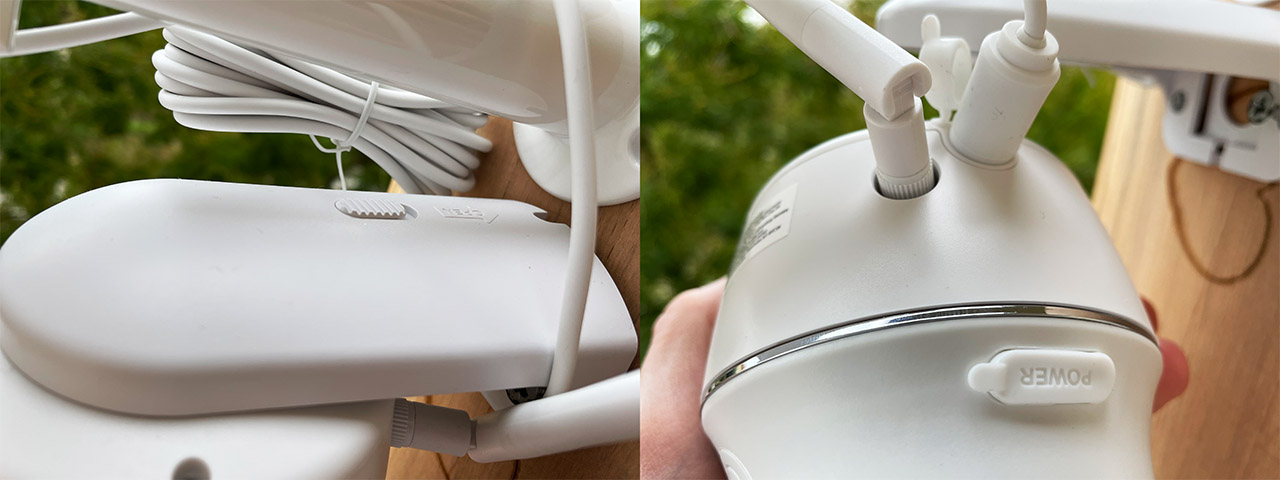
As usual, the sphere is black, while the rest of the case is covered by a white matte finish. And I have seen that Reolink has added a fairly large speaker (for a security camera) very near the lens – there is also a built-in microphone, so it’s very possible to have a two-way conversation with people that are near the camera (such as a courier). Around the lens, there’s a status LED (red means no WiFi connection, while blue means that the connection has been successful), a daylight sensor and a PIR sensor (six IR LEDs). If you move the sphere backwards a bit, you will see the microSD card slot (supports 128GB cards) and a a recessed Reset button.
I have noticed that there is a silicone cover with Power written on it and it’s there to cover the On/Off button (nice addition) and further down, there is another silicone cover with Open written on it. It covers a microUSB port which I admit took me a bit by surprise considering that most manufacturers moved away from this standard. I think the reason why it’s still there (besides cutting a bit in terms of cost) is because the solar panels have been mass-produced with a microUSB port, so yeah, Reolink essentially trapped itself for a few years – the Argus 3 Pro has this port as well. Inside the package, you will also get the antenna (it’s omni-directional), as well as the stand which is made of plastic and it can be attached at the top of the camera.
Internal Hardware
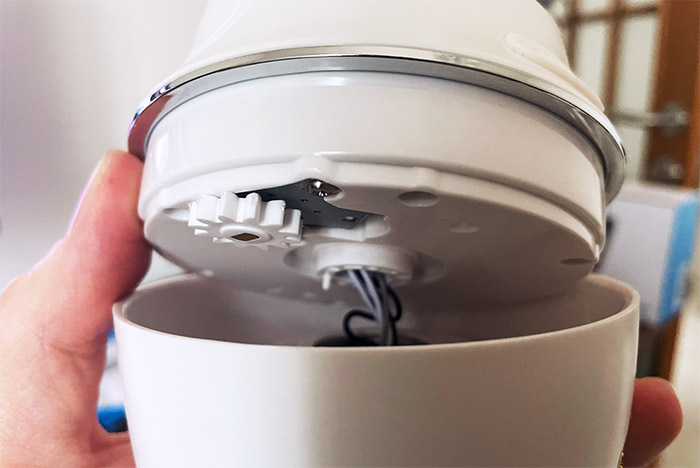
Since this isn’t the RLC-842, where you need to open the case to mount it, I assume that it’s very possible to lose the warranty if you want to take a sneak peek inside the Reolink Argus PT 2K. But, since such trivial things don’t bother me, I decided to check what’s inside the camera and the first thing that needed to be done was to remove the six screws from the base of the Argus PT (the section that will end up at the top). Then, I could remove the battery and I could see three other screws which, once removed, it allowed me to see the pan motor and how it works inside the case.
After removing the next set of screws, I finally reached the main components area and the first thing that I saw was the WiFi chipset (appears to be the same CC3200R1 ARM M4 MCU 802.11b/g/n chip as on the previous Argus PT). Going deeper, I detached the small PCB and the plastic that protected the spherical section of the camera. Afterwards, I removed the screws that kept the top part of the sphere attached and I could identify 32GB of flash memory from MXIC (MX25L25645G). I also assume they use the same Novatek NT98523MBG chip for the processing – I couldn’t identify it since they glued an aluminum heatsink on top of the chip.

The Installation
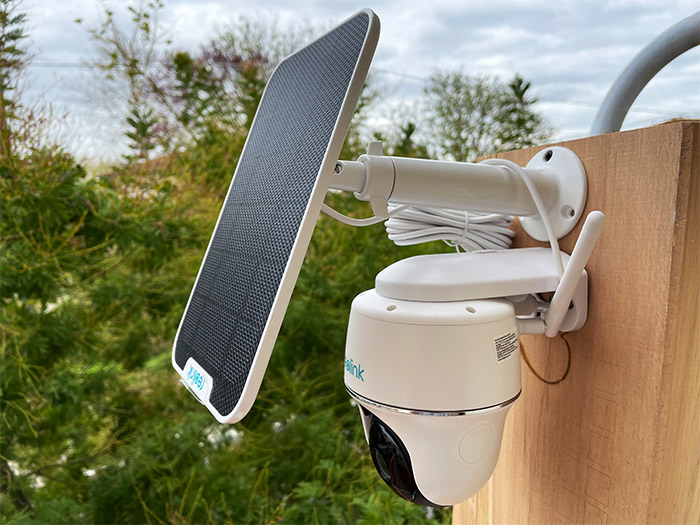
Unlike most other Reolink products that either get directly attached to the wall or ceiling or you need to use a bracket (then rotate the camera into place), the Reolink Argus PT 2K is a bit more particular. It’s not a difficult process or anything, it’s just that the support needs to be attached first, then you will notice that there is an Open button at the top. Disengage it and then rotate the small circular bracket out of its space. Yes, you can simply use this small bracket to attach the camera to a pole or tree (there is a strap in the package).
But, in my case, I just rotate the bracket into the camera and then I inserted it back into the support (rotate the bracket into place and release the button). And now it would also be a good time to add the antenna. The fact that it’s quite easy to detach the camera from its stand and then charge is a nice touch, but there is a solar panel available from Reolink that you can use to charge the camera continuously throughout the day. It’s the same solar panel that I seen when I tested the Reolink Argus 3 so you can read more about it there (in short, it’s compact and nicely built).
Note: If you do intend to use the solar panel, I suggest you first attach the solar panel and the camera stand, then connect the cable to the Reolink Argus PT 2K making sure to push the silicone cover over the port and then attach the camera to the stand (I also realized that there is an inner LED for charging).
The Mobile App
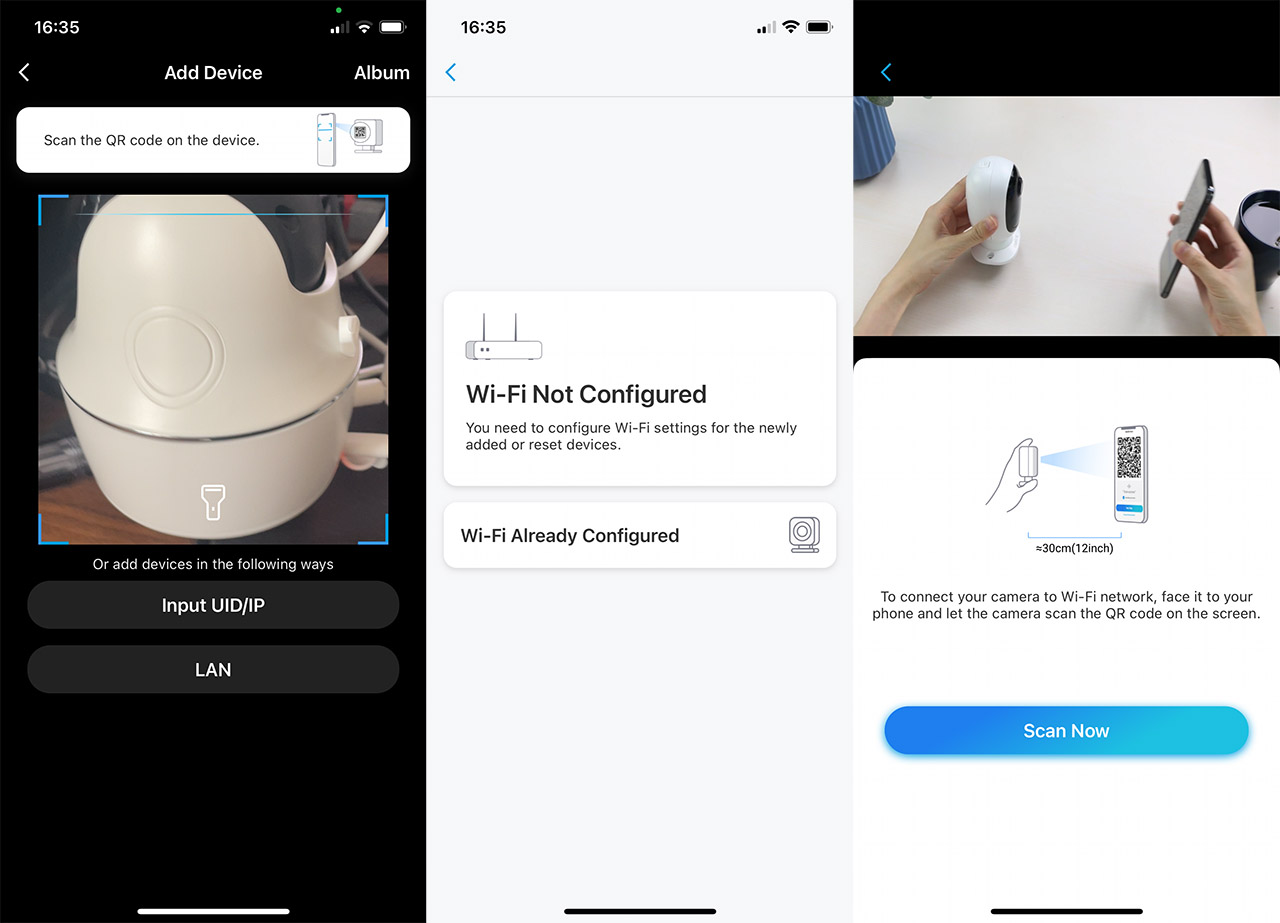
After turning on the camera, it will start making a sonar-like sound and that’s to let you know that it is searching for your phone, so it’s ready to be paired (it will also consume the battery). Download and install the Reolink app (Android OS and iOS) and then tap on the Plus sign. The app will want to access your camera to scan the QR code (which is located at the bottom of the Reolink Argus PT 2K) and then it will ask if the Wi-Fi is Configured. In my case it wasn’t (I was using the 5GHz network), so the app asked if it could know my location to identify the network by itself. I preferred to not give it my location, so I inserted the 2.4GHz credentials manually, after which I had to scan a QR code displayed on my phone using the camera.
There will be a bip and a voice confirmation that the connection has been successful. Then, I had to create a password, choose a name for the camera, select the location (outdoors or indoors) and I could access the GUI. If you have used any other Reolink camera, the layout is pretty much the same, so there’s the live view covering the top half of the window, while underneath, there are some quick action icons, as well as some main tabs at the bottom.
The quick action icons allow you to Play/Pause the footage, un/mute the microphone, capture a photo or record a video. There’s also the option to choose the image quality (Fluent or 4MP) and view the footage in full screen mode. Above the live view, there’s the live bitrate, as well as the button that will trigger the alarm (and I think it reaches about 75dB, so it not really that loud). The first tab at the bottom is called Talk and it will allow you to speak with a person near the Reolink Argus PT 2K; then, there’s the Clip option to digitally zoom on a certain area, as well as the PTZ to move the camera around. It’s more like a joystick, so you can move the camera in four directions (you can Pan 355 degrees and tilt up to 140 degrees).
The fourth tab allows you to visit the Playback and, as with the other Reolink cameras, it’s the way to check the videos captured by the camera filtered by certain time periods. If you tap on the cogwheel in the top right corner, you can access the Settings area, where you can see the Battery life, change the Network and the Display settings, as well as the notifications and email alerts (you can get a snapshot of what triggered the alarm). Furthermore, you can change the sound of the Siren (you can even schedule it), enable Time Lapse (it will eat up the battery) and adjust the PIR Motion Sensor settings (the Sensitivity).
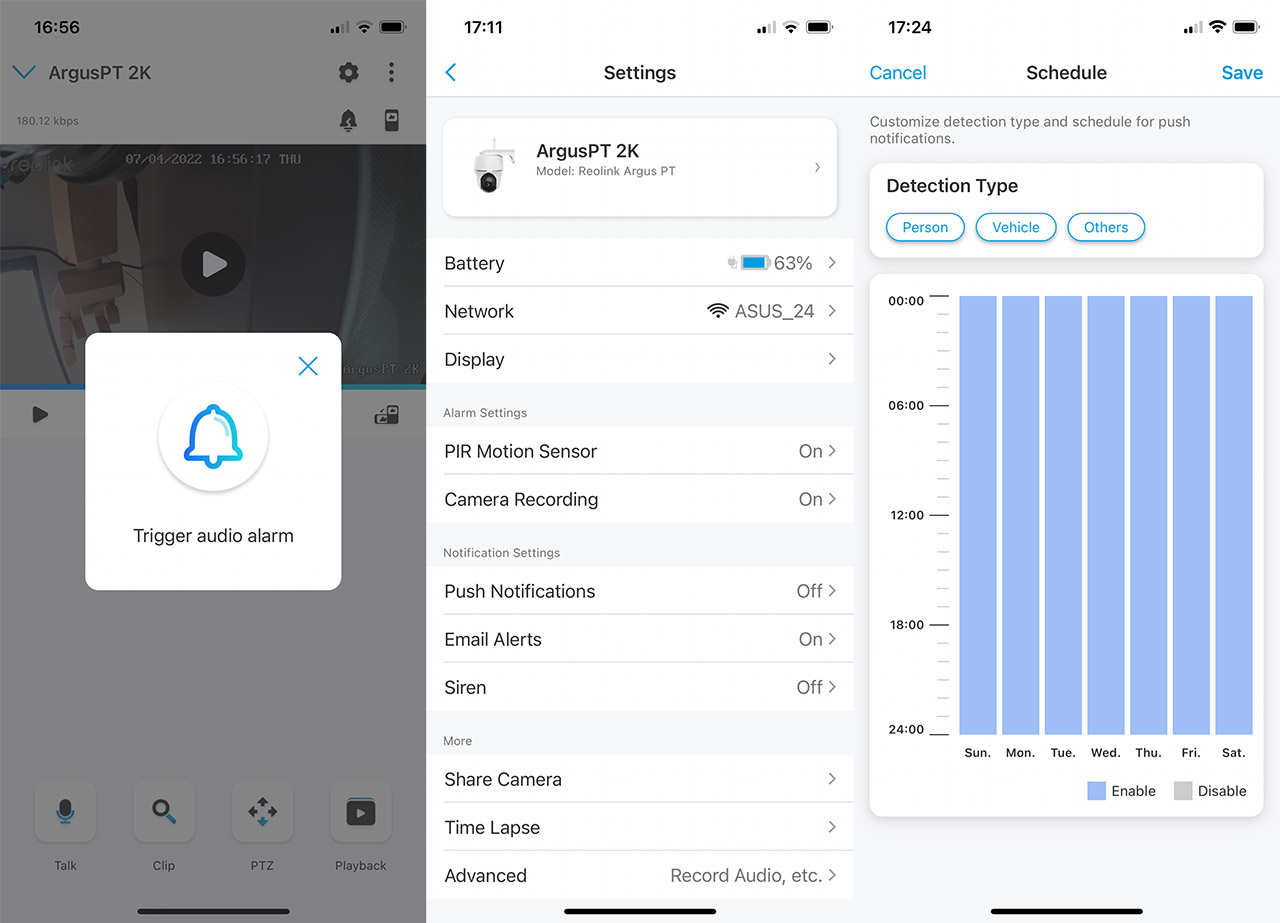
I haven’t seen any settings related to the smart detection and that got me a bit concerned that it was missing, but going to the Push Notifications section, I was able to see that there was indeed vehicle and person detection. In short, the notification will tell you if the alarm was set by a person or by a car. Lastly, as I already mentioned, there is support for Amazon Alexa and Google Home Assistant, but I do look forward for support for the open-source Home Assistant as well.
The Image Quality of the Reolink Argus PT 2K
The Reolink Argus PT 2K uses a 4MP sensor, with the resolution of 2560 x 1440p which is excellent for a WiFi camera that relies on batteries and, as I got accustomed with the Reolink cameras, the footage is very good. Especially during the day since, as you can see from the video, even if it was a bit cloudy, all the details are there and I do appreciate that they toned down a bit the contrast.
This way, the colors are now more natural, although a boost in contrast is still there (to enhance the image a little bit). I also saw that the chromatic aberrations that slightly affected the RLC-842A are gone which confirms that it was the transparent dome that was causing them. I did pause the video several times to see if I could identify the plate number on the passing cars, but the movement made is somewhat improbable that I could get a clear view.
If the car is parked (not farther than 100 feet), it’s possible to see the plate number, so those that stalk and want to see your habits (to enter your property later) would have to be very far and unobtrusive to not be captured by the camera. What about the pan and tilt? As expected there is a difference in reaction when you’re on your WiFi network and when you’re relying on the 4G/LTE (or 5G, if it’s available).
And it’s not negligible because in my case, it could take 3 to 5 seconds until the camera would move – the footage was also late by a few seconds when on 4G. When the camera was on my local WiFi, the notifications were almost instantaneous, even if it was about 30 feet away from the router, but be aware that this may differ depending on the signal strength, so make sure to keep it strong (and there are multiple ways to have WiFi both indoors and outdoors using access points or wireless extenders). During the night, the camera films in black and white because it lacks a spotlight to deliver colored night vision (it’s possible without it though, as seen on the Annke NC400).
That being said, the black and white video looks good and, while I appreciate the deeper blacks (from an artistic point of view), I think that it’s better to under-saturate the shadows, so no one can hide in the darkness. It’s going to be at the expense of video quality and I am not sure that all users will understand the trade-off. In any case, it’s not a bad idea to keep a light source where it gets very dark during the night, even a faint one since it will help tremendously. Regarding the pan and tilt movements, the performance doesn’t differ in any way from what we saw during the day.
Smart Motion Detection
As I already mentioned in the Mobile App section, the smart motion detection may seem a bit more subtle on the Reolink Argus PT 2K, but it’s actually working as well as on the other Reolink cameras. It’s just that you don’t have any saying on how it behaves, gaining a bit of a black box status. In any case, the notifications are the ones that are going to make it clear that the camera has either detected a moving car or a person and, in if it can’t tell the shape, it will just say that it has detected movement.
I saw that the icons don’t appear in the recorded footage (the usual car or person icons), but they do appear when checking the live view from my phone. And it does seem that it works fine during the day and the night, just make sure to keep some light source in the area of interest, so the camera can pick up the movement.
The Conclusion
If you want a reliable pan and tilt camera that can be mounted outdoors, you can’t really go wrong with the Reolink Argus PT 2K. Sure, it wasn’t built for the harshest weather, but it will survive most conditions and there’s also the smart motion sensing which is not something you regularly find at this price point. There’s also the 2K resolution and good night vision, and in terms of storage, you get to choose between microSD card or Cloud access. Additionally, there’s the optional solar panel that is able to keep the camera running for a very long time, so, if you’re on a trip, you don’t have to worry that the camera’s battery will run out before you return.
Pros
- Motorized tilt and pan
- Good image quality (1440p resolution)
- Smart motion detection
- WiFi support
- You can personalize the siren
Cons
- MicroUSB port for charging
- The siren is not that loud
- No spotlight
Mark is a graduate in Computer Science, having gathered valuable experience over the years working in IT as a programmer. Mark is also the main tech writer for MBReviews.com, covering not only his passion, the networking devices, but also other cool electronic gadgets that you may find useful for your every day life.