
The Reolink Argus 3 Pro is an improved version of the third generation of battery-powered outdoors-suitable cameras from Reolink and, while the Argus 3 was already plenty impressive from the cost-to-performance point of view, the Argus 3 Pro does come with a few new technologies, some of which, I already saw with a few PoE surveillance cameras (such as the RLC-520A).
The interesting thing is that at the moment of writing, both the Argus 3 and the 3 Pro have the same price (on their official website), so is Reolink actually trying to replace the non-Pro model? Although both devices could co-exist just fine in this market, I noticed that the second generation did not have a Pro version and the Argus 3 Pro may exist only to showcase the technological advances that Reolink has made in a very shot period of time.
At the same time, the Reolink Argus 3 Pro is seriously disrupting Netgear’s business, since it offers not only almost all of the features of the Arlo Pro 4 such as the 2K resolution, a powerful spotlight (6500K) or motion detection, but it also adds 16x digital zoom, the person/vehicle detection, 5GHz WiFi support and a huge battery to ensure the safety of your home for longer. And yes, there is also support for the mini solar panels, but you do have to buy it separately. That being said, it does seem that the Reolink Argus 3 Pro will most likely be the best battery-powered outdoor camera in its price range and above, so let’s give it a closer look.
Design and Build Quality
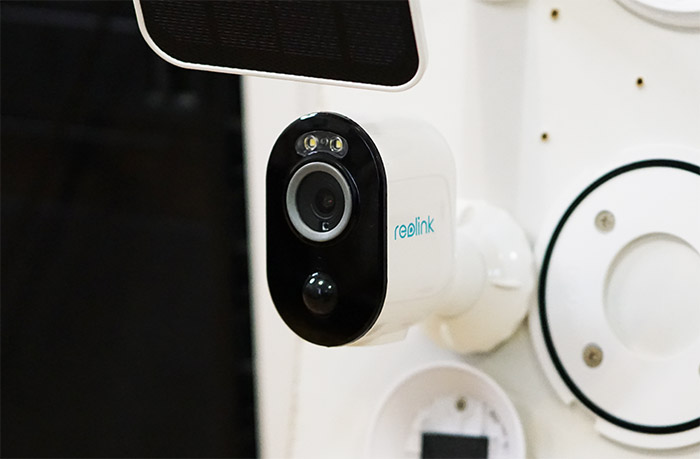
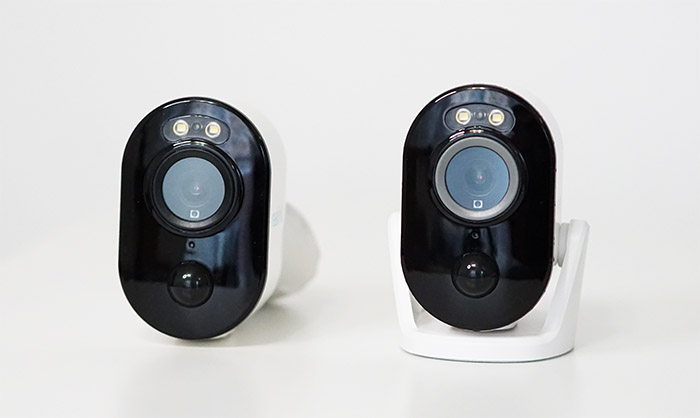
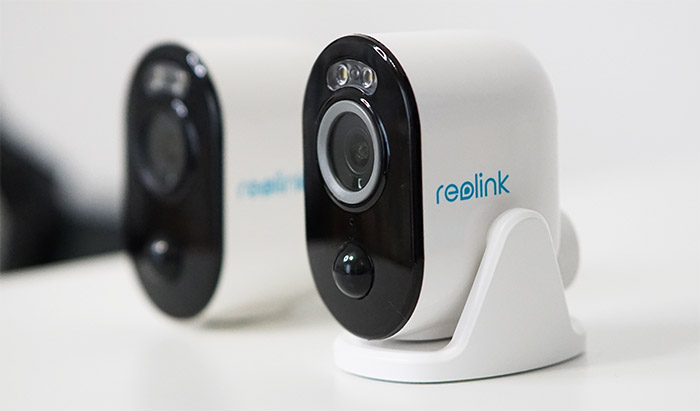
Design-wise, the Reolink Argus 3 and the Argus 3 Pro are nearly identical and, save for the gray ceramic ring surrounding the front-facing lens (instead of black, as on the Argus 3), you would not be able to tell them apart. So, expect the same compact pod-shaped plastic case covered by a white glossy finish, except for the front which is glossy black and yes, it does have the same dimensions – 4.8 x 3.5 x 2.2 inches (12.1 x 9.0 x 5.6 cm). There is an interesting addition in the package, a plastic stand (with two soft pads to not scratch the camera) which allows you to keep the Argus 3 Pro indoors on a shelf or desk. But the surveillance camera was designed for outdoor use and that’s where you’ll be able to make use of all of its features, such as the zoom, the spotlight, the long-distance IR sensor and the device was also built to withstand the elements.
Indeed, the Reolink Argus 3 Pro is IP65-rated which means that it’s dust-protected and will also survive powerful water jets from a storm. The camera will remain operational when the temperature swings between 14° to 131°F and, as with any other electronic device, do not place it in a location where it may be vulnerable to lightning strikes.
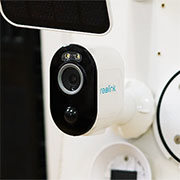
As I already mentioned, the Argus 3 Pro has a powerful spotlight and you can see it embedded in the front of the device – there are two LEDs on the sides for the spotlight and the one in the middle is the status LED. Underneath it, there’s the lens with the visible daylight sensor underneath the glass, while further down, there’s the motion detection sensor and the built-in microphone (surrounding the lens, there are six IR LEDs). Of course, just like the Argus 3, there is also a speaker on the rear side of the Pro, so you can have a two-way conversation to anyone in the vicinity of the camera.
In order to maintain the protection against the weather elements, Reolink has relied on a couple of silicone covers, one near the speaker to protect the microUSB port (would have liked to see a type-C connector) and one at the bottom to protect the recessed Reset button, the Power switch and the microSD card slot. And yes, Reolink has increased the supported capacity from 64GB to 128GB which should help store more videos without having to change the SD card (to protect the integrity of the device, make sure to always properly close the covers).
I know that the Argus 2 had a removable battery that you could recharge separately, but neither the Argus 3, nor the Argus 3 Pro went with this system and instead, you will have to remove the device from the wall entirely to recharge the 6,500mAh battery (there is a cable inside the package).
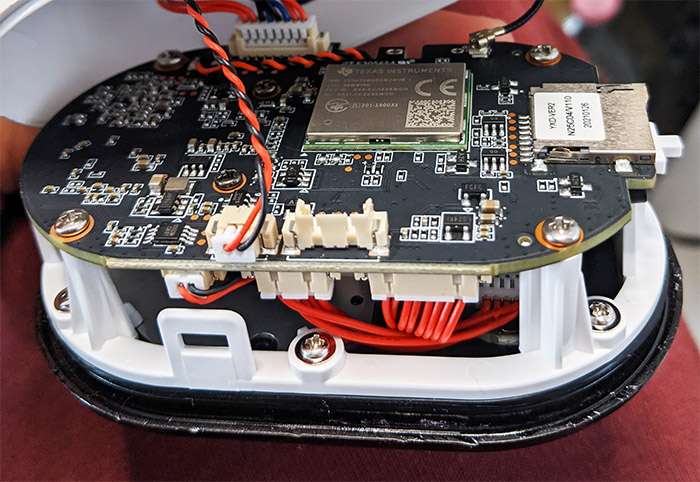
Reolink has made it relatively easy by creating a system very similar to the Netgear Arlo’s approach since you get a magnetic bracket to easily detach the camera. The magnet is very strong, so it’s not that easy to pick up the Argus 3 Pro from its hook, but if you’re worried people may steal it, there is an alternative: of course, I’m talking about the solar panel. It doesn’t come in the package, but it’s not really that expensive and it ensures that the battery is always charged – this way, you can also use the secondary non-magnetic security bracket to mount the camera. Although I did not open the case of the Reolink Argus 3, I decided to do so with the Argus 3 Pro and the process was surprisingly easy (it’s also very easy to lose your warranty this way, so tread carefully). I removed the two screws from the microSD slot area and then I could slide the internal section outwards.
I did disconnect the WiFi antenna, the battery connector and the speaker connector to have a better look at the PCBs and I could immediately identify the Texas Instruments CC3235MODSM2M0B dual-band wireless MCU module. I wanted to go further but, unfortunately, the cables between the secondary boards were glued, so no luck – I do assume that the camera uses the same Novatek SoC as the RLC-811A, the RLC-510A and the RLC-520A considering that all offer a nearly identical feature-package.
Setup and Functionality
After choosing the right spot to mount the camera and using the preferred bracket, you will need to download and install the Reolink app on your Android or iOS device. I already had it installed and have lots of Reolink cameras paired, but, if it’s the first time you’re using it, the app will only require to give access to services from your phone. After that, you will be greeted by an empty interface with a plus sign to add your first surveillance camera. Tap on it to open the camera and scan the QR code from the rear side of the Argus 3 Pro. After that, you will need to configure the WiFi connection and the good news is that it will work with either the 2.4GHz or the 5GHz network (although still up to the 802.11n standard). Next, you do need to start the camera: remove the bottom cover and simply flip the switch to the On position.
Doing so will enable the status LED and the camera will generate a sonar-like sound until pairing is done which is far better than the continuous voice message that the Argus 3 had. And I’m sure that most camera manufacturers didn’t think that a light sound could be more than enough to let the user know that the device is ready to be paired (so, kudos to Reolink).

After that, you will need to use the camera to scan a QR code from your phone and then the last two steps are to create a login password and to give your device a name.
The application’s user interface is almost identical to all other Reolink cameras and especially to the more recent models (those from the A series), so there are a few differences when compared to the Argus 3.
Reolink Argus 3 Pro
-
Pros
- 2K resolution
- Smart motion sensor that can tell apart moving cars from humans
- Spotlight + Colored night vision
- Bigger battery than its predecessor
- Support for 128GB microSD cards
Cons
- As a very minor complaint, the camera is still stuck with a microUSB port
Mark is a graduate in Computer Science, having gathered valuable experience over the years working in IT as a programmer. Mark is also the main tech writer for MBReviews.com, covering not only his passion, the networking devices, but also other cool electronic gadgets that you may find useful for your every day life.