
An outdoor WiFi range extender is a networking device which, as the name suggests, assumes the role of detecting an existing WiFi signal and extend it, so it can reach those difficult areas that your router is simply unable to cover. In 2021, you get a plethora of options to cover a larger area with WiFi for both the consumers and the SMBs, which means that the dedicated wireless extender (or repeater) has lost some of its value and it was either swallowed by the access points or by the router which can now run in this specific mode if the user desires so.
But, while typically, you could go with a WiFi mesh system to remove any WiFi dead zones, since we’re talking about outdoors, things get a bit more complicated and there aren’t that many options available. Sure enough, Netgear does offer a cool way to extend the signal from your house to your yard using the Orbi Outdoor Satellite, but this will keep you inside Netgear’s ecosystem (not that there’s anything bad about it, since the Orbi is a great WiFi system.. when it is stable).
UPDATE 03.27.2021: The Mikrotik NetMetal ac2 has been added to the best wifi extender list.
| DrayTek VigorAP 920R | Mikrotik NetMetal ac2 | TP-Link CPE510 | Hawking Technology HOD45B |
 |  |  |  |
| Read More | Read More | Read More | Read More |
 | |
So, I had a look at some ‘more universal’ solutions that could qualify as the best outdoor WiFi range extenders and I found that you should expect a rugged look (no more elegant designs with glossy finishes and internal antennas – instead, you’re most likely going to get larger, industrial-looking hardware with multiple external antennas), a better built quality, which should ensure the device’s survival in harsh external conditions (and, naturally, to have some sort of rating to justify it – such as IP67) and, quite possibly a higher cost (once again, because of the rugged exterior).
Furthermore, I also noticed that some of these devices aren’t pure range extenders, but also function as access points or even as fully-fledged routers. One important element that you need to understand is that a range extender may halve your bandwidth if you use a single-band extender, but this problem can be alleviated to a certain degree having more bands available – you also have to take into account any walls in between these devices, as well as any outdoors-type interference (the access point connects to the router using a cable, but I doubt many would prefer to have cables running throughout the yard).
1. DrayTek VigorAP 920R
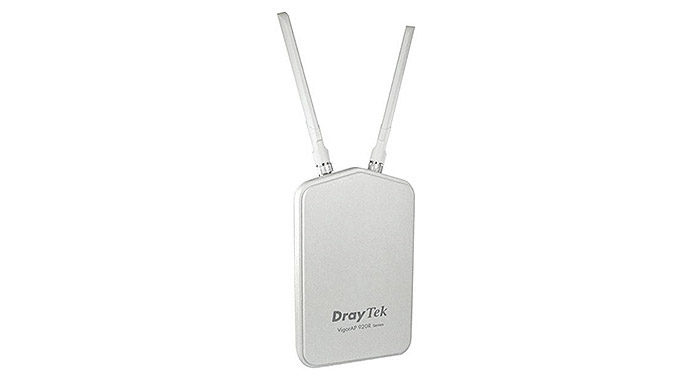
The DrayTek VigorAP 920R is one of the latest outdoor wireless access points from the Taiwanese manufacturer and it is part of a new series of devices which promises a high level of protection against the elements (it is IP67 certified), a point-to-point connectivity of up to 1.8 miles, a centralized management system which can monitor and configure multiple APs and routers and it offers multiple types of operating modes, including the Universal Repeater which makes it suitable for our current needs. Furthermore, while most devices that can work as universal repeaters are single-band only, the 920R is a dual-band AC1200-class product, so it will have an easier time dealing with the backhaul traffic (which really likes to halve the bandwidth).
The VigorAP 920R features a solidly-built case covered by a white matte finish and with two thick external antennas pointing upwards. The device was designed to have a neutral look (since you don’t need a flashy device outside your home to attract unwanted attention) and considering that it is neither too big, nor too heavy for an outdoor AP, it can easily be mounted on a pole (it measures 10.0 x 6.3 x 3.1 inches and weighs around 2.3 lbs – therefore, being in line with the traditional industrial-looking networking devices.
Furthermore, the device is IP67 certified, which means that the 920R is dust-resistant (the test was conducted using talcum powder and no dust deposit entered the enclosure) and water-resistant (the device can be completely submerged under water down to a meter for up to 30 minutes), which indicates that the VigorAP 920R can survive heavy storms and can be positioned in dustier environments (arid areas) without being compromised. Besides the IP67 rating, the device will remain operational when the outside temperature ranges between -40 to 158 degrees Fahrenheit and when the humidity is between 5 to 95 % (non-condensing). This makes it suitable for harsher winters and hotter summers. But what’s quite unique about the VigorAP 920R is that it has two built-in sensors (one for the temperature and the other for the humidity) which can send live feed-back via either email or alert message.
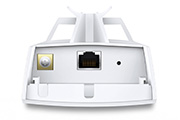
While the device will do just fine regardless of the weather, it still needs to have a solid lightning protection in place to ensure that it won’t fry at the first lightning storm. To do so, DrayTek has included a Ground cable inside the package which gets connected to the designated area on the rear side of the device and to the ground rod. On the bottom of the device, you can easily notice the three big screw caps, the one on the left covering the Factory Reset button (after you remove the cover, press and hold for about 10 seconds to return the access point to factory default settings), the middle covering the PoE In port and, in case you use the AP290RP version of the device, the third cap reveals a PoE Out port (a great addition for powering on any additional device, such as an outdoor IP camera which can be strapped to the same pole).
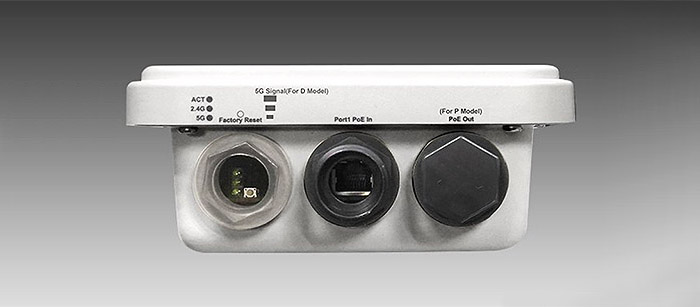
Next to the ports, on the frontal section of the case, but still pointing downwards, you’ll be able to see some unobtrusive LED indicators: the first LED light shows the status of the ACTivity (if it’s blinking, then the system is ready), while the 2.4G and the 5G LEDs will shine solid when the WiFi is ready and will start flashing as soon as data is either being received or sent.
The correct hardware installation requires that you first remove the top caps and connect the two thick antennas (6dbi gain on the 5GHz radio band and 3.5dbi on the 2.4GHz band) and afterwards, you need to remove the cover for the middle port to expose the Gigabit Ethernet port and disconnect all the components of the cable gasket.
Next, you need to insert the Ethernet cable through all the previously removed small components and make sure to properly tighten everything to ensure a good protection from outside conditions (for extra security and better isolation from interference, you could use a shielded CAT cable). After the cable is attached to the VigorAP 920R, take the mount plate from the package and remove it from the mounting kit: the former gets connected to the device, while the latter attaches to the pole; lastly, simply fasten the access point to the mount kit using the provided screws. But you’re not done yet, as you need to insert the Ethernet cable into the PoE adapter, so the device will receive power.
Of course, it may be wiser and a lot easier to first configure the VigorAP 920R before mounting it to a pole and, to do so, you have to connect the AP to the PoE injector which will get connected to a computer; next, open a web browser and go to 192.168.1.2 (the default address) to enter the username and password (admin for both) and gain access to the interface. To set up the VigorAP 920R as an Universal Repeater on either bands (which will then act as Station and AP at the same time), you need to start the Quick Start Wizard and, at the Operation Mode, choose Universal Repeater.
Here, you can click on AP Discovery and let it display a list of all the APs available in the area; after you choose your network, the SSID and MAC address fields should automatically fill themselves with the received info and, on the Channel settings, you can change it if there are too many interferences; the Security Mode, Encryption Type and Security Key are advisable to stay the same as on your main router/AP. This mode also allows you to Enable a Guest network for your outdoors visitors (you do get some QoS options and can create schedules).
To test the DrayTek VigorAP 920RP, I selected Universal Repeater mode on the 2.4GHz network (only one band can be set in this mode at a time) and I put the wireless router in the center of the house at about ten feet from the 920RP (which was mounted outdoors). Next, I used my laptop as a client and at about 5 feet from the repeater, I measured an average of 104 Mbps (-35dBm). Afterwards, I went further away from the device, at about 70 feet, where I measured an average 65.6 Mbps (-54dBm) and, at 310 feet, I measured an average of 22.7 Mbps (-61dBm). Lastly, at 460 feet, I measured around 9.37 Mbps (-72dBm) and that’s pretty much the maximum at which you would be able to browse the Internet from a laptop.
2. Mikrotik NetMetal ac2 Outdoor Extender

![]()
Before going any further, it’s important to understand that the Mikrotik devices are not that consumer-friendly and the RouterOS (which is a lot more than the software that you usually find on regular routers or access points) really doesn’t like holding your hand, so be aware that there is a significant learning curve before having some understanding of how things work (especially if you aren’t familiar with some of the tech terms). I have already added the NetMetal ac2 as a recommendation for being one of the best outdoor access points, but since it can also be configured to extend an existing wireless signal to some far away client devices, it does deserve a place on this list (and make no mistake, the NetMetal ac2 is one of the toughest rugged access point and more than capable of withstanding the outdoor conditions).
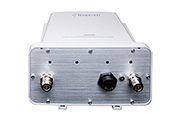
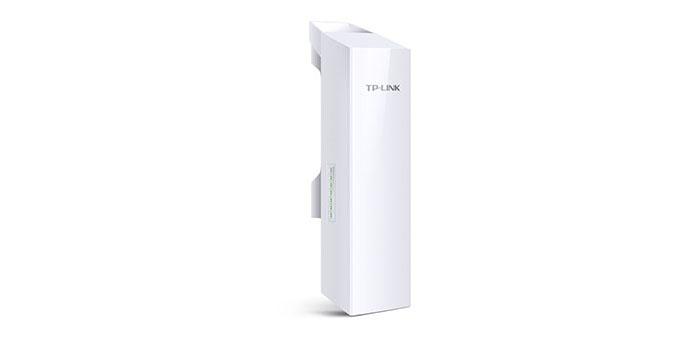
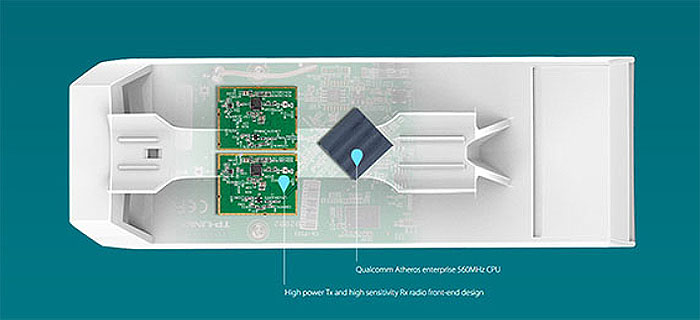
The Mikrotik NetMetal ac2 was designed to used as an outdoor wireless access point (we’re going to use it as an extender, so we need the same type of hardware) and, because it does not come with antennas in the package, you will need to purchase your own. Ideally, you should check the higher gain ones, otherwise, source signal may be too weak to re-transmitted. The enclosure is fairly long and it’s fully made of metal (it’s covered by a gray matte finish) and I know that it seems very big, rivaling the likes of DrayTek VigorAP 920RP. But, this is only true until you remove the top section to add the antennas – the device measures 5.63 x 9.72 x 1.88 inches. The bottom side is also detachable, well, semi-detachable since it always remains attached to the metallic body of the extender and this section is there to protect the ports from water or dust ingress.
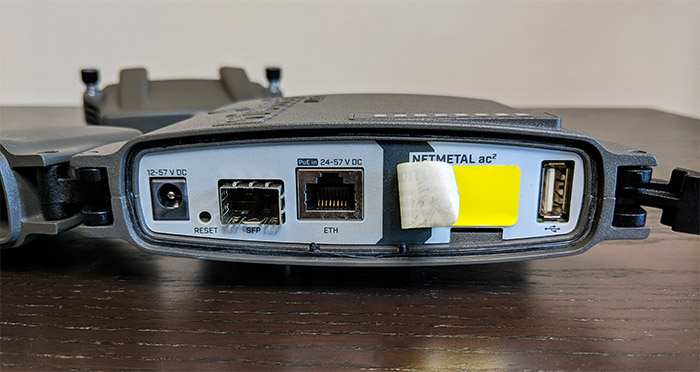
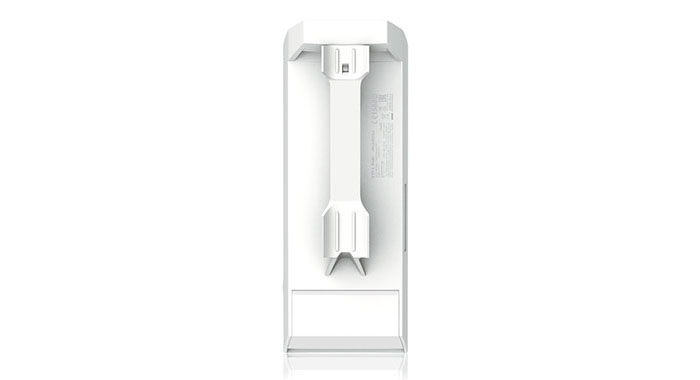
Inside the package, Mikrotik has added a small mounting bracket which can be used to attach the device to a wall, but you can also rely on the provided ring to mount the NetMetal ac2 to a pole. And in terms of ruggedness, the Mikrotik NetMetal ac2 is built like a tank, so it will do great against mechanical shocks (depends on the mounting location, it’s a welcomed protection), but the manufacturer said that the wireless extender should also be able to operate under some extreme temperatures (between -40 and 158 F) and it has an IP66 rating (protection from water and dust ingress). It’s worth mentioning that on the front side, just above the ports’ protective cover, there is an LED area with five indicators that have the role of showing the signal strength (one bar equates 89dBm and five bars shows that the signal is 61dBm or less), as well as a PWR LED, a USR/SFP LED (for fiber cable connection) and an ETH LED (for LAN/PoE connection).
Remove the protective cover and you’ll be able to see the Power port, a Reset button, a SFP slot, a Gigabit Ethernet port (supports PoE), a USB 2.0 port and a microSD card slot. I was pleasantly surprised to see that this AP is one of the few devices to provide a PoE injector inside the box (so yes, the NetMetal ac2 is a PoE WiFi extender / access point).
Just like all Mikrotik devices, the NetMetal ac2 comes with RouterOS and for this model, the License level is 4 which is more than enough for the user to set it up as a wireless extender. Similarly to the AP configuration, you can either use the Mikrotik Winbox utility to access the GUI of the device or simply enter the IP address in the URL of any browser (check it in the list of the connected devices from your router interface) and then you should be greeted by a somewhat dated-looking GUI with a long vertical menu on the left.
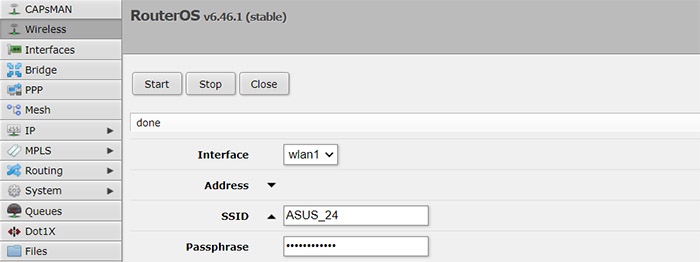
I am not going to go very deep into the configuration process (you can find a dedicated guide here), but the general steps that you need to follow are to go to the Wireless section and then you need to start the Scanner – select the wlan that’s going to be extended, identify the SSID from the main router (copy it and Stop the scan) and, after returning to the WiFi interfaces section, click on the Setup Repeater tab. Now, a smaller window will appear where you will have to enter the previously copied SSID, as well as the passphrase (the WiFi network password) and then click on Start. A new virtual interface will now appear and you will be able to check its Security Profile, its signal (through the registration section) and more.
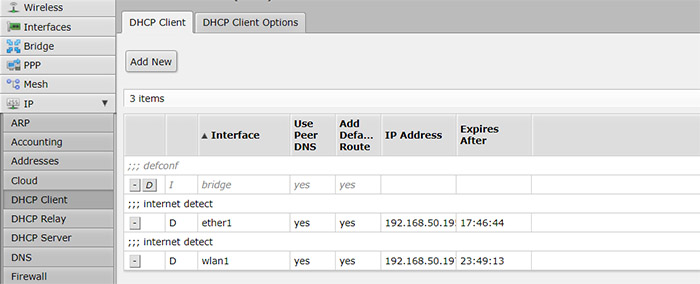
In case you want to check the IP address of the WiFi extender, you will need to click on IP > DHCP Client. And that was actually easier than expected – you now have a fully functional outdoor WiFi repeater. But, be aware that depending on the router you’re using, the signal strength and the distance, you may not be able to go very far from the router with the wireless extender, especially if the antennas aren’t that powerful – also, always remember that the bandwidth will be halved, at best.
3. TP-Link CPE510
![]()
At its core, the TP-Link CPE510 is a great outdoor wireless access point (which I have also briefly covered in the best outdoor WAPs), but, since it can function as a wireless extender / repeater as well, it makes it suitable for a WiFi-only type connection to the router. The CPE510 features a 2×2 dual-polarized directional MIMO antenna (13dbi), so it can cover an incredibly long distance, it uses the Passive PoE technology (up to 200 feet) to both power itself and to directly connect to the router (if you deploy it as an Access Point) and it relies on the Pharos Control CMS for monitoring and managing purposes (Pharos can include all the compatible TP-Link devices).
From the design point of view, the TP-Link CPE510 isn’t larger than your usual access point (measures 8.81 x 3.11 x 2.36 inches), but instead of having a circular shape, it went with a rectangular plastic case covered by a white matte finish and, while the front area is quite plain (with only the TP-Link logo), the rear side has a special attachment connected to the main body which allows the user to easily install the device on a pole. Inside the package, TP-Link does provide the necessary pole mounting straps to make the operation as painless as possible.
The plastic that was used to build the case was designed to survive outdoor conditions (ASA plastic material – which has a high resistance to weather conditions and is often used on automobiles) and the device is IPX5 rated, which means that the CPE510 should be protected against water jets, so it should survive unharmed when it is raining – be aware that it is not protected against complete submersions under water. What about during the winter? TP-Link claims that the device should remain operational when the temperature is between -22 and 158 degrees Fahrenheit, so, theoretically, it should survive both a harsh winter and a hot summer. But probably the number one enemy is the lightning which can easily fry the device.
To protect against it, TP-Link suggests using a shielded CAT5e Ethernet cable (or better) and, if the device has a a grounding terminal, such as the case of the CPE510, then you can connect a grounding cable to it in order to keep the AP/Extender protected (the CPE510 features a 6KV Lightning Protection and a 15KV ESD Protection).
On the left side of the device, you can find seven LED indicators which, depending on the configured mode, will light up in different patterns: the four upper LED indicators will remain solid green when the device is in access point / router mode and will light up depending on the signal strength when the CPE510 is set to Repeater mode (or any other mode except access point and router); the last three LED indicators show the status of the LAN ports and the Power.

On the bottom of the device, remove the cover to expose the ports area: from the left, there’s the Grounding Terminal, a shielded Fast Ethernet (10/100 Mbps) port which supports a passive PoE connection (it will not work with 802.11af/at adapters) and a Reset button (keep it pressed for 8 seconds to return the device to the default settings).
To perform a proper hardware installation, you need to take an Ethernet cable and connect one end to the LAN port on the CPE510 and the other to the PoE injector (which comes into the box), then take another Ethernet cable and connect one end to the LAN port of the injector and the other to a computer; lastly, simply connect the PoE injector to a power source.
Afterwards, the TP-Link CPE510 can be monitored and configured using PharOS interface which can be accessed by opening a web browser and going to 192.168.0.254 (the default address). Here, you’ll be asked to insert the username and password (it’s admin for both – it can be changed immediately) and then start the Quick Setup process. Since we’re interested in the extender aspect of the CPE510, on the first step of the configuration process, we’re going to choose Repeater (Range Extender); afterwards, you’ll be asked to specify the LAN IP address and the Subnet Mask and next, you can configure the Wireless Client Settings: here, at the SSID or Remote AP area, click Survey which should display all the available upstream wireless networks.
Once you’ve identified your root network, you need to choose the same Mode, Channel Width and Security as on the router. And that’s pretty much it, from here on, the CPE510 should take the signal from your router and extend it further outside your home.
The TP-Link CPE510 is a single-band device (5GHz, 802.11a/n) and the maximum theoretical throughput is advertised at 300 Mbps. The 5GHz band may require for the repeater to be closer to the router, but after everything is configured, the signal should reach up to at least a couple of miles with minimum interference (in ideal conditions, TP-Link claims that it can go as far as 10 miles).
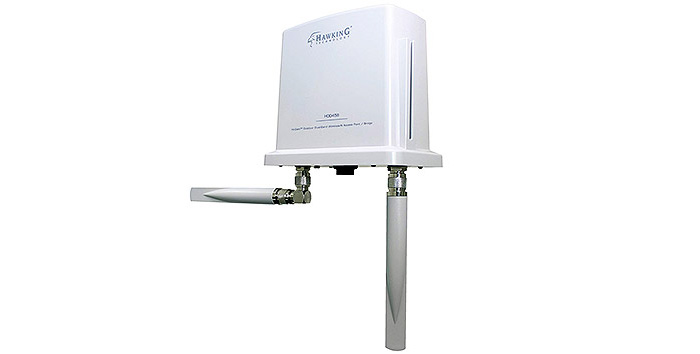
4. Hawking Technology Hi-Gain Outdoor Access Point / Bridge / Repeater HOD45B
Hawking Technology is a Canadian-based manufacturer of networking devices, their most popular products being the Hi-Gain Wireless access points, from which I chose the HOD45B especially because of its ability to act as an Universal Repeater (the device is also dual-band, but, unlike the DrayTek VigorAP 920R, it only supports the 802.11a/b/g/n wireless network standards). The Hawking Technology is not as popular as other brands that focus on the same audience, but it has slowly gained some traction both in the US and the European market and considering that the home user and the SMBs require newer and better technologies with each passing year, it could be only a matter of time until the Hawking networking devices become more widespread.
The Hawking HOD45B is perhaps the most industrial-looking device from this list, featuring a rectangular body covered by a white matte finish and with two detachable antennas which are designed to point downwards (it makes sense since you most likely will position the device elevated on a pole). In terms of size, the device is within the acceptable limits, measuring 6.25 x 6.87 x 3.5 inches, but its thickness is a factor that needs taken into consideration before choosing the right spot where it’s going to be mounted; in terms of weight, the HOD45B weighs 1.58lb, which means that it’s going to be easy to maneuvre.
The body of the HOD45B was designed to be outdoor-suitable, so the AP is IP67 certified, which means that it can withstand submerges under water down to 3 feet for half an hour (heavy rains won’t affect the device) and its integrity won’t be compromised in dusty areas (the case when you mount the HOD45B in a barn or in a more arid outdoor environment). Furthermore, the device should remain operational when the temperature is between 32 and 104 degrees Fahrenheit and if the humidity stays within 10 and 90% (non-condensing). This means it is not really that suitable for areas where the winter temperature goes under 32 F (as well as where the summer is too hot).
But the number one enemy of any outdoor networking device is the lightning and, while the other manufacturers have added an easy way to ground their devices, Hawking seems to have decided against it, which means that the best way to keep the HOD45B relatively safe is by using antennas surge protectors and connect them to a grounding point.
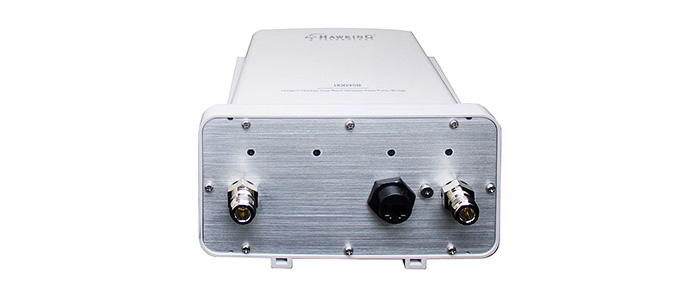
On the bottom of the device, there are a couple of connectors for the two 5dBi Hi-Gain dual-band dipole antennas (one on the left and the other on the right), a Reset button covered by a protective screw (use a long and thin object to press and hold the button for about 15 seconds to return the device to factory default settings) and in the middle, there’s an RJ45 PoE Ethernet Gigabit port – use an Ethernet cable to connect it to the 48V 0.5A switching PoE Power Adapter (provided in the package).
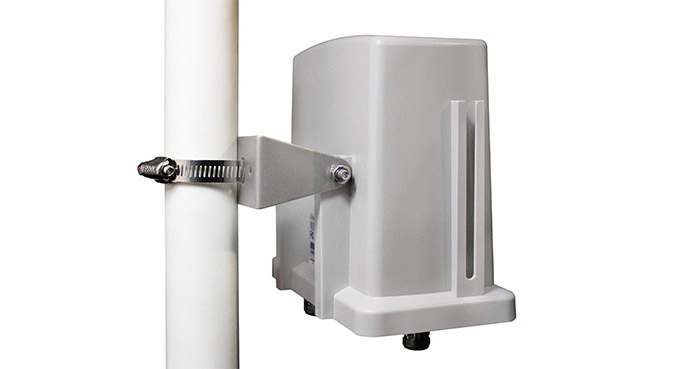
The hardware installation requires that you connect the two antennas (one straight and the other should use the provided L-shaped connector), remove the gasket from the Ethernet port and run a cable through all the components of the gasket and afterwards make sure to secure it in place. Next, take the Ethernet PoE adapter and connect the other end of the cable to the Power + Data Out port – if you want to configure the HOD45B before mounting it on a pole (which you should), connect an Ethernet cable to the remaining port on the adapter and to a computer. After you have finished the configuration, take the device outside, attach the mount bracket to the AP and then use the provided pole clamp to securely tighten the grip (the device can also be mounted on a wall using the same mounting bracket).
To configure the Hawking HOD45B as an Universal Repeater, you need to connect it to a computer, open a web browser and go to 192.168.1.230 (the default address) and, when requested, enter admin/1234 for the username and password. Next, at the Quick Setup section, select ‘Universal Repeater’ as the Mode, choose an SSID (should be the same as the root WiFi network), select the network to which the repeater will connect from the list, insert the wireless password if required (also make sure that the security is identical on both the extender and on the router) and wait a few seconds until the process is done.
Mark is a graduate in Computer Science, having gathered valuable experience over the years working in IT as a programmer. Mark is also the main tech writer for MBReviews.com, covering not only his passion, the networking devices, but also other cool electronic gadgets that you may find useful for your every day life.