
The Best Managed Ethernet Switches
| Cisco SG300-28 | Mikrotik CRS226-24G-2S+IN | FS S3910-24TS L2+ | Juniper EX2200-24T-4G |
 |  |  |  |
| Read More | Read More | Read More | Read More |
 | | |
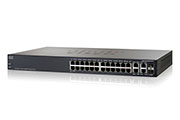
1. Cisco SG300-28 L3 Ethernet Switch
![]()
Cisco is a recurrent name when we are talking about any networking products and that’s because the Cisco Systems is the largest networking company in the world, having lots of network security-related patents and let’s face it, whenever Cisco comes out, everyone thinks about high-quality, stable products that are easy to configure and are packed with all the latest features.
Sure enough, Cisco products aren’t known for having a cheap price tag, but there was a switch that caught my eye, namely the SG300-28, a 28-port Gigabit Managed switch that seems to be one of the most affordable Layer 3 switches on the market and which is perfect for small businesses and for home use, if you’re a tech enthusiast (although it may be an overkill).
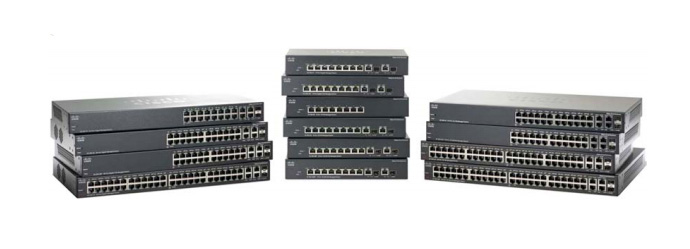
For this reason, it sits as the best managed Ethernet switch (L3). Besides the 28-port switch, the SG300 series also has models of 8 to 48 ports using the Fast Ethernet technology and models of 10 to 52 ports, using the Gigabit Ethernet connectivity.
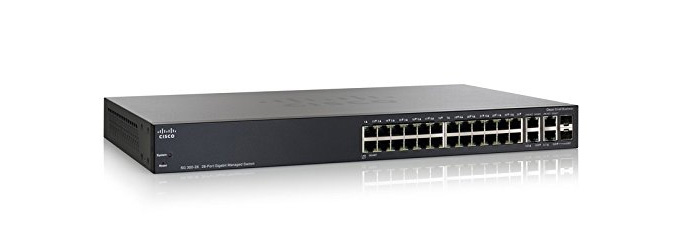
Cisco designed the SG300-28 in the same fashion as the other switches on the market: you get a sturdy, metallic, rectangular case with a light-grey matte finish covering the external surface, except for the front side, where the surface is black.
The footprint of the SG300-28 is quite large, even though it is advertised as being a desktop switch (it measures 17.3 x 10.1 x 1.7 inches and weighs 8.6 lbs), so it occupies a lot of space if you decide to place it on a shelf or on the desk (don’t forget to stick the four rubber feet on the bottom). But, if you want to use this device in an office, then you may not like the idea of placing it flat on a surface.
Fortunately, Cisco gives you the option to mount the switch on a rack (1 rack unit high) using the included kit and there isn’t a wall-mounting possibility (only the 8-port devices can be mounted on the wall). The top of the device is quite uneventful, there is only the Cisco logo. Both the left and the right side of the switch is home to large patterns of airflow vents and I was surprised to see that this large device is fanless. This means that it relies solely on passive cooling and there is no fan noise, the switch just sits quietly and does its job.
The front of the SG300-28 is occupied by the 26 10/100/1000Mbps Gigabit Ethernet RJ45 ports, each with two LED lights, one for LINK/ACTIVITY (solid green means that there is a link between the port and the connected device) and the other for GIGABIT (if the LED is solid green, it means that there is a 1000Mbps link established between the devices, otherwise, if the LED is off, it means that the connection speed is under 1000Mbps or that there is no connection to the port).
On the right side of the ports, you can also find two combo mini-GBIC slots (each combo has one 10/100/1000M Ethernet port and one mini-GBIC/SFP(Small Form-Factor Pluggable) Ethernet Gigabit slot), each port with the corresponding two LED lights (Link/Act and Gigabit).
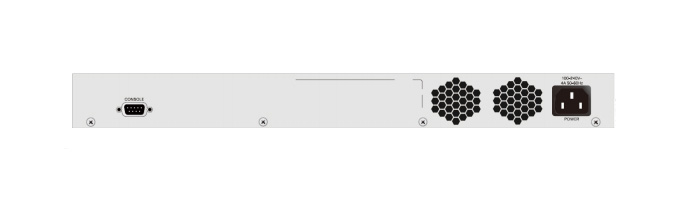
On the left side of the block of ports, there is a single System LED (if it’s amber, it means that there is a hardware failure) and a recessed Reset button (which can be accessed by inserting a paper clip). The back side of the switch, there is the Power port (100-240~ 4A 50-60Hz) and a Console port, where you can connect a serial cable to a PC for using the terminal emulation program.
Hardware-wise, the Cisco SG300-28 is equipped with a Marvell ARM CPU, 128 MB of RAM and 16 MB of flash memory. Furthermore, the SG300-28 features a switching capacity of 56 Gbps and a forwarding performance of 41.67 Mbps (64-byte packet size).
The SG300-28 can be configured using two different methods, one by using a web-based interface and the other, through the console port, by using the Command Line Interface (CLI). In order to configure your switch using the console port, you have to connect a computer using a serial cable and start a terminal application (for example, the HyperTerminal). You can check out what command lines you can use by following this guide: https://www.cisco.com/c/dam/en/us/td/docs/switches/lan/csbms/sf30x_sg30x/administration_guide/CLI_300_1_2_9.pdf.
To gain access to the web-based interface, open a browser of your choice and go to 192.168.1.254 (the default IP address) that will open the Login page. Here, insert cisco for both the user name and password (the first time, you also get the option to change the password). The UI has two main sections: one on the top right corner, where you can choose the language, Log out, access the About page and visit the Help section; the other consists of the main menu positioned vertically.
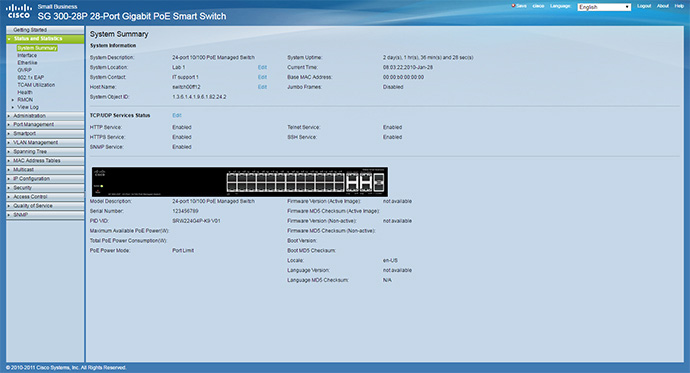
The menu has the following sections: Getting Started, Status and Statistics, Administration, Port Management (includes Port Settings, Link Aggregation, Green Ethernet), Smartport and VLAN Management. This includes the Default VLAN Settings, Create VLAN, Interface Settings, Port to VLAN, Port VLAN Membership, GVRP Settings, VLAN Groups and Voice VLAN.
There’s also the Spanning Tree, MAC Address Tables, Multicast, IP Configuration (DHCP Relay, ARP and Domain Name System), Security (TACACS+, RADIUS, Password Strength, Management Access Method, Secure Sensitive Data Management, SSL Server, SSH Server, SSH Client), Access Control (includes IPV6 Based ACL and ACL Binding), Quality of Service and SNMP.
Since this is a Layer 3 managed switch, you can expect that every section is full of options that help you make a complete, in-depth configuration (just make sure that after you went through all the settings, you have to realise that you made the changes to the current, running configuration, so you have to click the save button at the top, otherwise, all the changes will be lost after the first reboot).
Note: Inside the package, you can expect the Cisco SG300-28 unit, a Power cord, a serial cable, a rack-mounting kit, a Quick Start Guide and a CD-ROM with user documentation.
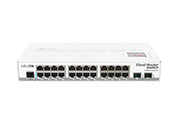
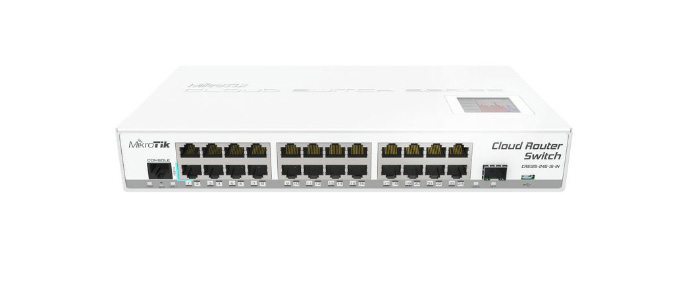
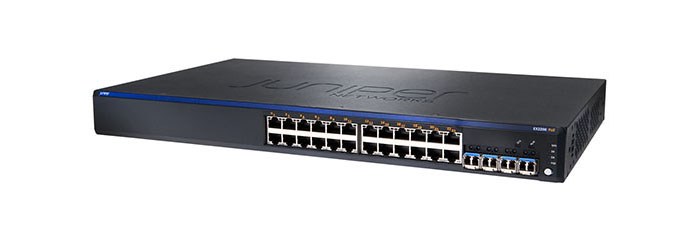
2. Mikrotik CRS226-24G-2S+IN Ethernet Switch
![]()
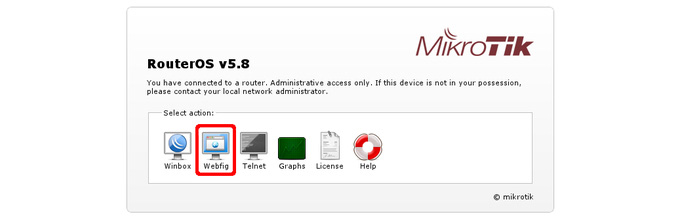
The Latvian Company, Mikrotik, isn’t as large as Cisco, but it has managed to capture the attention of the entire world with its computer networking equipment (especially since we are talking about a relatively new company – it was founded in 1996). Besides the great router and switch series, Mikrotik has also brought us the RouterOS, a Linux based software that can turn a computer into a network router (along with the implementation of various features, like VPN, QoS, firewalling, the ability to serves as a captive-portal-based hotspot system and many more features).
The device I’m going to focus is the Mikrotik CRS226-24G-2S+IN, a cloud Gigabit router Switch that features 24 ports, Layer 3 management, PoE functionality (Passive PoE) and the license L5 RouterOS.
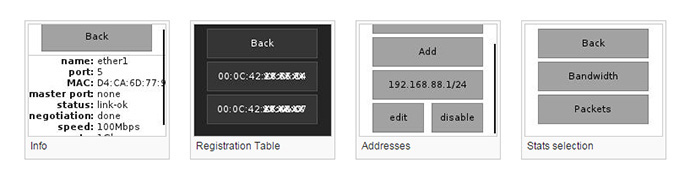
The Mikrotik CRS226-24G-2S+IN is a neat looking device, having a bit more aesthetic value than the other switches from competition. The case is rectangular and metallic, covered with a white finish. On top, you get a small touchscreen. Obviously, it was not created to be the main input method, since it doesn’t have the functions, nor the responsiveness of a smartphone’s display, but it can be used to setup the IP address of a LAN interface and some other simple configuration options.
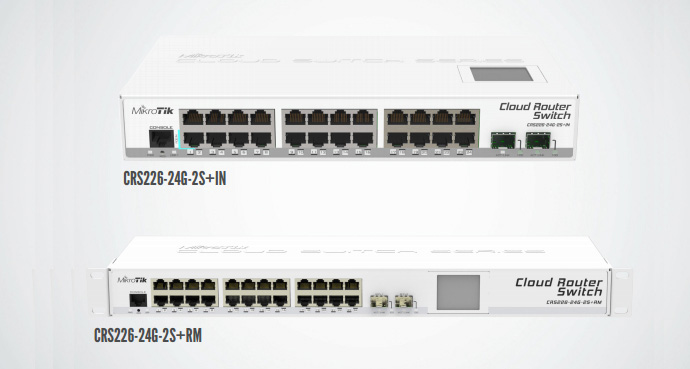
This isn’t necessarily a recent device, but Mikrotik has adopted the new trend of making switches as compact as possible. This statement is true for the Mikrotik CRS226-24G-2S+IN, because it is a very compact device considering it has 24 ports (it measures 11.2 x 5.7 x 1.7 inches) and it’s also quite lightweight (it weighs 2.9 pounds). The switch can be positioned flat on the surface (this is the only position available), but allows a certain degree of ventilation thanks to its four feet, since there are some vent holes on the bottom of the device. Near one of its feet, you can also find a label with printed info about the switch (Serial Number, Model Name).
The front of the device is home to the Ethernet RJ-45 10/100/1000 Gigabit ports positioned in three groups, there’s also a Console port and two SFP+ Ethernet ports (the first SFP+ port supports 1.2 Gigabit and 10 Gigabit, while the second SFP+ port supports only the 10 Gigabit mode). The Ethernet port 1 allows you to power the switch over Ethernet (PoE In).
Underneath the Console port, there are three LED lights for Power, RES and USR 1. Additionally, every LAN port has a LED light (green for 1000Mbps connection, amber for 10/100Mbps connection) and the two SFP+ ports have two LEDs: one for ACT/LINK and the second for 10G. The interesting thing about this Mikrotik switch is that through the RouterOS, it allows the users to configure each LED activity the way it suits them better.
The back of the switch has a DC input (10-28V) and different types of vents, from which one seems to be designed for a fan. In reality, the CRS226-24G-2S+IN is fanless (relies only on passive cooling), so it’s not noisy and the unit has remained surprisingly cool (considering that it features a strong performance).
Under the hood, the CRS226-24G-2S+IN sports a Qualcomm Atheros QCA8519, clocked at 400MHz, backed by 64MB of RAM and 128MB of Onboard NAND (multiple OS partition support). The chip comes with a non-blocking design, so every port can be used full-duplex simultaneously.
The Mikrotik CRS226-24G-2S+IN features the RouterOS software, an extensive tool that allows for a huge number of configurations (it has level 5 license, which means that almost all features are licensed at an unlimited level). In terms of features, the RouterOS has everything you would need and more, and because of the large number and the complexity of some of them, Mikrotik has created a dedicated wiki page to help out those in need: https://wiki.mikrotik.com/wiki/Main_Page.
Let’s get it straight, setting up the CRS226-24G-2S+IN is a pain, but once you do it for the first time, you’ll understand the flow of the switch. That being said, remember that you talk to the CPU directly, which talks to the switch chip at 1GBps. Now, if you access the settings from ‘/interface ethernet switch’, you are controlling the switch chip, any other configurations are done on the CPU (which is not really that powerful).
Also, you need to understand that the RouterOS uses the concept of master port and slaves in order to configure groups (especially useful if you want to configure ports for VLAN). Additionally, any ports can be removed from the switch and be used for routing. If you want to set up Link Aggregation, you must do it in the ‘/interface ethernet switch trunk’, but, unfortunately, the CRS226-24G-2S+IN does not support LACP (nor Spanning Tree).
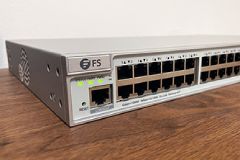
3. FS S3910-24TS L2+ Ethernet Switch
Read the full review of the FS S3910-24TS
The FS S3910-24TS is the mid-range network switch from the fully managed Pro switch series designed for heavier, enterprise-level networks and just like the S3910-24TF, it sports 24 Gigabit LAN ports and four SFP ports. The device is very well equipped, so it has a few more features than the entry-level model from the series (FS S3910-24TS) and perhaps the most important one is the hot-swappable power supplies.
Yes, I know it’s a somewhat niche feature, but then again, the targeted audience is the enterprise market where chances are the networking devices need to work continuously, 24/7. Besides that, the FS S3910-24TS includes some Layer 3 routing features and the support for physical stacking of up to four identical switches, so it has well worth its place in this article.
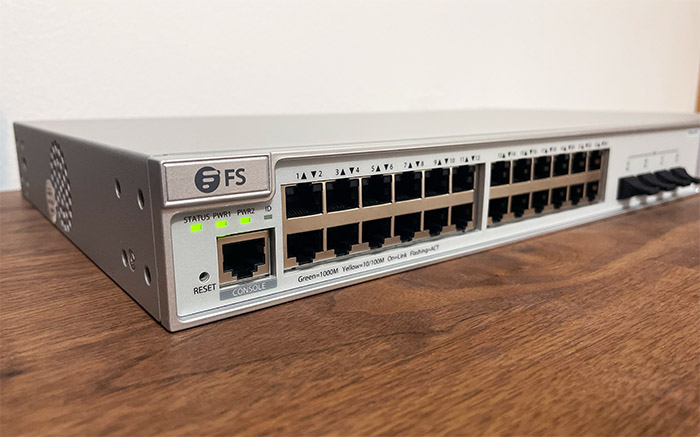
The FS S3910-24TS features a rectangular metallic case, covered by a grey matte finish and overall, the Ethernet switch is one of the largest I have tested so far, especially considering the number of ports available (slightly smaller than the S3910-24TF).
The FS S3910-24TS measures 17.3 x 9.7 x 1.7 inches and, as expected, it was designed to be mounted on a rack (it has the mounting ears and everything), but if you prefer it, you do get the option to leave it on a desk (it does have four silicone feet), but it will take a lot of space.
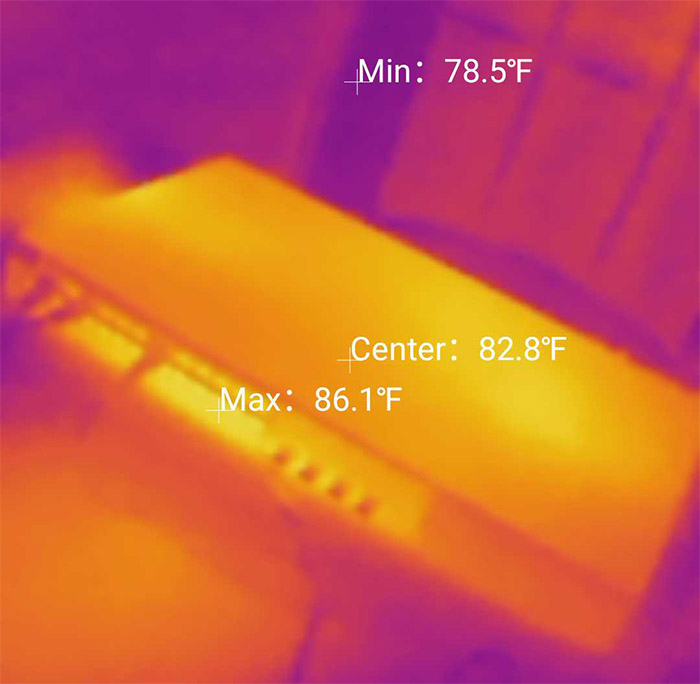
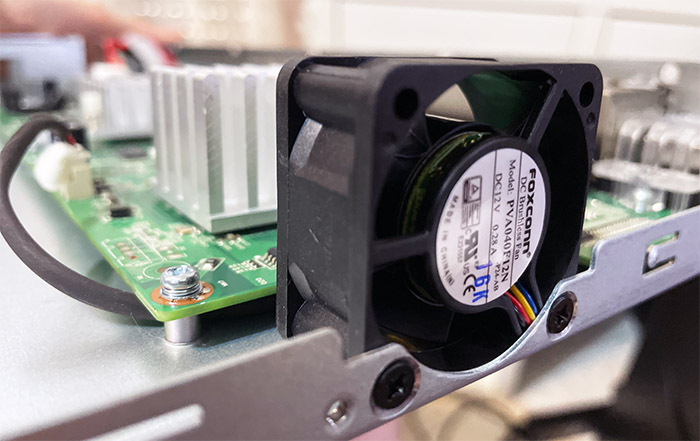
In terms of heat management, the FS S3910-24TS fares very well and that’s because it does rely on a fan to keep the temperature low. And yes, it is noisy, so a cabinet is a good choice, but you do have the option on replacing it with something like a Noctua fan – the switch does have rpm levels depending on how heavy the load is.
On the front panel, there’s the Reset button and the Console port – it’s worth mentioning that the device does have 8KV lighting protection.
Above these ports, there’s the Status, PWR1 and PWR2 LEDs and, to the right, there are 24 Gigabit Ethernet ports (none are PoE, unfortunately) followed by four 10Gbps SFP ports that are protected by black silicone covers. Each port has one LED which will show the type of connection (green means Gigabit, yellow means 10/100Mbps).
The other side of the switch is home to the two removable power supplies that are easy to replace even if the device is still running. After opening the case (which is a fairly straight-forward process), I saw that the FS S3910-24TS is equipped with a Broadcom B50282C1KFBG octal PHY, 512MB of RAM from Micron, 256MB of NAND memory from Micron (29F2G08ABAEA) and a Broadcom BCM56152A0KFSBLG switch chipset. Furthermore, the S3910-24TS features a switching capacity of 128Gbps.
Just like the Cisco switches, you can use a serial cable and use the Console port to configure the FS switch (the controls are also almost identical to Cisco), but you also get the possibility to use the GUI by accessing the IP address (the username/password combo is admin/admin).
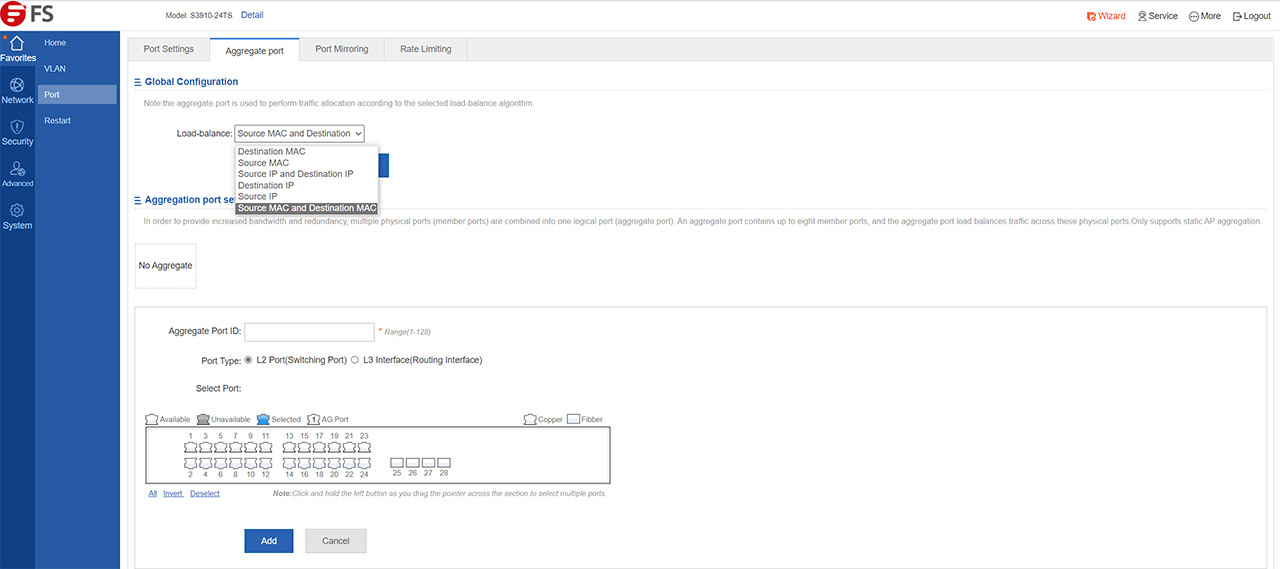
If you decide to go this route, there are a few particularities that you need to properly set up (you can find them in the full review). The user interface is easy to navigate and, while it may seem simple at first, there are a lot of options available.
There’s DHCP relay, eportal Authentication based on the selected ports, DHCP Snooping + IP Source Guard, Port isolation, STP + RDLP and more. As for the Layer 3 features, there’s OSFP and RIP and I also saw the option to enable DHCP.
Performance-wise, the FS S3910-24TS did really well and, as the IxNetwork benchmark showed, it has detected 0% frame loss when the frame size was between 64KB and 1,518KB, while the average aggregated latency is 3,700ns.
Note: The package contains the FS S3910-24TS L2+ unit, a Power cord, some mounting screws, some rack mount ears, four silicone feet and a Quick Guide – unfortunately, there is no serial cable inside the box, so you will have to purchase a separate one.
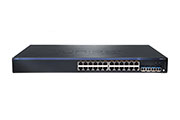
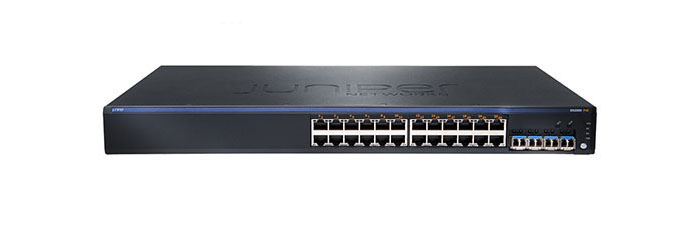
4. Juniper EX2200-24T-4G L3 Managed Ethernet Switch
![]()
Juniper Networks is an American manufacturer of networking products founded almost thirty years ago and which, in half a decade managed to challenge the Cisco dominance of the market and five years later, it became a multinational corporation which would heavily influence the networking world over the next two decades.
People usually associate the Juniper products with high quality, but, while the consumer market was not the main target (Juniper focuses more on the enterprise-type devices), the company got in the centre of attention a couple of years ago with the NSA scandal and because it has been found that backdoors were installed into its devices (the Dual_EC_DRBG weakness seems to have been removed afterwards).
That being said, Juniper Networks offers a large variety of routers and switches and I am going to focus on one of its more popular (and reasonably priced) Ethernet switch, the Juniper EX2200-24T-4G which is perfect for both small, entry-level companies and for any tech-enthusiasts that want to learn the sophisticated Junos operating system.
The EX2200-24T-4G follows the same design pattern as the other switches on the market (modularity is necessary for mounting the device on the rack), offering a rectangular metallic case, covered by a black matte finish, with the Juniper logo carved on the top and the only traces of color are on the front, in the form of a narrow dark-blue band and some light blue patches on top of the SFP ports. The EX2200-24T-4G is fairly large for a 24-port switch (measuring 17.5 x 1.75 x 10 inches and weighing 6 pounds) and, while I wouldn’t call it compact, it is reasonably sturdy and well-built. Juniper has kept the same dimensions for its 48-port variants of this switch, which, in turn, look a lot more compact.
The device can be positioned on a desk or shelf, but, because of its size, it is better to mount it on a rack (takes one rack unit – 1U), especially if it will be used in an business environment (office), where space is very important.
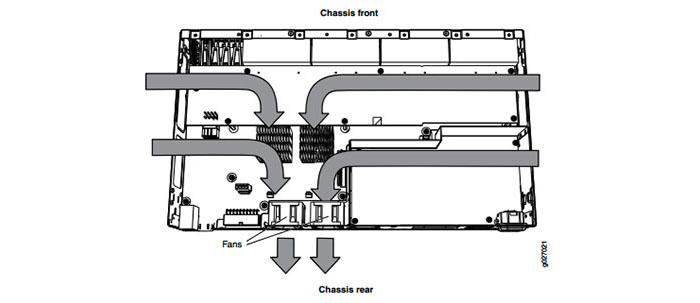
Since this is a managed switch, Juniper took some precautions into ensuring that the EX2200-24T won’t overheat: there are two zones with lots of vent holes on the left of the device and two on the right, while, on the rear side, you can find three exhaust openings, with two openings having fans behind them and the last one (the one on the right) is closed.
The PoE variant off the EX2200 will have the third opening exposed, for added airflow. The fans are advertised as having a low power consumption and as being silent (32.7 dB) – the fans aren’t completely silent and you can definitely hear them especially if you installed the switch near your working station, so that’s why I think it’s better to install such devices in a rack (if you’ve gone past the warranty, you can swap the fans for some quieter ones).
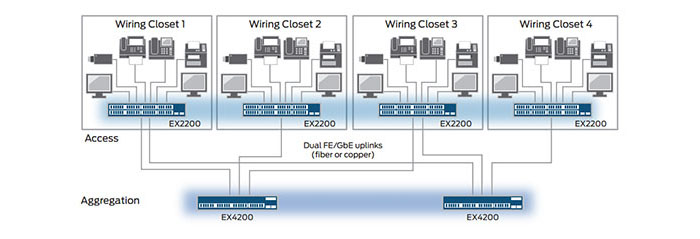
The front side of the EX2200-24T-4G is home to two sets of 12 10/100/1000BASE-T Gigabit Ethernet ports (each with two LEDs for Link/Activity and Status), four SFP uplink ports (which support 1-Gigabit SFP transceivers for fiber and copper connections. You can also configure these ports into Virtual Chassis ports in order to interconnect EX2200 switches in a Virtual Chassis.
Each SFP port has two LEDs (which indicate the Link/Activity and the Status of the specific port), two Chassis status LEDs – SYS and ALM, a Mode button (offers a simple interface for selecting LED modes and for bridging devices up) and four Port status mode LEDs.
On the rear side of the switch, there is a Management Ethernet port with Link/Activity and Status LEDs (the MGMT port uses an auto-sensing RJ-45 connector for connecting to a management device for OBM), a USB port, a Protective earthing terminal, a Console port (an RS-232 serial interface used to connect the switch to a PC or laptop for management purposes), an ESD point, the three air exhaust fans, a label with info about the device and an AC power cord inlet.
Inside the case, Juniper has equipped the EX2200-24T-4G with an 800 MHz ARM CPU (Feroceon 88FR131?), 512 MB of RAM and 1GB of flash memory (the switching engine model is Store and Forward). This way, the EX2200-24T-4G features a switching capacity of 56 Gbps and a forwarding rate of 42 Mpps.
There are two main methods in which this switch can be configured: by using the CLI (Command Line Interface) or by accessing the J-Web interface. The first method involves connecting a computer to the Console port on the switch via a DB-9 serial port adapter, wait for the Junos OS shell prompt root% and type ezsetup, enter the hostname (optional), the root password and select yes to enable Telnet and SSH. From here, you can select the management scenario, the SNMP parameters, the date and time and save (commit) the configuration.
To configure the switch using the J-Web interface, first requires you to press the Mode button for 10 seconds, connect the EX2200-24T-4G (the port 0) to a computer via an Ethernet cable and open a web browser in order to navigate to https://192.168.1.1. Next, you will be prompted to enter the user name (root), the password (leave blank) and, on the Basic Settings, enter the hostname (optional), the password and the time zone.
Afterwards, select the management scenario: can be In-band Management -Use VLAN default for management (configure all data interfaces as members of the default VLAN), In-band Management – Create new VLAN for management or Out-of-band Management – Configure management port (to configure only the management interface). The next step involves going to the Manage Access page to enable the Telnet, SSH and SNMP services and that’s it, you can now log into the J-Web interface (or by using CLI) to continue configuring the switch.
The UI first greets you with the Dashboard section, which, on the top side displays a graphical representation of the switch and underneath, you can see the System Information, the Health Status of the switch, the Capacity Utilization and the Alarms. Using the top menu, you can also visit the Configure section which opens a new set of option on the left: Interfaces (Ports and Link Aggregation), Switching (VLAN, Spanning Tree, IGMP Snooping, LLDP, RTG, RTG), Security (Filters, 802.1X, Port Security and Port Mirroring), Routing (Static Routing, RIP and Policies), Class of Service, System Properties, Services and CLI Tools.
Next, there the Monitor section which opens its new set of options: Interfaces, Events and Alarms, System View, Switching, Security, Routing, Class of Service and Services. You can also access the Maintain section, which includes the Files, the Config Management, the Software, Reboot and Customer Support and, lastly, there’s the Troubleshoot section.
Note 1: The maximum power consumption of the Juniper EX2200-24T-4G is 50 W.
Mark is a graduate in Computer Science, having gathered valuable experience over the years working in IT as a programmer. Mark is also the main tech writer for MBReviews.com, covering not only his passion, the networking devices, but also other cool electronic gadgets that you may find useful for your every day life.
The article is OK as a broad brush review, although for the life of me, I don’t see how most of these are claimed or reviewed to be rack mount with seeing holes to attach the un-supplied mounting ears.
The article is big enough as it is, so I can’t go into detail with every device, but I have individually reviewed lots of Ethernet switches already (especially the L2 managed ones), so check those articles out for an in-depth dive.
Have you considered the Open Mesh Cloud PoE+ Switches and new G200 Router/Switch? (I don’t work for Open Mesh.. just liked your reviews and have used older Open Mesh products) Thanks
well i read your article and i really like it,please write one article in cisco switches like
CVRQSFPSFP10G