
Lastly, it’s worth mentioning that the access point can work as a mesh node in a mesh network, so yes, it is possible to cover difficult areas with access points which will behave as a single entity, optimizing the paths and reorganizing the entire infrastructure in case a node fails or if a new node is added to the network.
To test the wireless performance of the EnGenius ECW220, I connected the access point to a PoE switch (TRENDnet TPE-LG80), which, in turn was connected to the router (an Asus RT-AX86U). Next, I connected a server computer to the Ethernet switch and I took a WiFi 6 client device (Intel AX200) that I connected it wirelessly to the 5GHz network (80MHz, OFDMA on).
This setup was needed because the ECW220 has a single Ethernet port.
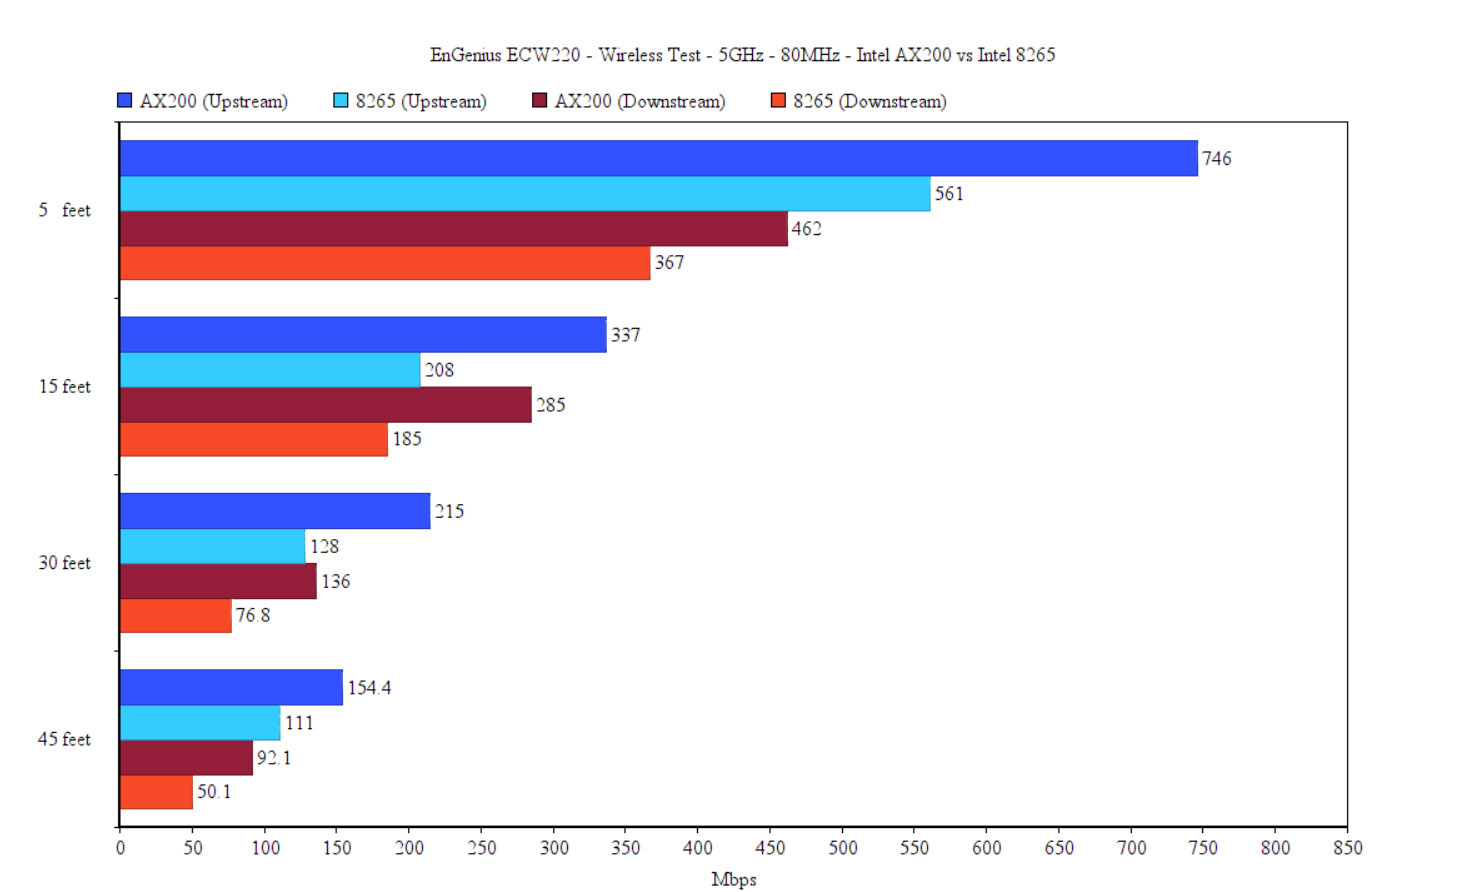
That being said, upstream, I saw an average of 746Mbps at 5 feet and an average of 337Mbps at 15 feet; going further away to 30 feet, I measured around 215Mbps and, at 45 feet, I saw an average of 154.4Mbps. Downstream, I measured an average of 462Mbps at 5 feet and an average of 92.1Mbps at 45 feet. Afterwards, I switched to the 2.4Ghz network (40MHz) and, upstream, I measured an average of 125Mbps at 5 feet and an average of 55.5Mbps at 45 feet.
Downstream, I saw an average of 110.6Mbps at 5 feet and an average of 33.9Mbps at 30 feet. On the next step, I connected a WiFi 5 client device (equipped with an Intel 8265 WiFi card) to the 5GHz network and, upstream, I saw an average of 561Mbps at 5 feet, while, at 15 feet, it declined to 208Mbps. At 45 feet, I saw an average of 111Mbps. Upstream, the access point delivered an average of 367Mbps at 5 feet and an average of 50.1Mbps at 45 feet.
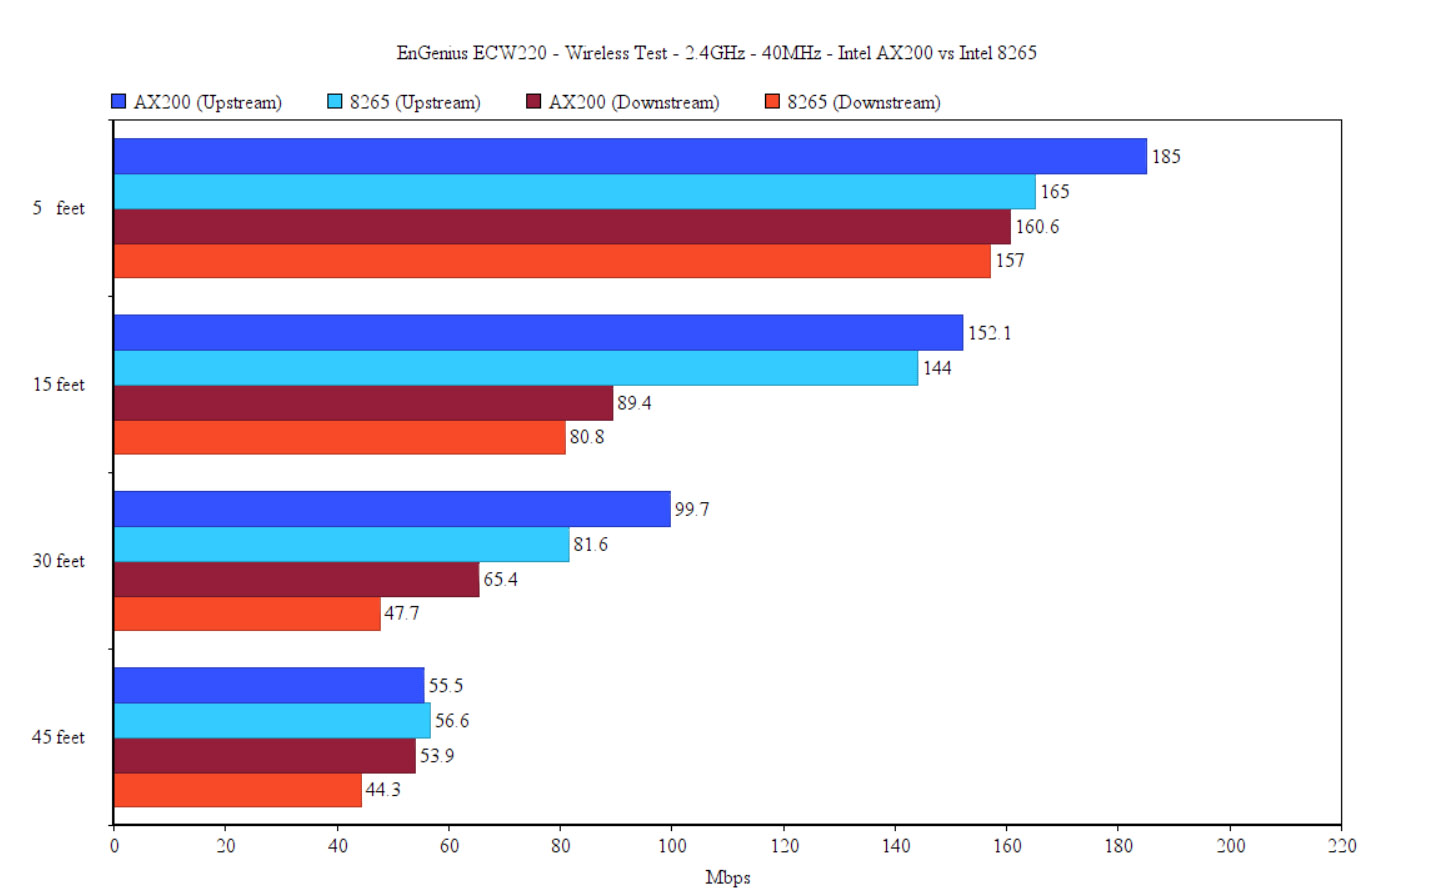
Lastly, I connected the client device to the 2.4GHz network and, upstream, I saw an average of 165Mbps at 5 feet and an average of 56.6Mbps at 45 feet.
Upstream, I measured an average of 157Mbps at 5 feet and an average of 24.3Mbps at 45 feet. Since there is a single Ethernet port, it means I can’t test the LAN to LAN performance and, considering that it’s a ceiling-mounted access point, the EnGenius ECW220 does not have a USB port – this means no storage performance test either.
Setup and Software
After connecting the EnGenius ECW220 to a power source, either PoE or using a power adapter (as well as an Ethernet cable to your router), you should be able to log into the standalone web-based utility to check the status of the network and to perform some minimum configuration changes. But, be aware that this is not a hybrid access point, so the expected features are going to be found in the Cloud platform. In any case, if you still want to at least check the standalone GUI, check out the IP address that the ECW220 received from the router (from the router interface) and enter that address in the URL bar.

You will be asked to insert the username and password which are admin and admin and then, after changing the password, you will be able to roam the interface. The first window is the Device Status which will show various info about the access point and the status of the connection. Next, there’s the Local Setting where you can set a Static IP, enable STP, perform a basic VLAN configuration or enable the HTTP/HTTPS proxy.
Of course, the reason you purchased this device (or intend to) is the Cloud management platform and, to adopt the ECW220, you first need to go to cloud.engenius.ai/ezm/dashboard and either log into an existing account (as I did) or create a new account. Afterwards, you can create an Organization and Network, if you don’t want to add the AP to an existing one.
After that’s done, head over to the Organization > Inventory and License and click on Register Device. At this point, you have two choices, either enter the Serial Number manually or download the mobile app and add the device there. I chose the former and, after registering the EnGenius ECW220, I selected it and clicked on Assign Device to Network. That’s it, the access point is now a part of your network, so it’s possible to start configuring it. Since we’re dealing with a Cloud AP, you should be able to change the settings that are only related to the ECW220 or you can push the general, already set configuration that is available for all newly added access points. To check this config, go to Configure and select SSID.
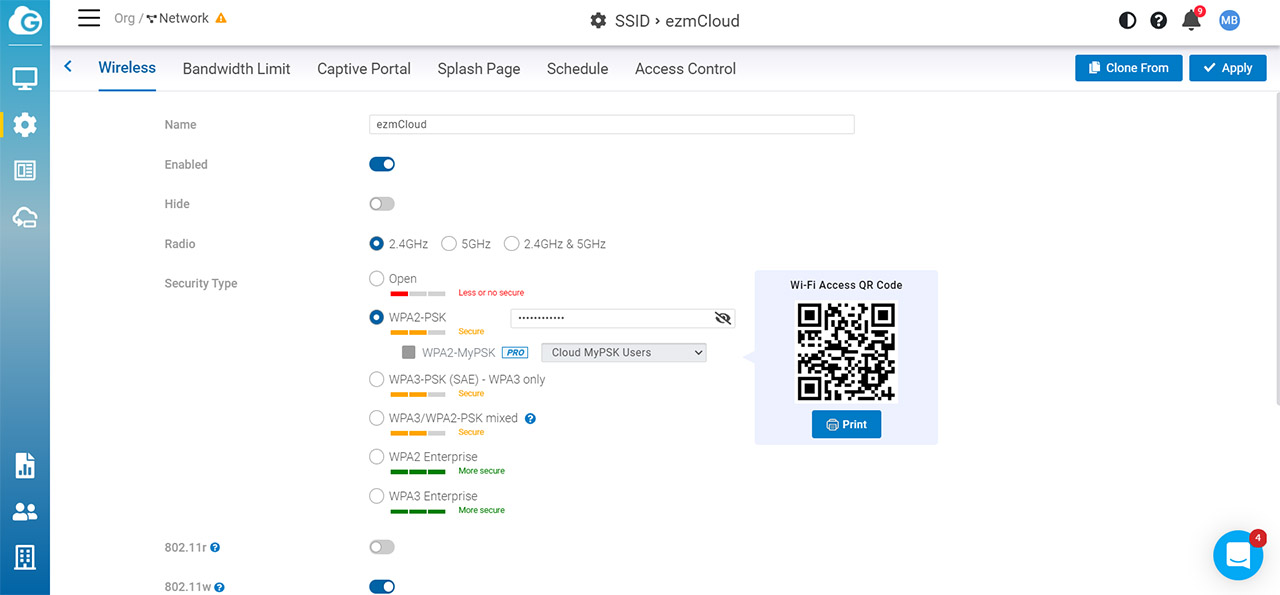
Here, you can create new SSIDs and set the radio, the security, set the VLAN, enable L2 isolation, band steering and more. Additionally, you can configure the Bandwidth Limit (a type of QoS with presets depending on the type of application), enable the Captive Portal and the Splash Page (the type of authentication: includes EnGenius Authentication, RADIUS, Voucher, Social Login, Facebook and Google authentications), set Schedules access or set Policy Block List and VIP List. Besides the SSID, you should go to the Radio Settings and here, you have the option to create Indoor and Outdoor WiFi profiles: set the channel, the TX power, the client limit, the mesh, the client balancing and more.
These settings can be applied to any newly added access point, but it does not happen by default, you will need to go to Manage > Access Points, identify the ECW220 and then click on Details. This, way, you will be taken to the dedicated page of the AP, where you can enable the set SSIDs from under Summary. On this page, you are also able to see various status info, some Realtime Meters, enable Mesh, set the IP assignment, as well as check the connected Clients. EnGenius has also made available a mobile application where you can access the Cloud platform and it has a similar layout to the web-based utility, the Dashboard showing the network map, the devices that are adopted on the platform, the Throughput and more.
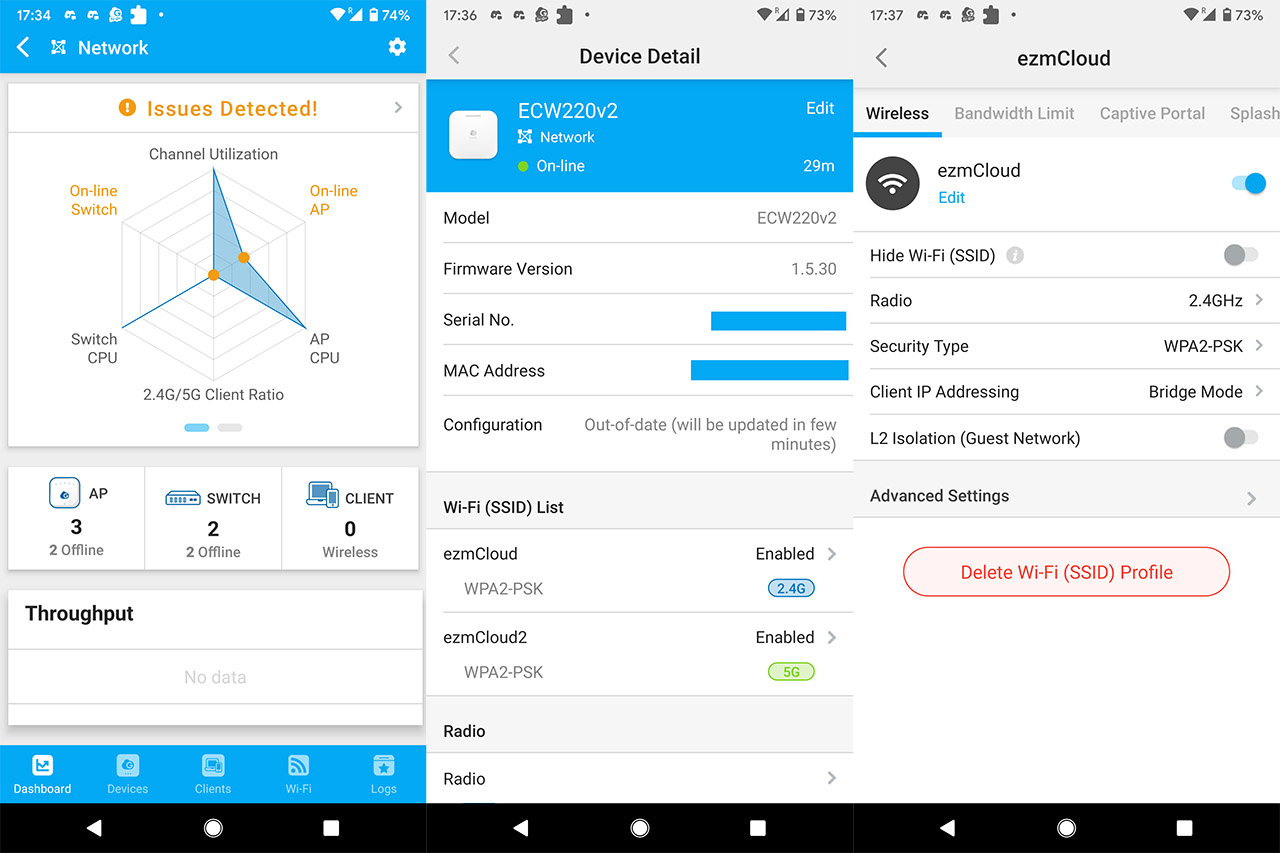
Under Devices, you can find the EnGenius ECW220 and, by clicking on it, you will be taken to essentially the same dedicated page as you would on the web-based GUI. Lastly, you also get the option to configure the general settings that can be pushed towards more than one connected EnGenius devices. So, overall, the app is very versatile and offers a very similar package of features as the web-based GUI, so it’s a great way to monitor and configure the network when you don’t have access to a larger terminal.
Conclusion
Despite being less equipped than the ECW230, the EnGenius ECW220 is a very good option for both SMBs and the home users that may want to try something different than the regular consumer-focused hardware. The access point is smaller and more compact, while also retaining everything that made the ECW230 one of the best designed access points out there. The experience with the Cloud platform is just as great and yes, the wireless performance is going to be a bit less impressive, but the ECW220 still behaves well enough with both WiFi 5 and WiFi 6 client devices. So, without a doubt, it’s worth taking into consideration if you’re in the market for this type of device.
EnGenius ECW220
-
Pros
- Very compact
- Elegant design
- Can be monitored and configured using the EnGenius Cloud management platform
- Supports PoE and it's more power effective than the ECW230
- Decent wireless performance with both WiFi 5 and WiFi 6 client devices
Cons
- No cables inside the package (yes, not even an Ethernet cable)
- 80MHz channel bandwidth limitation
Mark is a graduate in Computer Science, having gathered valuable experience over the years working in IT as a programmer. Mark is also the main tech writer for MBReviews.com, covering not only his passion, the networking devices, but also other cool electronic gadgets that you may find useful for your every day life.