
The ZimaBlade is the second generation of SBCs released by IceWhale Technology and, at first glance, it seems to be a closer to bare-bones solution of the ZimaBoard SBCs, but it’s not just a stripped version of an 832, there are some notable improvements. And there are also some strange decisions which could potentially be a deal breaker.
| ZimaBlade | |
|---|---|
| Zimaboard.com | Check Product |
| CrowdSupply.com | Check Product |
The new ZimaBlade comes in two versions, there’s the dual-core 3760 and the quad-core 7700, the former being advertised to carry a price tag of $64 (at the moment of writing), so it does seem to be a veritable competitor to the Raspberry Pi boards which unfortunately, have gotten more difficult to acquire and more expensive.
I got the quad-core version and it’s an Intel J3455 processor which takes us to that whole potential deal-breaker thing. The Apollo Lake CPUs are old and the manufacturer has already stopped offering servicing updates just a months days ago, so the platform is a bit outdated. Will that have an impact on the way the device will function? Most likely not, but you know, in case it needs security updates due to some obscure vulnerability, it’s not going to receive it from Intel.
Moving forward, we see that the ZimaBlade does not have built-in RAM, but it does support expansion of up to 16GB (DDR3L) and there are quite a few expansions available at extra cost, including RAM, SATA, as well as multi-Gigabit PCIe cards. The operating system remains CasaOS which is built especially for NAS purposes, but it will work fine with other applications (including Docker). I have tested the ZimaBoard 832 a few months ago and I was impressed by its performance and form factor, so let’s put the ZimaBlade to the test and see if it’s a worthy alternative to a dedicated NAS and if it manages to be better than Raspberry Pi for a multitude of other applications.
The Design and Build Quality
The ZimaBoard 832 had a metallic housing which had the role of dissipating the internal heat and, while it may not seem so, the ZimaBlade follows the same approach.
The SBC does come with a see-through case and the frame seems to be made of plastic, but it’s just for looks because the plastic can be easily removed, exposing the metallic case. It has a ribbed pattern on one side and it does dissipate the heat away without relying on a fan (passive cooling). The unit measures 4.2 x 3.1 x 0.9 inches (10.7 x 8.0 x 2.3cm) which makes it a bit smaller than the ZimaBoard and pretty much the same size as a Raspberry Pi 4.
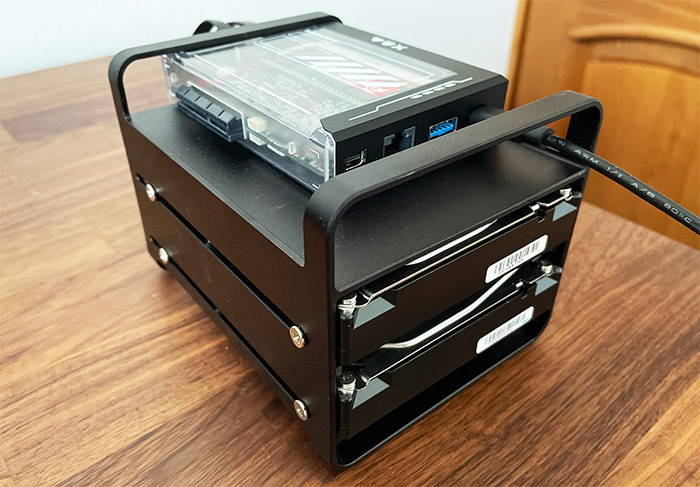
If you decide to get the NAS kit which includes some cables and 16GB of RAM, you also get a metallic storage stand where you can insert a couple of HDDs, leaving the compact ZimaBlade at the top. The idea is that the SBC will not occupy much space regardless where you decide to place it. I also saw that there are four silicone feet to keep the unit in place which is a good addition considering that the ZimaBoard 832 lacked them and it was moving around after attaching modules and cables. As for the ports and connectors, you will immediately notice the PCIe slot and we’re dealing with PCIe 2.0 x4, the same as on the ZimaBoard 832.
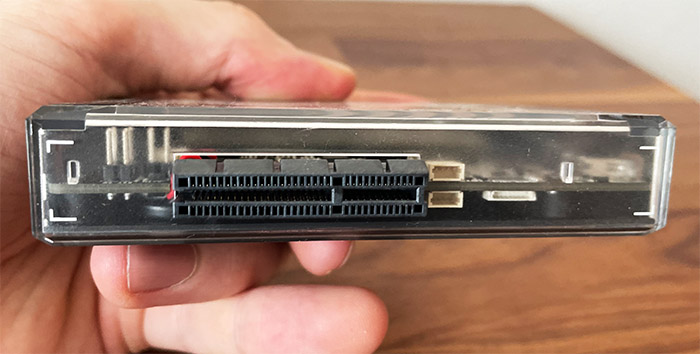
Seeing the type of PCIe, I am curious how it will perform with a multi-Gigabit Ethernet connection – we will see in the following sections. I’m also curious if it will work with external GPUs, especially seeing that the 832 could handle a GT710 – most likely the ZimaBlade will handle it as well. Since I mentioned the ZimaBoard, I noticed that the PCIe is positioned in a similar manner, so you will have to take the plate out of any extension device if you want it to fit onto the device.
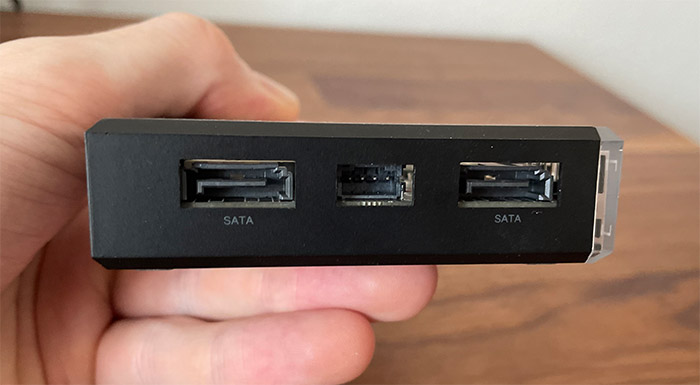
Remaining on the frame of the ZimaBlade, we could find the dual-SATA 3.0 connectors that can go up to 6GBps and on the opposite side of the board, we can see the USB-C connector that can be used for charging up the unit. And I noticed that the provided power supply can go up to 36W, but the advertised charger is 45W. so I am pretty sure it can go higher. This way, it should handle a couple of HDDs and a few lighter accessories, so I am curious whether the ZimaBlade can handle a higher output charger – we will see that in testing as well.
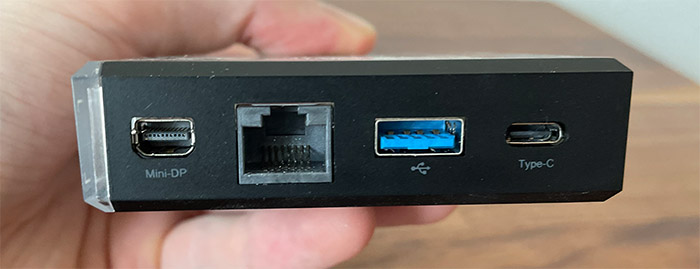
But the problem goes a bit deeper because the charger is 12V-only and does not negotiate for lower voltages. And yes, this means that you will fry most of your other USB-C devices if you mistakenly connect this adapter to them. I would go as far as replacing this adapter altogether, making sure that it is always out of reach for anyone in the house. Next to the USB-C port, there is a USB-A 3.0 port, a Gigabit LAN port (while the ZimaBoard 832 had two Gigabit Ethernet ports) and a Mini-DP 1.2 port for connecting a monitor.
The last mentioned one supports 4K at 60Hz and I think it is very much possible since even the ZimaBoard 832 could stream video to a 4K TV at full resolution. Although there is no external LED, the top is transparent and you will be able to see the red LED which shines through immediately after powering up the device.
The Internal Hardware + Benchmarks
The ZimaBlade 7700 is the better equipped version and it comes with a quad-core Intel Celeron J3455 processor (can go up to 2.2GHz). The ZimaBoard 832 came with a quad-core N3450 and, while the J3455 is a tiny bit better in overall performance, both of these CPUs are from the same Apollo Lake series. This means that both of them reached ESU/EOSL a few months ago, so neither will see updates from Intel.
Additionally, Intel had to revise this specific chip due to LPC and RTC issues which lead to a very short processor life, so I would have been relieved if the manufacturer went with a J3455E chip instead. In any case, Intel was vague about how the CPU was impacted, but we can’t deny that some QNAP and Synology NAS devices did indeed fail due to this specific issue.
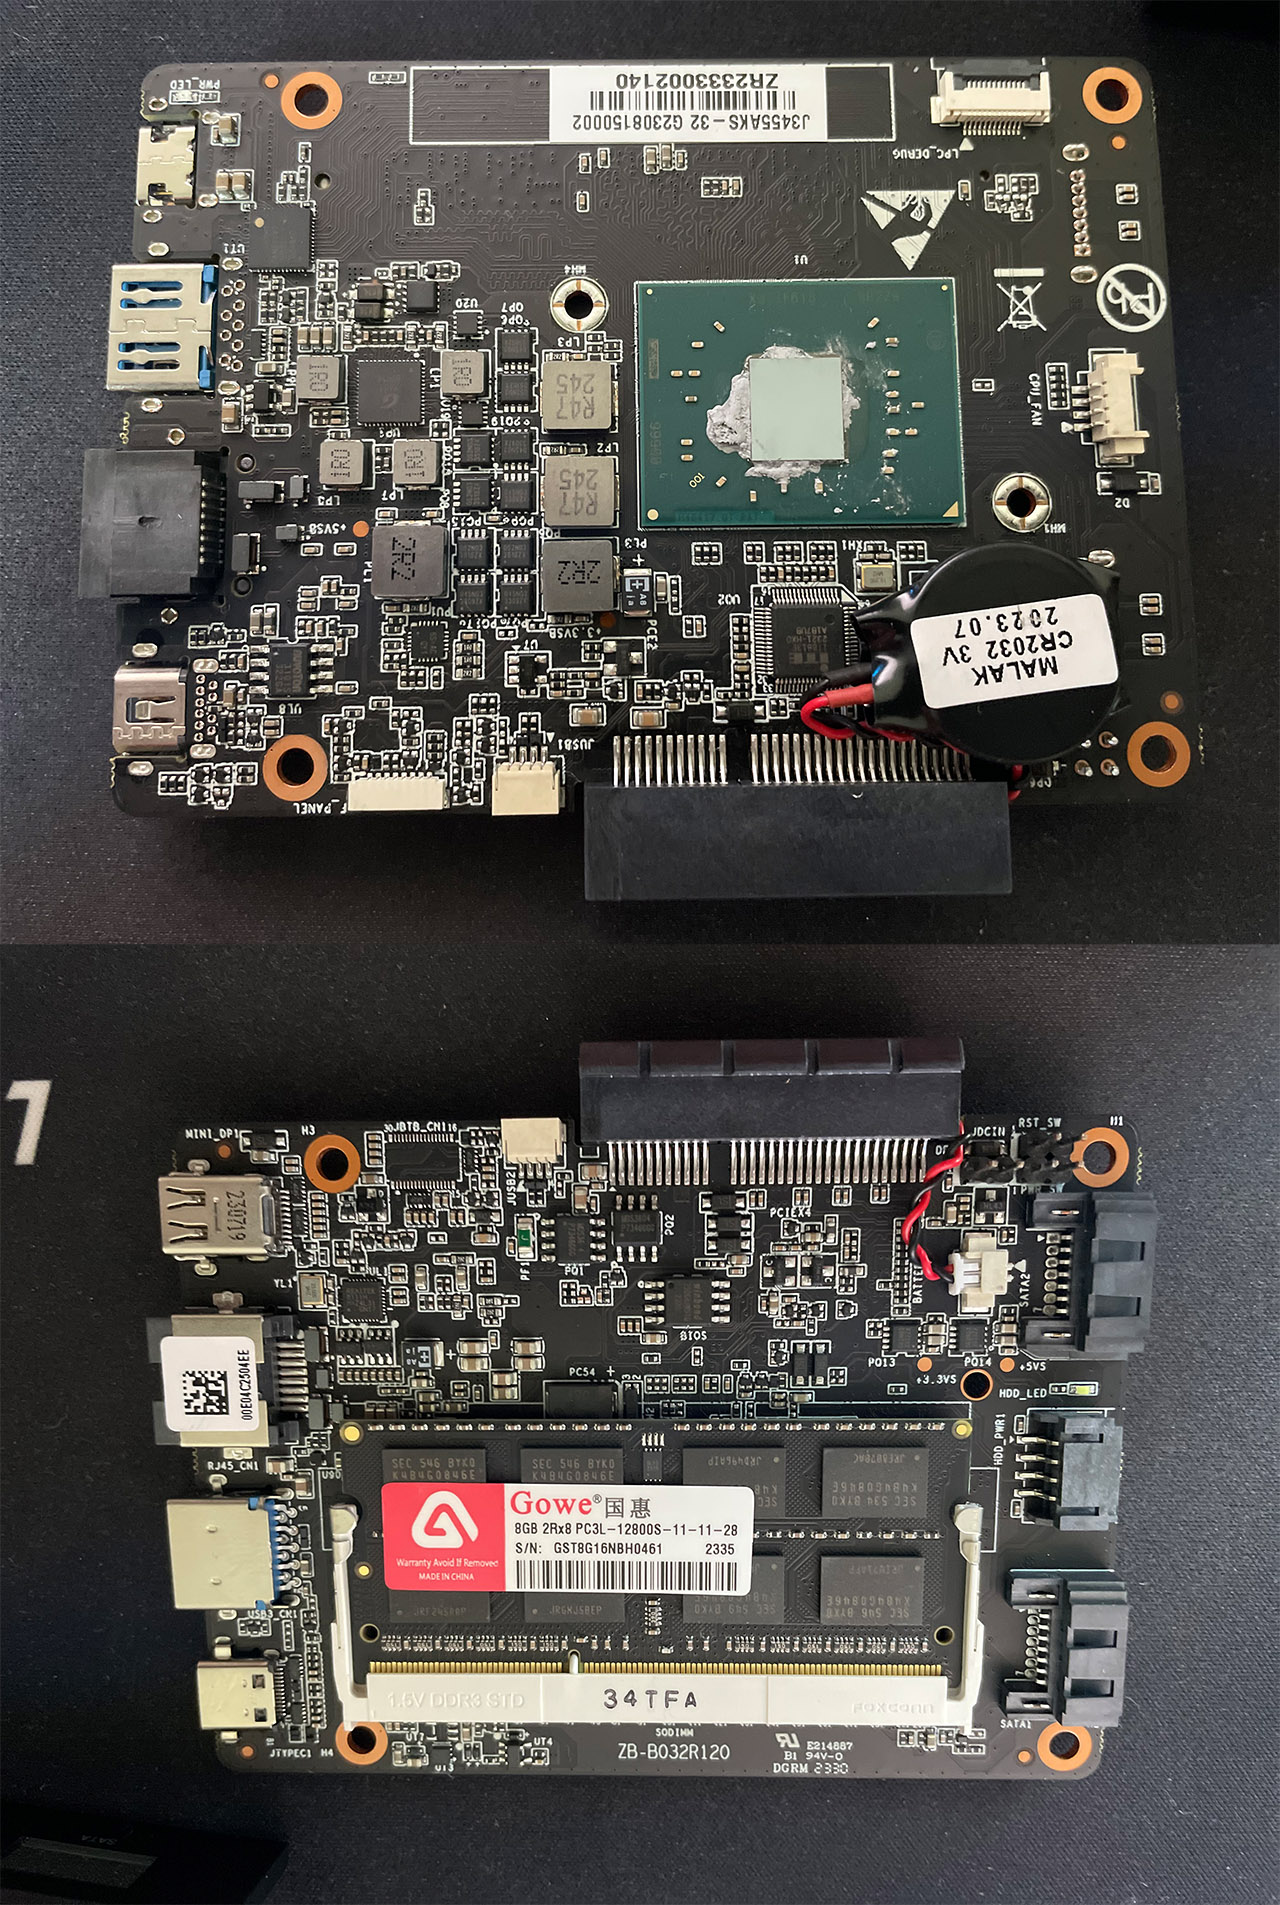
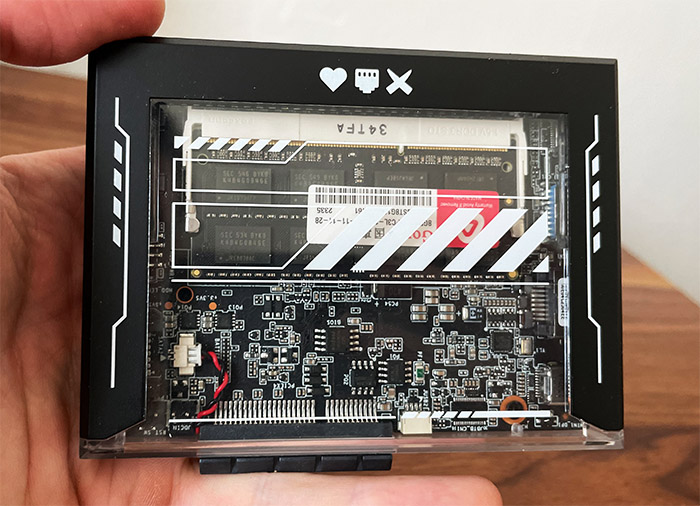
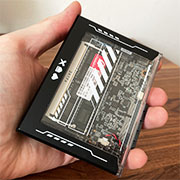
Moving forward, I was able to identify the SlimPort ANX7447 USB Type-C Cosspoint Switch, 8MB of NOR flash from Winbond (25Q64JWSIQ), the Realtek RTL8111H Gigabit Ethernet controller and there is also 32GB eMMC storage. I have added an 8GB of RAM stick, but it is possible to add up to 16GB of DDR3L RAM. With that out of the way, I had to see how well the ZimaBlade performs, so I ran a few synthetic benchmarks to get a better idea.
I saw that IceWhale has published some results that they got running GeekBench 4, so I decided to run my own instance using GeekBench 6. And the results were vastly different, but you shouldn’t compare them across different benchmark generations. The single-core score was 295, while the multi-core score was 891. You can see the full results here.
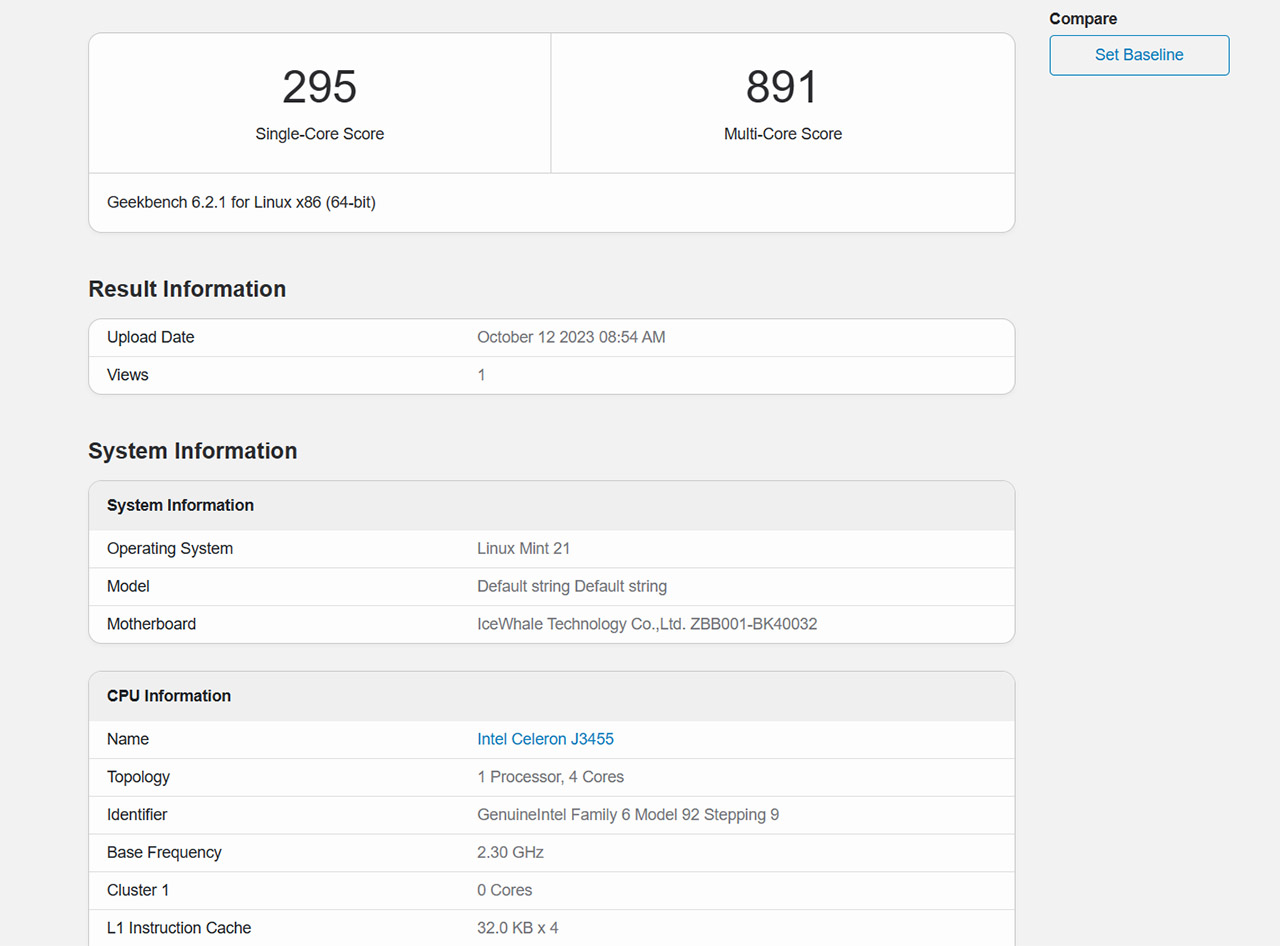
If I were to compare the single-core result, it would be the same as AMD Athlon II X4 630 and very close to a quad-core AMD A8-3820. As for the multi-core result, it’s very close to the dual-core Intel Core i5-2450M and not that far behind the aforementioned A8-3820. If you read the ZimaBoard 832 review, you know that the GeekBench 6 would not run due to thermal throttling, so it’s nice to see that the ZimaBlade is better in terms of thermal management.
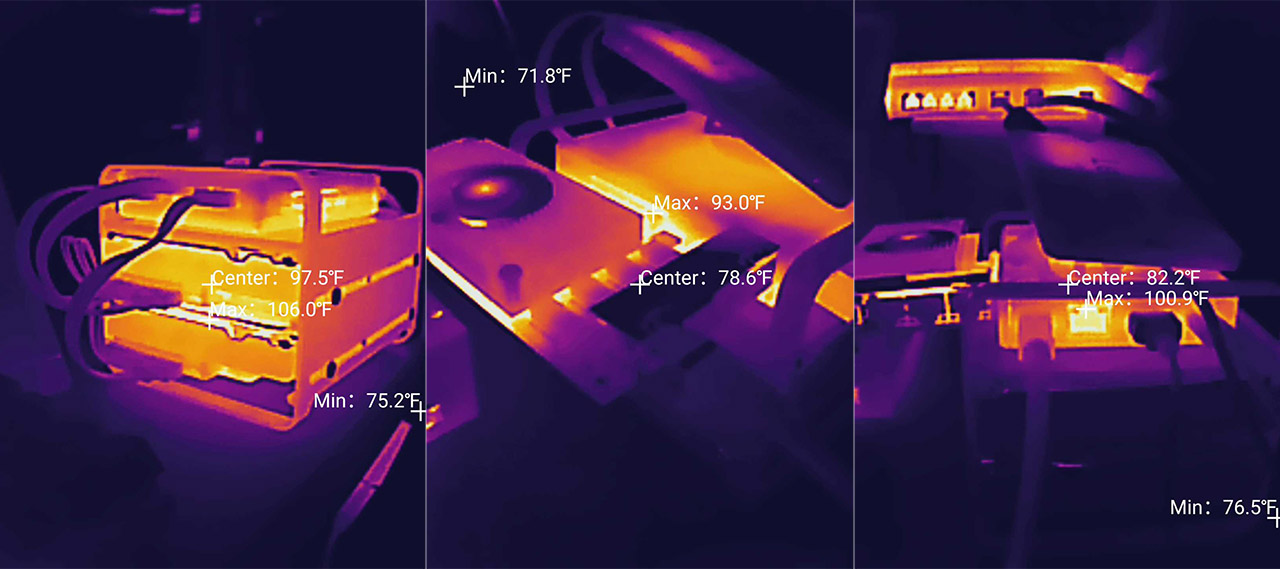
I added a couple of photos to get a better idea about how hot the device can get under load.
Moving forward, I ran the Linpack Extreme and, at 10,000 LDA, we got an average of 13.4 GFlops which is alright considering the hardware behind the ZimaBlade. I also decided to run the Unigine Super benchmark from the Phoronix Test Suite (same as when I tested the ZimaBoard 832). And yes, it’s a GPU test, so did the Intel HD 500 APL 2 do better than on the 832?
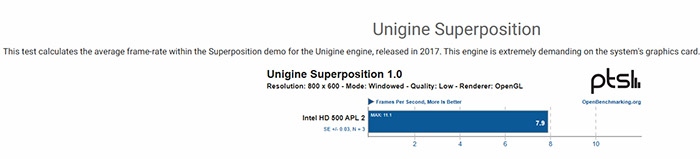
While keeping the resolution to 800x600p and the details to Low, we see that the average FPS while running this benchmark was 7.9FPS. So, gaming is out of the question if you want to use the built-in GPU. That wont’s stop me running some games from Steam, but I don’t really expect spectacular results.
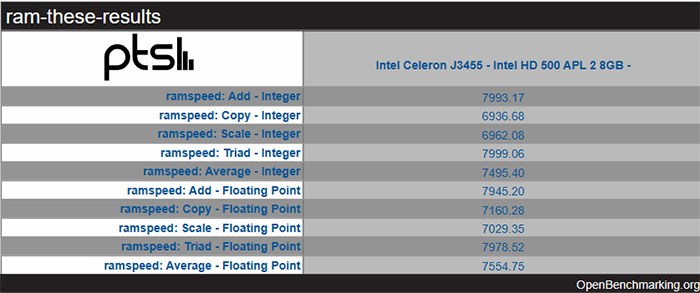
The last synthetic benchmark is still from the Phoronix suite and it’s the ramspeed: you guessed it, it tests the RAM performance. Running the Integer benchmark (Add, Copy, Scale and Triad), we get an average of 7495.4MBps. The Floating Point tests revealed an average of 7554.75MBps.
The CasaOS
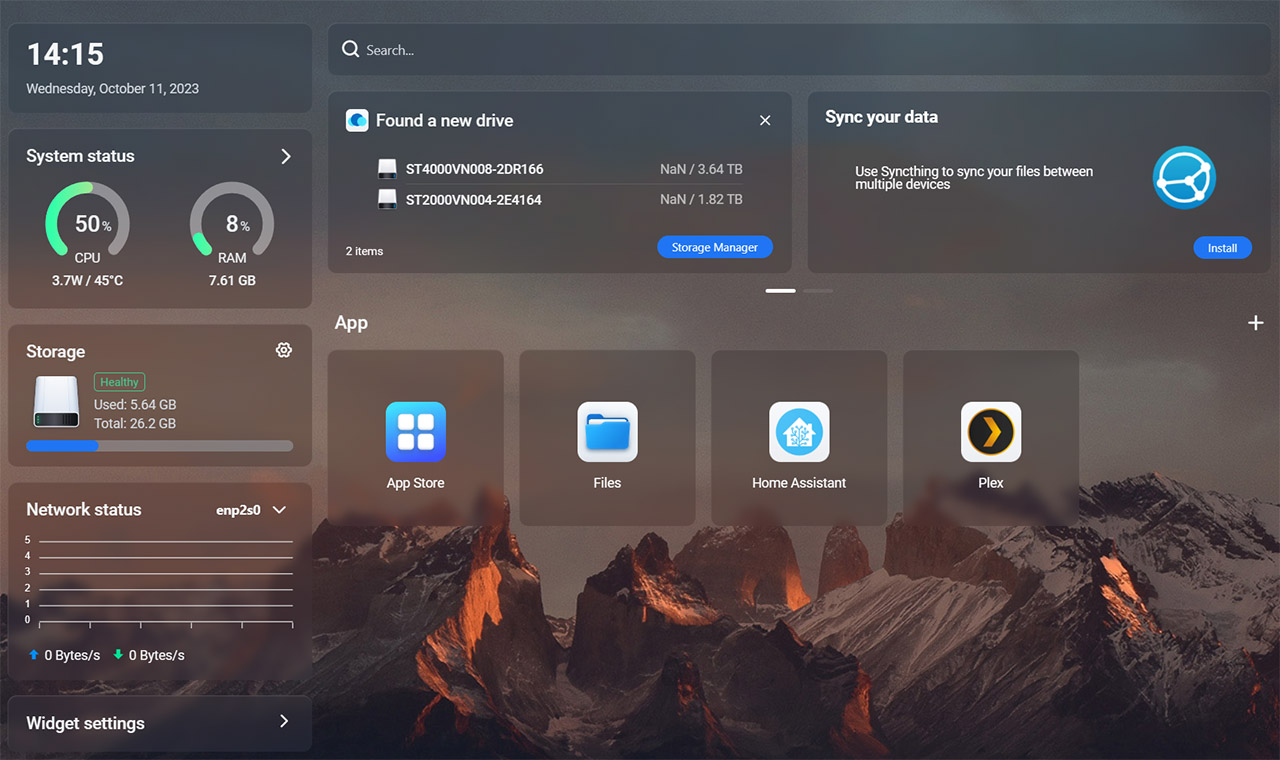
Just like the ZimaBoard, the ZimaBlade SBCs come with CasaOS already installed but, after connecting a monitor and a keyboard, I noticed that the system booted Debian GNU – I could log in (casaos for both username and password) and use the console. To gain access to the GUI, I simply entered the IP address that was given to the ZimaBlade by the router in a browser from a computer connected to the local network. The CasaOS will immediately ask to create an account (name / password) and then I gained access to the dashboard. And, it’s pretty much the same as it was when I tested the ZimaBoard 832.
We get to see the status of the RAM and CPU (including the power that’s drawn by the processor), the Storage and Network status, and at the moment, it’s still not possible to use WiFi adapters to connect to the local network. As before, I tried an Asus and a TP-Link PCIe adapter and neither was detected by CasaOS – they did work with Linux Mint, as we well later see. The Syncthing app is the main suggestion on the Dashboard and it’s a useful app for syncing data between multiple devices – just be aware that it’s not going to work as a back-up tool.
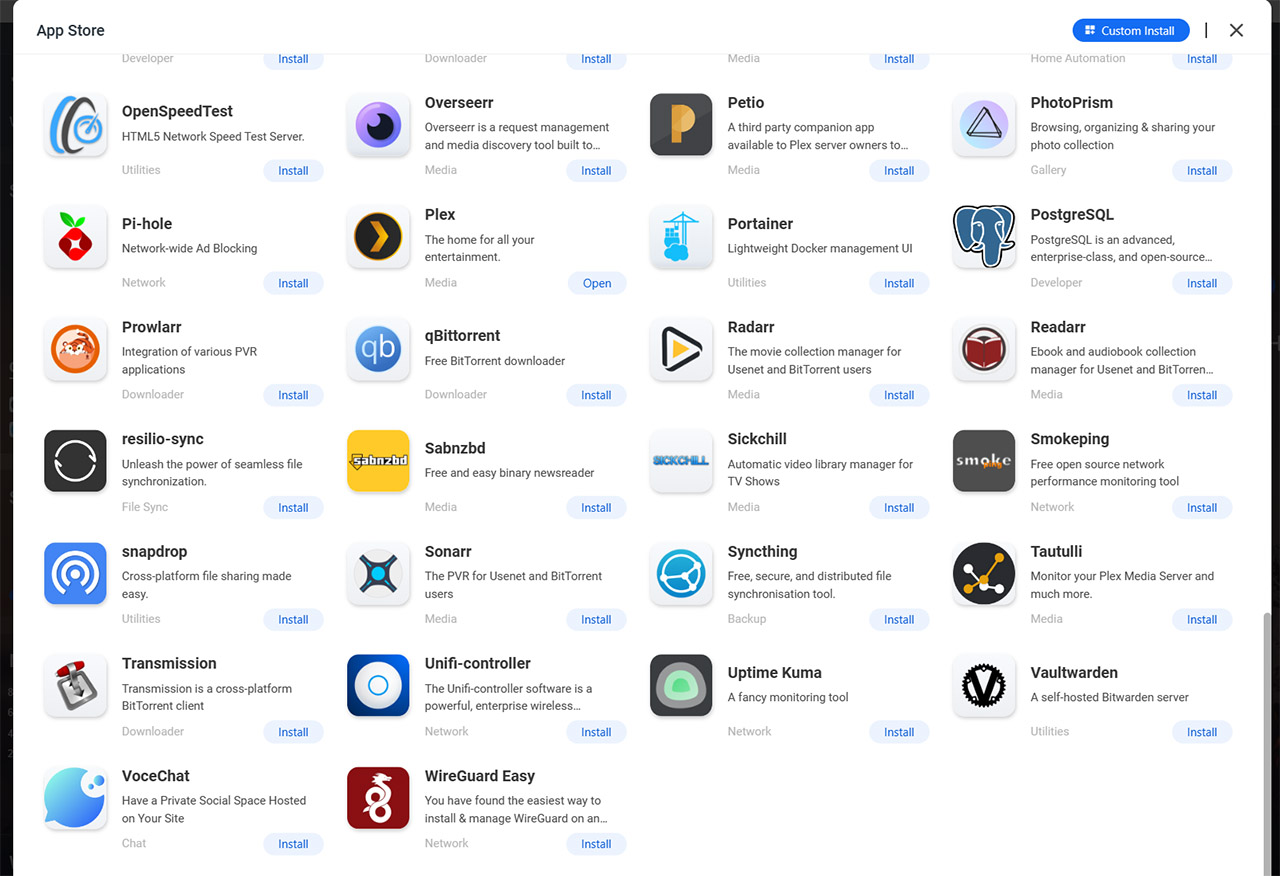
I noticed that the ‘Smarten up your home’ section was still just a mere promise, but the Home Assistant option always remains open. And the App Store does include it. This takes us to the actual nature of the CasaOS – it is using Docker to allow the installation of various applications, while ensuring the correct communication between them. I have played a bit with Docker when I had to install HA on a Seeed Mini and it seems that the concept is very similar, although much more simplified.
Installing Home Assistant was just a matter of clicking on a button and it seems that the App Store is much more populated than it was a year ago. We still have the AdGuard Home, 2FAuth, JellyFin, qBittorrent, piHole, the UniFi controller and PhotoPrism, but there are a lot of other new apps, too many to list here. I am going to mention a few curious ones, such as the open-source Chatbot UI and the ChatGPT Next Web, the tunneling daemon Cloudflared, Duplicati for encrypted backups, emulatorjs, Plex and Vaultwarden for self hosting a Bitwarden server. When I tested the ZimaBoard 832, some apps have been removed and replaced by others, but it seems that since then, the App Store not only remained consistent, but it got better.
I know that some of you were interested on how Home Assistant and Plex worked in the CasaOS environment. The Home Assistant behaves the same as when it’s run in a Docker system (I dedicated an entire article here: https://www.mbreviews.com/how-to-home-assistant-seeed-mini-router/#install) and for Plex I wrote a separate section, so see it below. The Files section will let you access the inner folders of CasaOS (including Documents, Downloads, Gallery and Media), plus you get to add new local storage, including the option to connect to Google Drive, Dropbox and OneDrive.
Working with Plex
Setting up Plex on CasaOS is the same as on any other platform – either create an account or sign into an existing one, add folders to the Library and connect to your video subscriptions (and/or torrents). I was curious whether the ZimaBlade would handle 2K videos, so I added one to the ZimaBlade, later being detected by Plex.
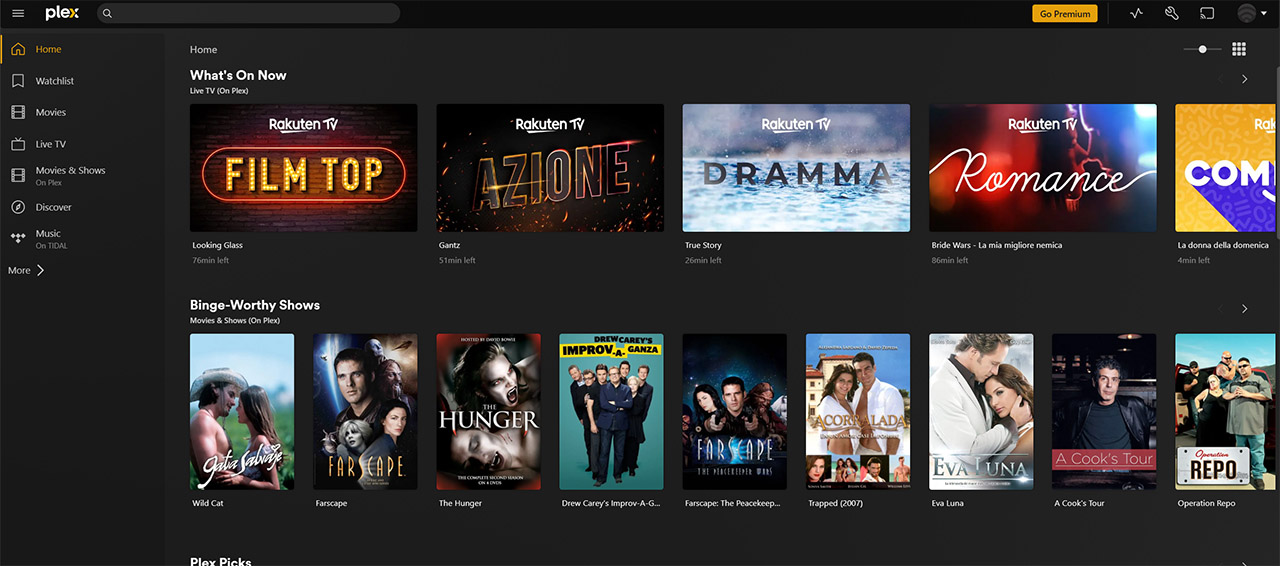
I pressed on play and it took 3-4 seconds until it started, but then it worked flawlessly. Depending on the video, it may buffer from time to time, especially with 4K videos, but after refreshing the page, it usually works fine for many hours at a time.
The ZimaBlade as a NAS
We got that nice metallic chassis, so it would have been a shame not to put it to good use. So, I took a couple of HDDs, one 2TB Seagate Ironwolf HDD and a 4TB Seagate Ironwolf HDD (same that I used when testing the TerraMaster Clone D2) and attached them to the chassis, an easy process: just rotate the screws on the side of the HDDs. Then, use a SATA Y-cable (there should be one provided in the package if you got the correct kit) and connect the HDDs to the ZimaBlade.
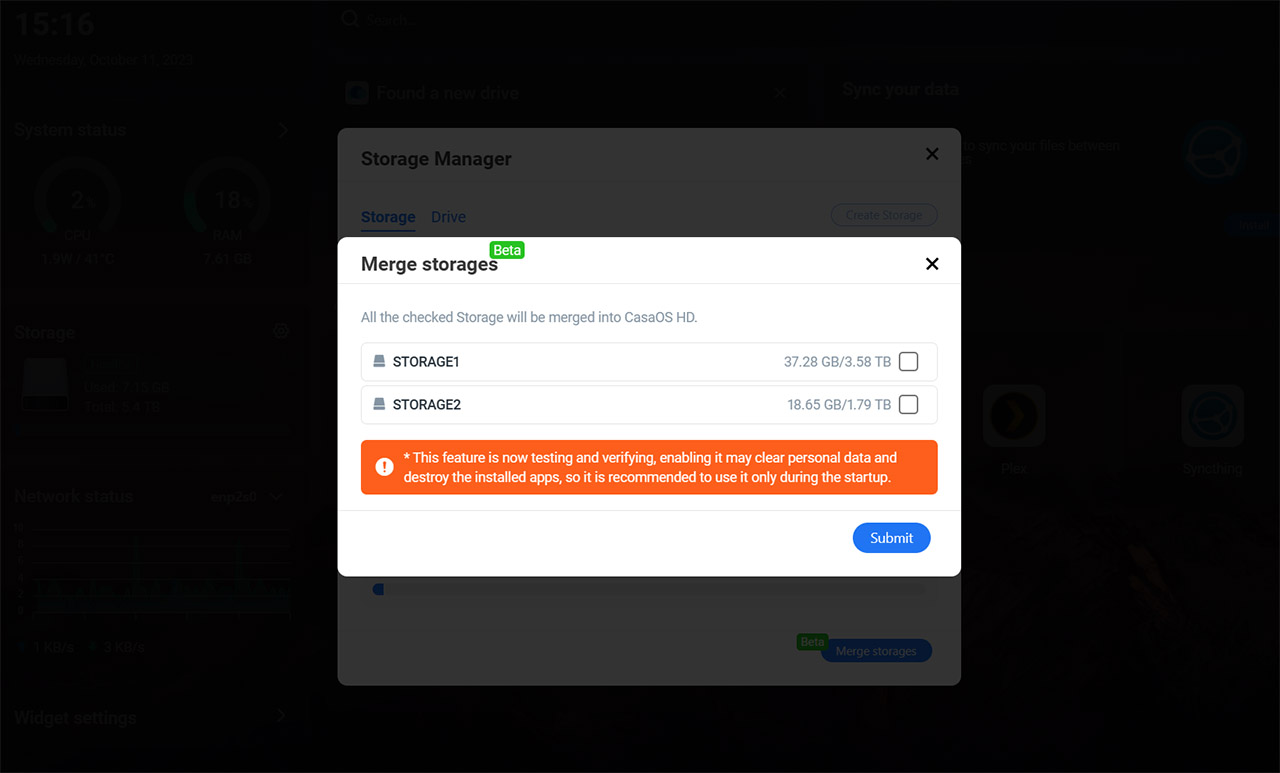
I logged into the CasaOS and indeed, the two HDDs storage drives were detected and ready to be used. You can see that the drives can be mounted (or formatted and mounted) and then, even if it’s in Beta mode, you can merge drives together. After that, we can use Duplicati and Synthing to help create that ‘data back-up on a NAS feeling’ and, for media servers, there’s Plex and other apps (check the Store for an updated list).
Gaming on ZimaBlade
Even if the ZimaBlade is mainly advertised as an alternative to the dedicated NAS systems, the point of this device is flexibility and you bet I am going to run games on it. I quickly installed Linux Mint on a 256GB SSD from Lexar (weirdly cheap nowadays) – how else did you think I ran all those benchmarks? Then, I also installed Steam and the first thing I wanted to do was run Elden Ring, but I was surprised to see that I could not install it. I mean, I could always just run Tomb Raider, again.. NO! I will run Elden Ring! So, I made sure to set the Enable Steam Play for other titles to on and installed the game.
It still didn’t work – it launched, but I guess the GPU was just ‘too powerful’ to run such titles. Dammit. Back to Tomb Raider we go.
We continue where we left off after testing the ZimaBoard, so the environment is more challenging, having to render a large open-space area (at 1080p). But I suppose it’s playable, with some occasional falls in FPS, but the hardware can run it, while it did fail to load Elden Ring altogether. Can you add a discrete GPU to make things better? Although I had higher hopes when I tested the ZimaBoard, they were a bit unfounded because the PCIe limitations are very much relevant. Sure, you can add a discrete GPU, but it needs to support 2.0 x4 lanes. I had a GTX 560ti available which is 12 years old and even this GPU needed more.
Multi-Gigabit Performance
I know that you wanted to see how well the 10Gbps connection would work with the ZimaBlade, but at the moment, I only have the proper equipment to see if the ZimaBlade can keep up with a 2.5GbE connection.
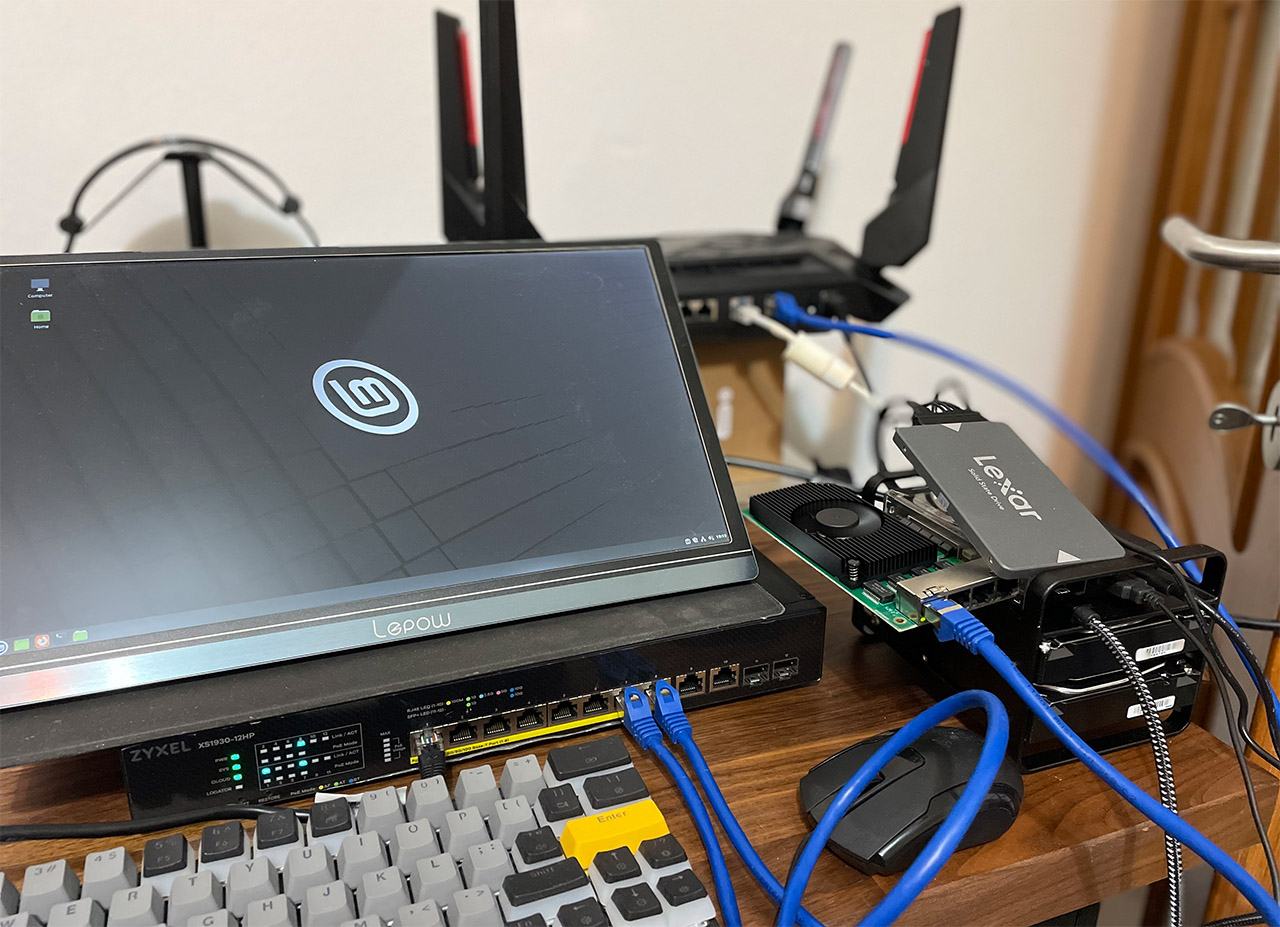
So, I attached the 4x 2.5GbE PCIe module to the side of the device and I used a multi-Gigabit switch as the central point for our connections (the eternal Zyxel XS1930 which can also show that we indeed get 2.5GbE connections from the client, the server and the router). The router is an ASUS GT-AX6000 and the server is a Desktop PC with a built-in 2.5GbE Ethernet port.
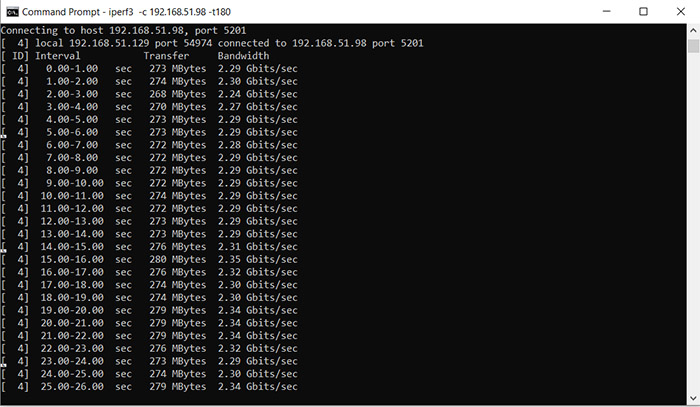
Having said, that, I ran a few iperf instances, up and down, and the results were good. Upstream, the ZimaBlade managed to go up to an average of 2.34Gbps, while downstream we see a similar result, 2.3Gbps. We didn’t reach the 2.5Gbps due to some overhead, but the ZimaBlade has proven that it can handle such type of connection. Hopefully in the future I will have the necessary hardware to check a 10Gbps connection as well.
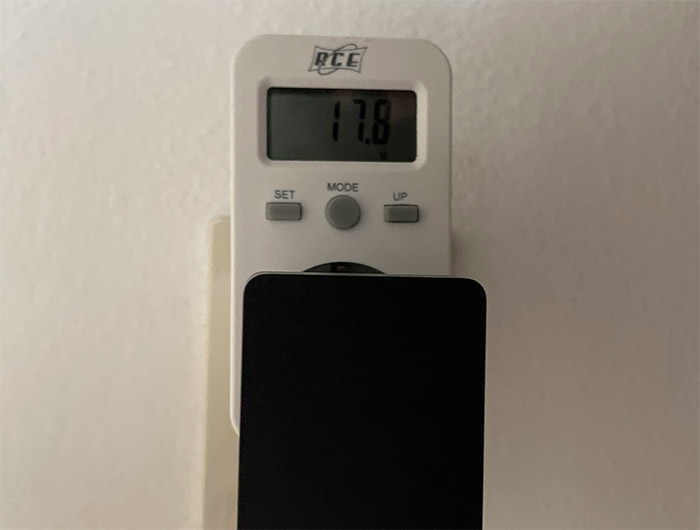
The Power consumption
The power management is very strictly made on the ZimaBlade and the maximum I was able to pull was 17.8W when I was testing the 2.5GbE connection. Not even playing Tomb Raider pushed the needle above this value and that’s because each component will be limited to a certain power threshold, so the overall budget didn’t exceed the maximum 34W. That is unless I added a module which could push above, at which point, the unit will just crash. I know that some of you will ask if using a more powerful charger will allow the use of more demanding expansion cards.
I did use a different charger (a 300W Ugreen GaN charger) since the provided one is a nuke, but don’t dream about going above the maximum supported by the ZimaBlade itself. But what’s that maximum? The manufacturer did not disclose it and I do not have an expansion PCIe card that would go to the max 25W, so I couldn’t really test it, but it’s safe to assume that it’s somewhere below 50W. The ZimaBlade is not a powerhouse, but it can handle quite a bit considering its price tag (far more than the Pi4).
The Conclusion
After testing the ZimaBoard 832, do I consider the ZimaBlade an overall upgrade? I am not sure. The manufacturer did try to make the device more modular and expansion-friendly, while also lowering the price tag a lot more for the base model. This means that the user will have to get its own RAM, but then again, the metallic chassis for the 2 HDDs is one of the best ideas that IceWhale had so far. I could create an actual two-bay NAS and the CasaOS has received far more applications in the last few months, so the community is certainly growing.
I also did observe some thermal improvements over the ZimaBoard 832 while running some benchmarks, so it is an upgrade, even though not a huge one. At the same time, I am sure people will be skeptical about the Intel CPU gen and should be careful not to use the charger with any other device (it will fry it). That being said, while it’s not the perfect device, it does offer a lot of value for the money, so if you’re budget constrained and want the flexibility of a device that’s more powerful Raspberry Pi, then the ZimaBlade is a very solid option.
ZimaBlade
-
Pros
- The modularity factor is even better than on the ZimaBoard
- Good heat management
- A good variety of ports available.
- The metallic chassis is a great idea for creating a NAS.
- CasaOS is pre-installed and ready to go.
Cons
- Dangerous adapter cable to other devices.
- Outdated CPU platform
- That single USB port is not enough.
- Short power cable.
Mark is a graduate in Computer Science, having gathered valuable experience over the years working in IT as a programmer. Mark is also the main tech writer for MBReviews.com, covering not only his passion, the networking devices, but also other cool electronic gadgets that you may find useful for your every day life.