
If you have a spare EnGenius access point around and need to extend your WiFi network without relying on cables, then you may be wondering how can you set up an EnGenius AP as a wireless repeater. And it’s doable with some models, but be aware that this is the least desirable way to cover your home with WiFi due to the severe bandwidth limitations that are a natural consequence of wireless repeaters. Sure, it’s easy to set up since you only need to know the SSID and passkey of the network that’s going to be repeated, but the bandwidth is usually halved (in best case scenario). That’s because there are more stream of traffic: from the client to the wireless repeater and vice versa, as well as from the repeater to the router and back.

Furthermore, be aware that EnGenius has been focused a lot more on its Cloud platform, so its modern wireless APs aren’t really designed to be manually set as WiFi extenders. But, at the same time, they do support the possibility to create a mesh network. Which is the same thing, right? In a sense, yes, but things are a bit more complicated since the dual-band setup can help alleviate the backhaul issue quite a bit. That being said, let’s explore some of the available options and see how you can set up an EnGenius AP as a wireless repeater.
Since the ECW line is not really an option, I decided to take the EnGenius EAP1250 from the shelf and put it to good use. After powering it on using an EnGenius ECS1008P PoE switch (yes, the EAP1250 can be powered via PoE), I had to reset the access point to its default factory settings because it was previously paired to the SkyKey I controller and the necessary settings were missing from the stand-alone GUI. So, in case you are missing some of the settings, don’t panic, reset the access point.
1. Access the EnGenius GUI.
The easiest way to access the user interface of an EnGenius access point is to simply check what IP address it has received from the router. So, go ahead and access the router GUI, check the clients and the IP address should be there.
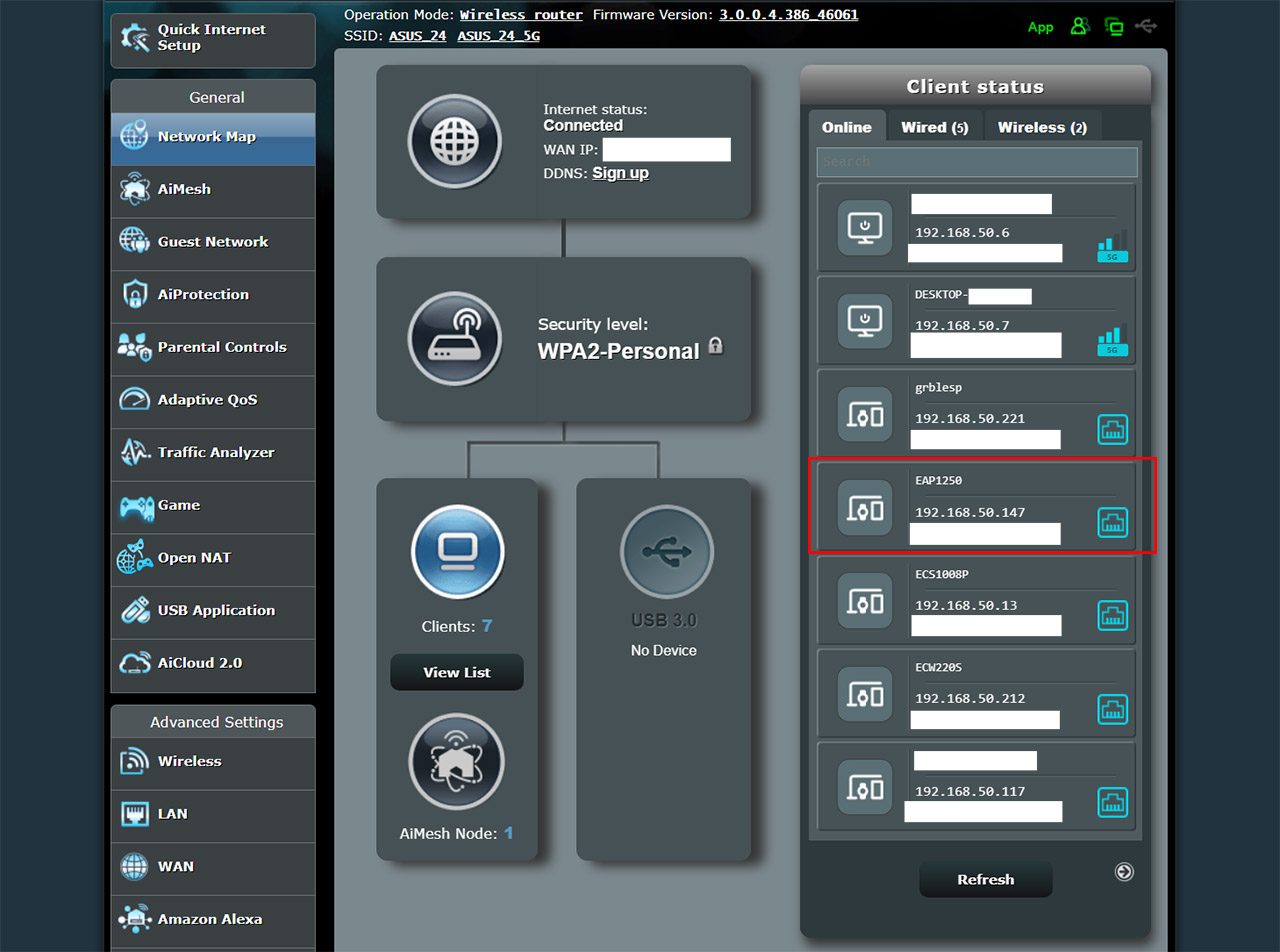
Alternatively, if you don’t have access to the router interface, you can use some free tools that will reveal the IP address of the devices from your network (for example, the IP Address manager from SolarWinds is really good). Enter this IP address in the URL bar of any browser and, when asked, enter admin/admin for the username and password. Change the default credentials and now you have gained access to the EnGenius GUI.
2. Change the Operation Mode to Repeater.
Identify the vertical menu on the left and navigate to Network > Wireless. Then, under Wireless Settings, you should see Operation Mode.
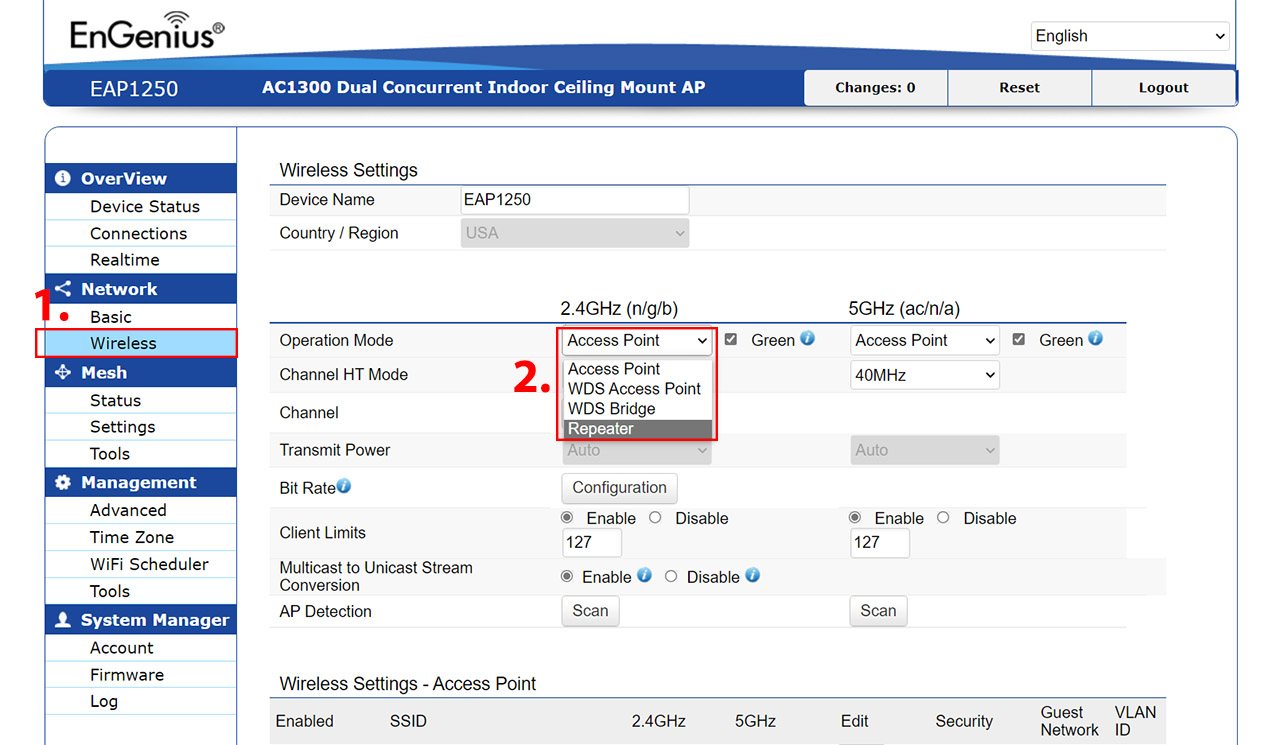
Select which band you wish to extend (2.4GHz or 5GHz) and then switch from Access Point to Repeater (there’s also WDS Access Point and WDS Bridge modes available). Be aware that you can only repeat one band at a time (a very annoying shortcoming of using this approach).
3. Enter the SSID that will be repeated.
Just like other brands, such as Mikrotik, EnGenius has made it easy for you to select the SSID that will be extended, so, while still on the Network > Wireless section and the Operation Mode set to Repeater, scroll down until you see the AP Scan tool.
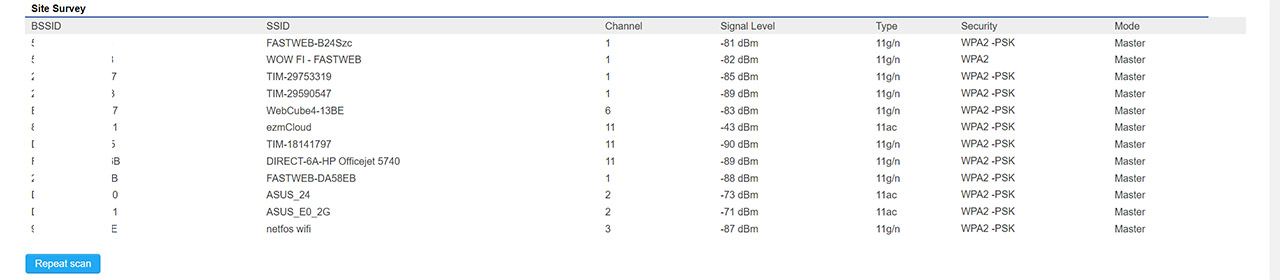
Click on it and a new window should pop up which will search all the available APs in the area. I wanted to extend the 2.4GHz network of my Asus router and after clicking on it, it got all the necessary info automatically (it got the passkey directly from my router, but it won’t work with devices outside the network), so I simply clicked on Save and waited until the process was done.
Alternatively, you can manually insert the info by going to the Wireless Settings 2.4GHz (or 5GHz, depending on the chosen band) – simply scroll lower than the AP Scan and you should see it.

Press on Edit and a new window will appear where you need to insert the SSID of the band that’s going to be repeated, as well as the passkey (if there is one – if it’s not, make sure to add one because it’s a serious security issue). Press Save and wait until the EnGenius AP finishes setting up the new configuration.
4. Make any other changes to the wireless repeater.
At this point, you should have a fully functional wireless repeater, but you can also go back and adjust any wireless settings you may want. That’s because the IP address given by the router should remain operational, so you don’t have to take notes or change any specific setting.
5. (Advice) Why it’s better to just rely on the mesh technology.
I know that many of you want to expand the wireless network without having to lay down cables in your home, which is where the wireless extender comes as a saving option, but, unless you use a very old EnGenius AP that would have ended up forgotten in the attic somewhere, it’s far better to rely on the mesh tech. I say that because the concept is very similar, since you get more than one APs inter-connected via WiFi, so one AP pretty much extends the network further in the house. But, like I said in the intro, there is a better handling of the backhaul traffic, so there’s less impact on the bandwidth.
Of course, this is a solution for people that have more than one EnGenius access points in their house and not for those that simply want to extend the WiFi farther from the router. Also, if you intend to purchase an EnGenius AP just to use it as a wireless repeater, please check out whether your router supports the mesh technology, so perhaps another cheaper router from the same brand may be the better solution. Check AiMesh from Asus, OneMesh from TP-Link and the mesh system from Synology.
Mark is a graduate in Computer Science, having gathered valuable experience over the years working in IT as a programmer. Mark is also the main tech writer for MBReviews.com, covering not only his passion, the networking devices, but also other cool electronic gadgets that you may find useful for your every day life.