
The best wireless access point is a networking device that needs to keep up with the fast pace of tech development by implementing the latest technologies suitable for both small and medium businesses (allowing the creation of large scalable networks), as well as for the home user, especially as an equivalent to the mesh WiFi systems. Considering that the demand for such devices is very high, there is now a large variety of wireless access points to choose from and, based on the wireless performance, the amount of features, the user-friendliness of the UI, the design and the aforementioned scalability factor, I chose the best Wi-Fi access points on the market, by taking into account both the 802.11ac and the 802.11ax standards.
UPDATE 03.25.2023: I have added the Meraki Go GR12 WiFi 6 AP the best wireless access points list
UPDATE: The Xclaim Xi-3 AP has been removed from the list because the manufacturer decided to announce that the entire series has reached EOL in 2021.
| Zyxel WAX650 WiFi 6 Access Point | TP-Link EAP660 HD Wireless Access Point | EnGenius ECW230S Wireless Access Point |
 |  |  |
| Read More | Read More | Read More |
 | |
| Ubiquiti U6-LR Wi-Fi 6 Access Point | Meraki Go GR12 Wireless Access Point | Linksys LAPAC1750C Wireless Access Point |
 |  |  |
| Read More | Read More | Read More |
| | |
It’s true that the wireless access point has the role of converting the data received from a wired Ethernet cable into wireless signal (2.4GHz, 5GHz or 6GHz) but a wireless router can do pretty much the same thing, so one my ask why would you need a separate access point?
The routers can definitely do a great job at serving all the close-by clients, but, there are always WiFi dead spots where the signal just won’t reach and so, if you have a rather large house, you may need at least one additional wireless access point to help with your network.
While the main purpose of an AP is to extend your network, some manufacturers have taken up to a new level, adopting the mesh networking technology, so you can use one or two small devices in your home (which are usually very easy to set up) or you can use a bunch of them and create a mesh network, where your clients can seamlessly roam the building and have uninterrupted access to the Internet and a steady, strong signal.
Note 1: If you have an old router laying around, you may try to convert it to an access point and save some money in the process.
Note 2: I purposely left out the Outdoor Access Points, which will be the subject of another article.
CHECK OUT: THE BEST OUTDOOR WIRELESS ACCESS POINTS
Best wireless access points brief comparison
| Zyxel WAX650 | TP-Link EAP660 HD | EnGenius ECW230S | Ubiquiti U6-LR | Meraki Go GR12 | Linksys LAPAC1750C | |
| CPU | quad-core 2.0GHz Qualcomm Atheros IPQ8072A | quad-core 2.0GHz Qualcomm Atheros IPQ8072A | quad-core 2.0GHz Qualcomm Atheros IPQ8072A | dual-core 1.35GHz Mediatek ARM MT7622AV | quad-core 1GHz Qualcomm IPQ6010 | single-core 700MHz Qualcomm Atheros QCA9558 |
| RAM | 512MB Nanya NT5CC256M16ER-EK | 512MB ESMT (2x M15T4G16256A) | 1GB Samsung (SEC201 K4A8G165WC) | 512MB (2X Winbond W632GU8NB-11) | 1GB SK Hynix (H5AN8G6NDJ) | 128MB (2X ETRONTECH EM68B16CWQH-25H) |
| Storage | 512MB Winbond W29N02GZSIBA) | 128MB ESMT F59D1G81MB-AZM1P0H9N | 256MB MXIC MX30LF2G18AC-XKI | 64MB (Winbond) + 16MB & 512KB (MXIC) | 256MB Spansion MS02G2 | 16MB Macronix MXIC MX25L12835FMI-10G |
| Switch | Atheros AR8033-AL1A | Qualcomm QCA8081 | Qualcomm QCA8081 | Marvell AQrate AQR112G | Qualcomm QCA8081 | Qualcomm Atheros AR8035-A + Qualcomm Atheros QCA9558 |
| 5GHz Radio | IPQ8072A (QCN5054) 802.11a/n/ac/ax 4×4:4 | IPQ8072A (QCN5054) 802.11a/n/ac/ax 4×4:4 | IPQ8072A (QCN5054) 802.11a/n/ac/ax 4×4:4 | Mediatek MT7975AN & MT7915AN 802.11a/b/g/n/ac/ax 4×4:4 | Qualcomm QCN5152 802.11a/n/ac/ax 2×2:2 | Qualcomm Atheros QCA9880 802.11a/n/ac 3×3 |
| 2.4GHz Radio | Qualcomm IPQ8072A (QCN5024) 802.11b/g/n/ax 4×4:4 | Qualcomm IPQ8072A (QCN5024) 802.11b/g/n/ax 4×4:4 | IPQ8072A (QCN5074) 802.11b/g/n/ax 4×4:4 | Mediatek MT7622 802.11a/b/g/n 4×4:4 | Qualcomm QCN5121 802.11b/g/n/ax 2×2:2 | Qualcomm Atheros QCA9558 802.11b/g/n 3×3 |
| PoE Support | 802.3at (48V) | 802.3at (21.5W) | 802.3bt (31W) | 802.3af/at (48V) | 802.3af (12V) | 802.3af/at (12V) |
| LAN Ports | 1x 5GbE + 1x 1GbE | 1x 2.5GbE | 1x 2.5GbE | 1x 1GbE | 1x 1GbE | 1x 1GbE |
Which is the fastest wireless access point
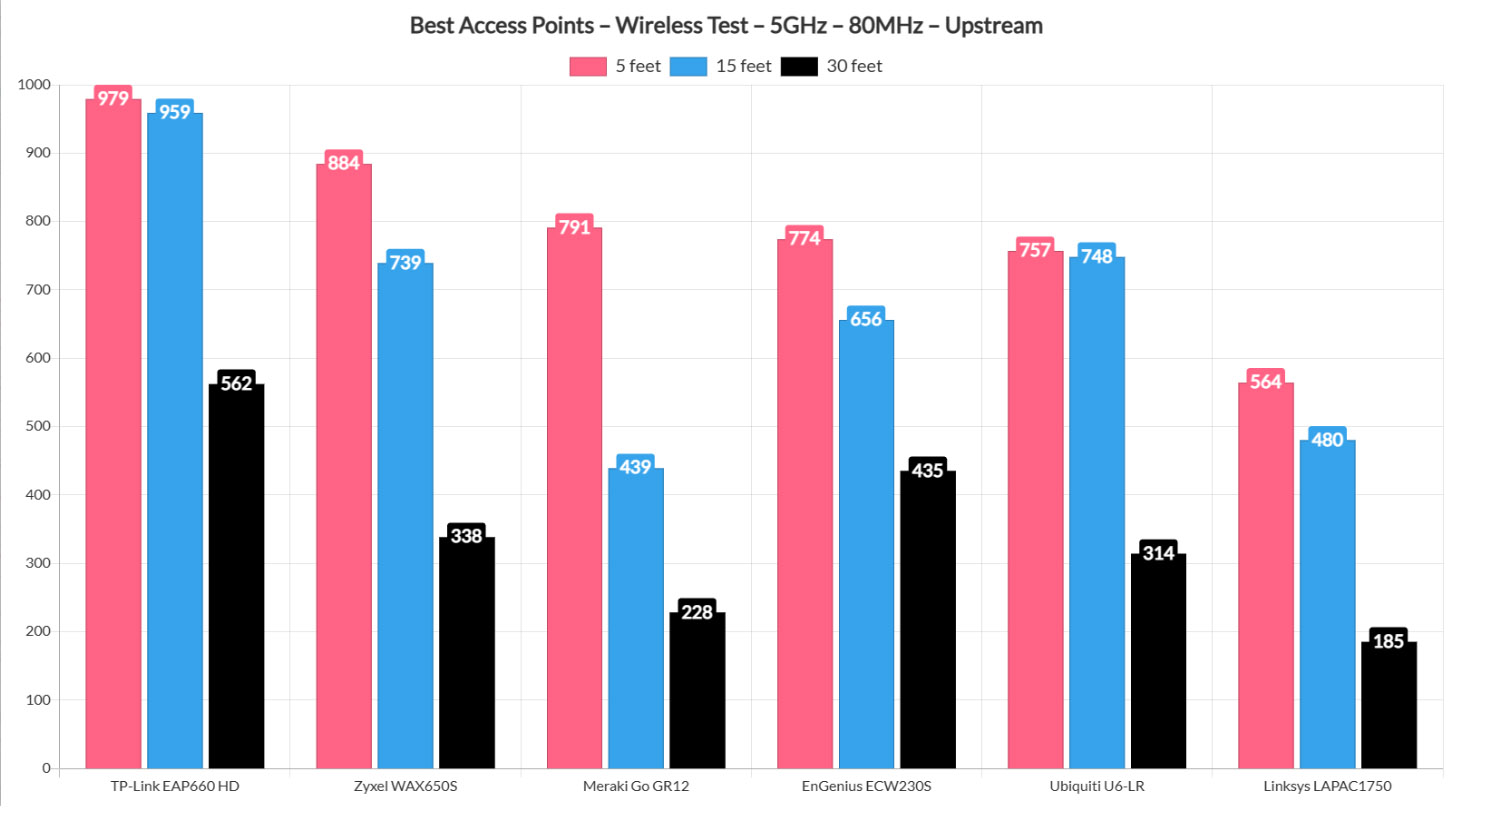
After I tested all six wireless access points, the TP-Link EAP660 HD dethroned the Zyxel WAX650S on the 80MHz, and in terms of price, it’s absolutely unbeatable at the moment of writing. It’s not surprising that the WiFi 6 access points take the lead considering that they makes use of a few new technologies, as well as some improved features from the previous WiFi standard. All devices were tested in the same space and the client device for the WiFi 5 APs was either a computer equipped with an Intel 8265 adapter (the older one was equipped with an Asus PCE-AC88 PCIe), while the WiFi 6 access points were and will be tested using a computer equipped with a TP-Link TX3000E (AX200) adapter. Furthermore, since most WiFi 6 APs have multi-Gigabit ports, the server device will also have a multi-Gigabit port, as to not throttle the performance of the wireless access point.
Be aware that being the fastest access point doesn’t necessarily mean you have the best device for your network, because the software and other features, as well as the price can weigh just as heavy on the value of the access point. For example, the security features of the EnGenius ECW230S puts it way ahead all of its competitors and the extra tools that help the system admins makes this device one of the best wireless access points for system administrators since it’s far easier to get an accurate idea of what happens on the network even from outside the site.
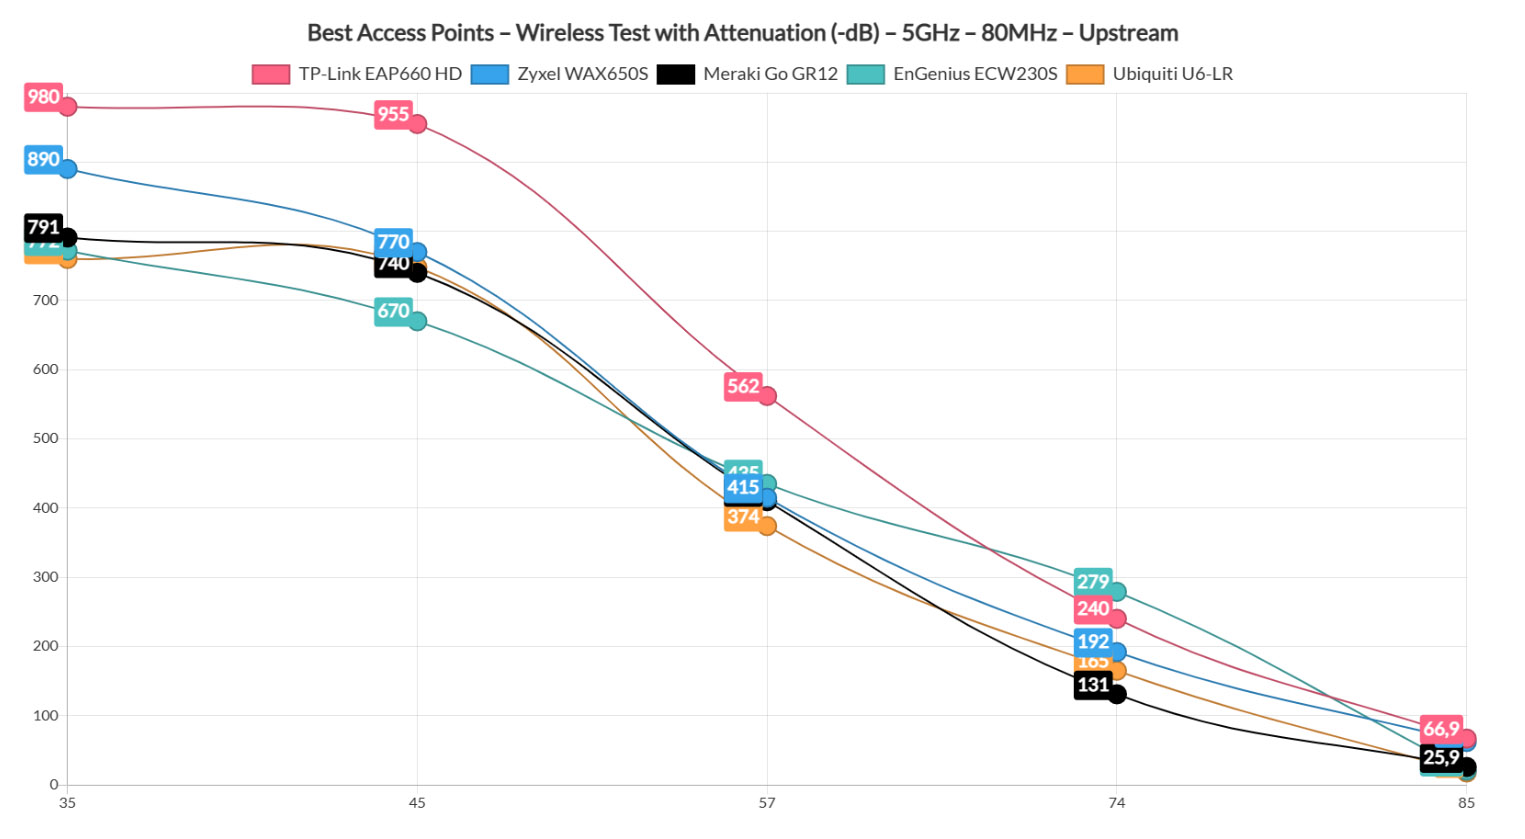
While the distance may seem like a decent enough objective way of comparing the performance of the best wireless access points, the attenuation is a far better point of reference since it’s easier to also reproduce these results at home or in the office. The 45 feet in my office will differ than those in your home. But a -70dB attenuation will make it clearer about what to expect in terms of WiFi speed at a certain spot in your home.
That being said, I did test a few WiFi 6 access points that did support the 160MHz channel bandwidth and we do have a few different models taking the lead. But be aware that the 160MHz width is very sensitive to interference (less non-overlapping channels), so, to get these type of results, you need to have little to no amount of walls and preferably no other WiFi device to interfere with the data transfer. In a crowded area, it’s actually best to downgrade to 40MHz since not even the 80MHz can show decent results.
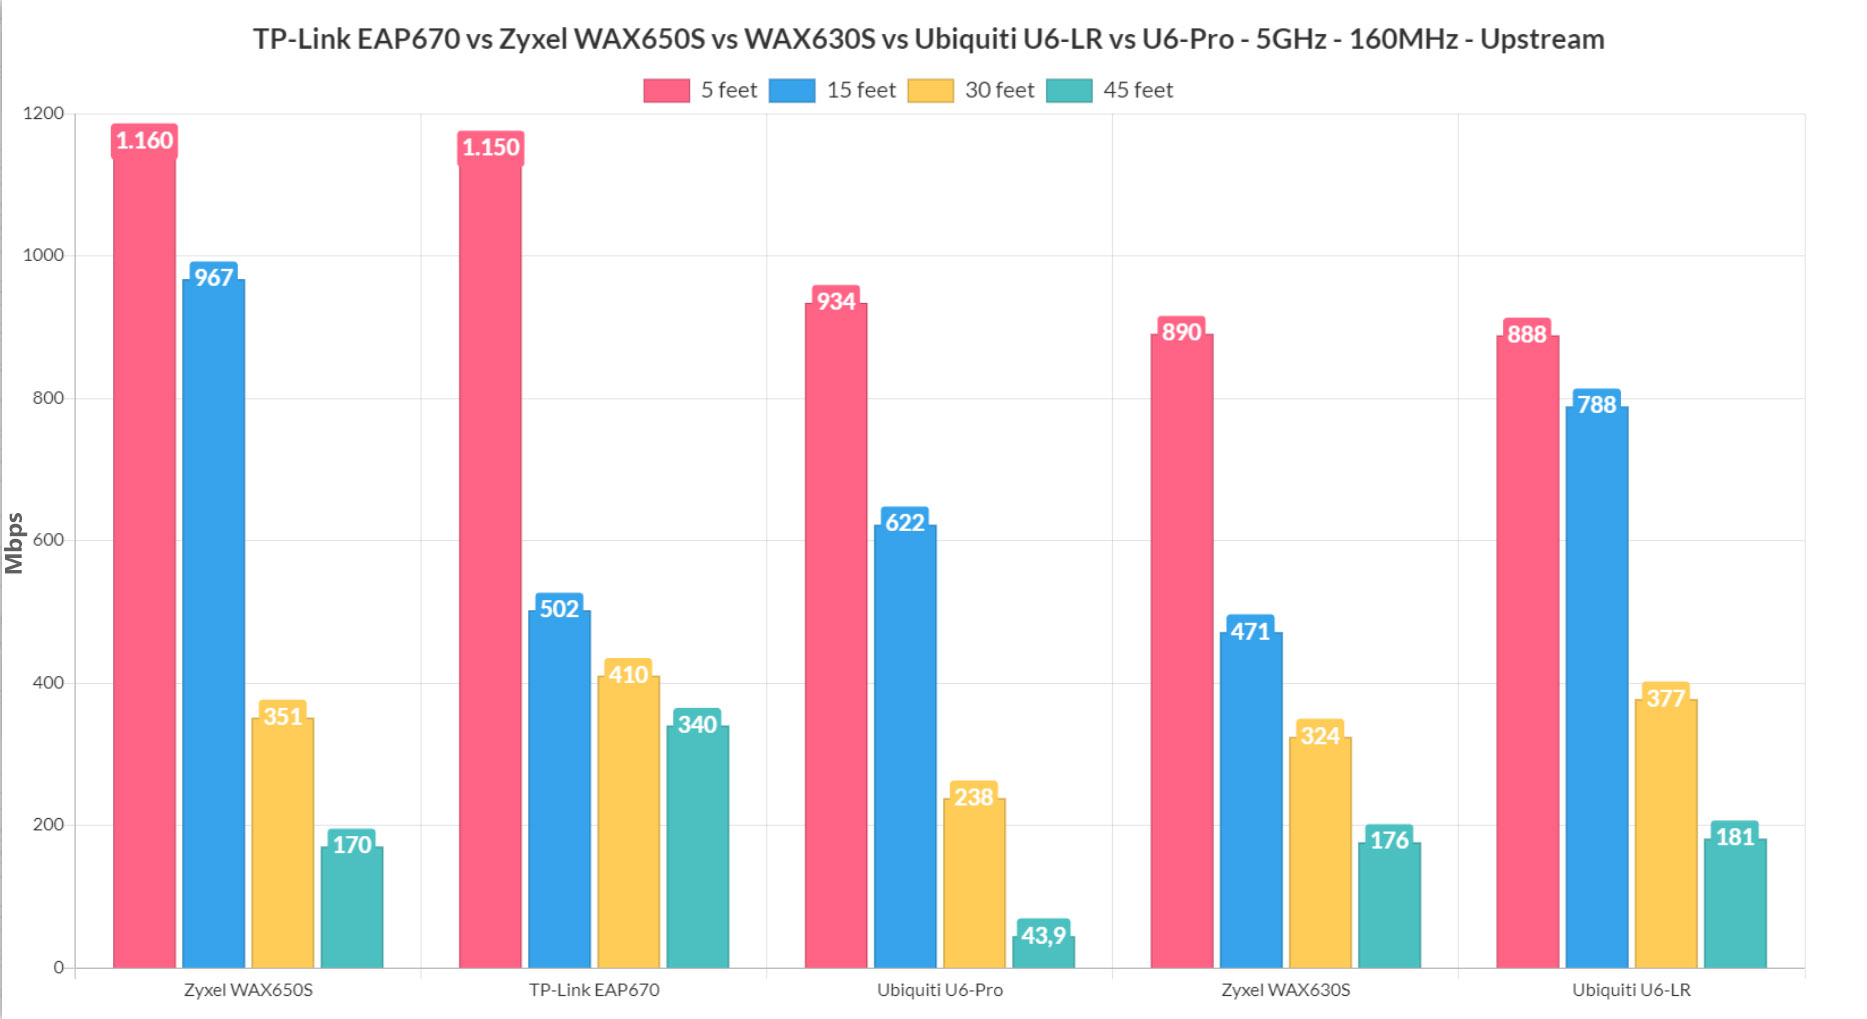
As you can see, the Xyxel WAX650S retakes its top place, but the TP-Link EAP670 gets very uncomfortably close at 5 feet, although losing momentum immediately after. The U6-Pro and the WAX630S are very similar in performance, while the U6-LR showing an advantage after 15 feet and forward (especially at 70 feet).
The wireless access point with the best coverage
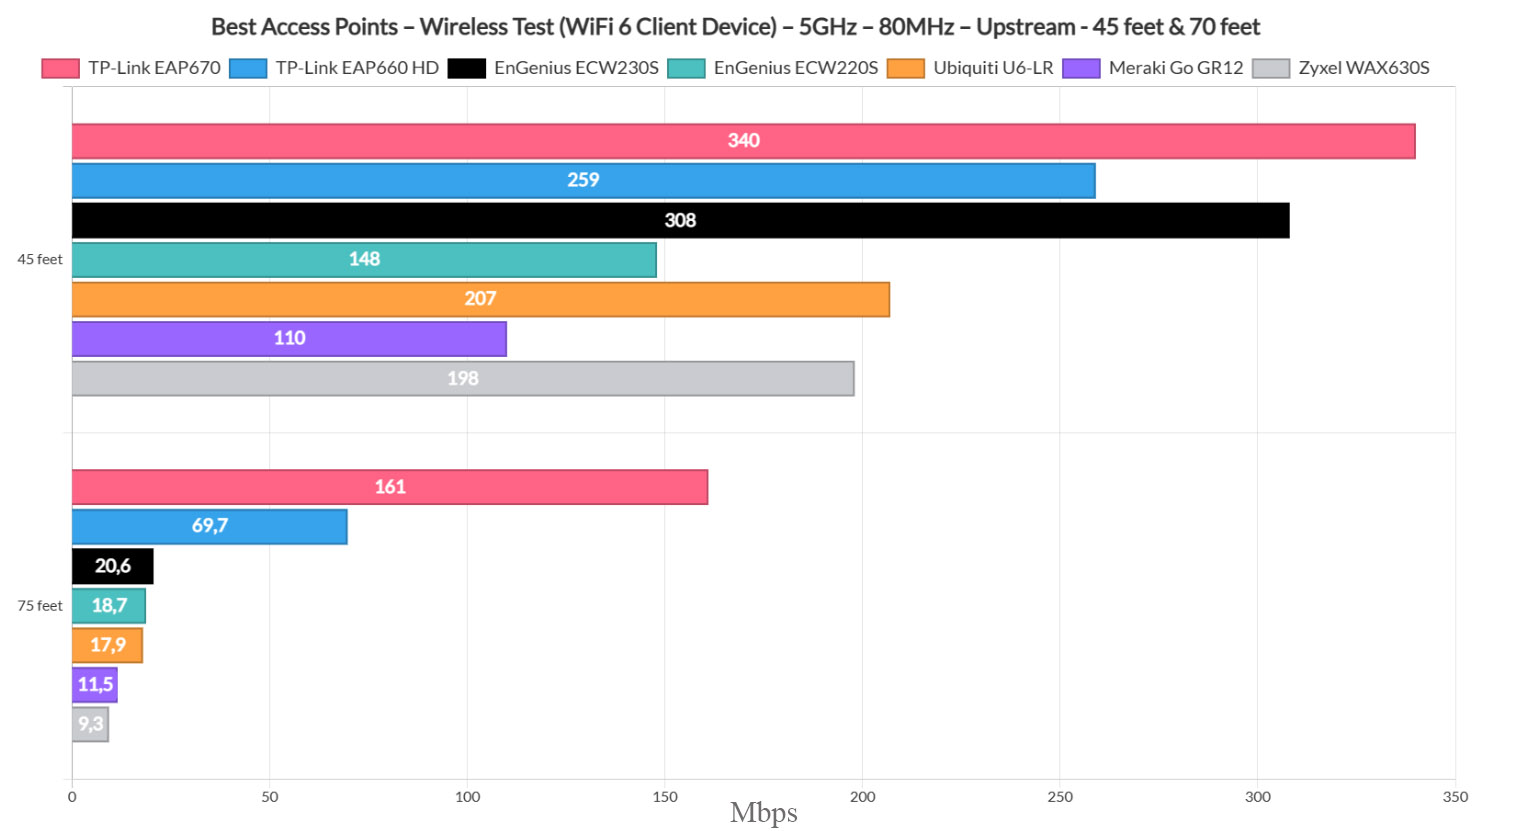
As you can see the focus was towards the 70 feet, which is why the two TP-Link access points remain at the top even at the 45 feet mark (because it means that you get a better speed farther from the wireless access point). And yes, TP-Link is again towards the top when checking the throughput with a limited amount of client devices connected at the same time (two WiFi 5 and one WiFi 6 as seen in the individual analysis of each device).
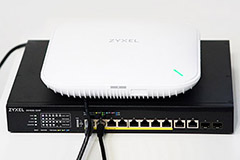
1. Zyxel WAX650S WiFi 6 Access Point
![]()
The Zyxel WAX650S is currently one of the best WiFi 6 access points on the market and yes, it’s a bit more expensive than the other devices from this list, but this is a device which competes against enterprise-level access points, so its performance is on a different level. Sure enough, it does make use of the OFDMA technology, it has support for MU-MIMO, Beamforming and 160MHz channel bandwidth, but what I found the most interesting is the support for PoE++. It seems that you will need a powerful PoE Ethernet switch (such as the XS1930-12HP) to be able to use the most out of this access points and yes, the WAX650S does come with a 5GbE port to allow you to go beyond the old Gigabit limitation.
Additionally, I do appreciate that the device can be used in stand-alone mode in a proper way (there is a sufficiently comprehensive software), as well as with the NXC controller or, if you have a larger network, it will work just fine with the Cloud Center platform.
The Zyxel access points are usually designed on the larger side and the WAX650S is definitely out there as a bulky networking device. Indeed, at 9.25 x 9.06 x 2.11 inches, this is an access point that you’re going to see as soon as you enter the room, so perhaps mounting it on the wall would be more aesthetically pleasing than on the ceiling. That being said, I know that some other manufacturers have opted for some aluminum or zinc alloy, but Zyxel decided to keep the budget for the inside of the AP, so it made the case entirely from plastic.
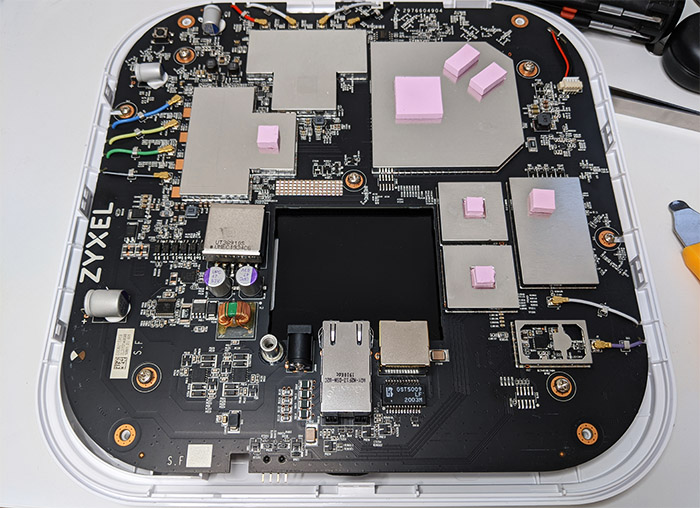
It’s a hard plastic, so it’s fine and the heat management is also well made considering how crammed up everything is on the inside – there are some fairly hot points, but it’s mostly just warm to the touch.
If you turn the device upside down, you can clearly see the two dedicated areas for mounting the device on the ceiling (or on the wall) and in between them, there’s a carved in area where you can find the 12V DC-In Power connector (to power up the AP via a power cable), a 5GbE Uplink port (which can work in 1GbE and 2.5GbE mode), a LAN1 Gigabit Ethernet port (to connect wired clients) a recessed Reset button (press it for about 10 seconds to return the AP to factory default settings) and a grounding screw. I also opened up the case of the WAX650S and I could see that it went with the quad-core 2GHz Qualcomm IPQ8072A, 512MB of RAM and 512MB of flash memory, which is excellent.
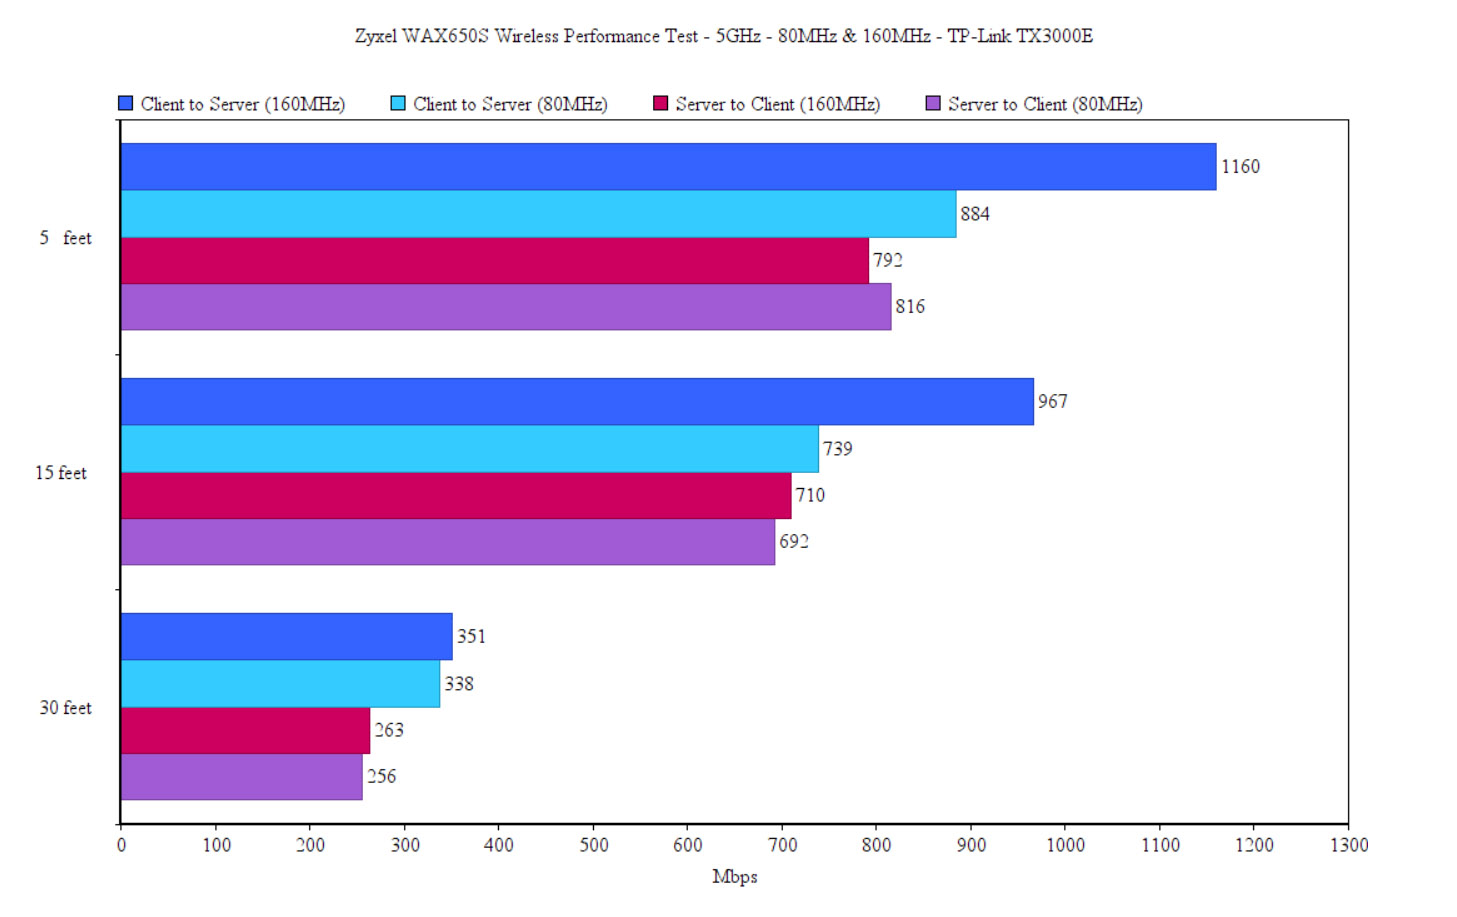
I have already praised the Zyxel WAX650S for having a great wireless performance and, when I tested it, I used a MacBook Pro + a QNAP QNA-UC5G1T adapter as the server (to get that multi-Gigabit connection) and a computer equipped with an AX200 WiFi adapter as the client. This way, on the 5GHz (160MHz channel bandwidth), I saw an upstream throughput of 1,1650Mbps at 5 feet and 351Mbps at 30 feet. Using the 80MHz channel bandwidth, the speed went down to an average of 884Mbps at 5 feet and 338Mbps at 30 feet. The 2.4GHz performance (40MHz) was also very good, so I managed to measure an average of 241Mbps at 5 feet (upstream) and an average of 122Mbps at 30 feet.
If you intend to use only a single Zyxel WAX650S unit (or two), then you can use the stand-alone user interface (accessible by going to its IP address – can be found using the ZON utility) and just like the NWA1123-AC HD, it does offer a satisfying experience, offering more than the few basic options that we got with the NAP303. But the Zyxel WAX650S will also work great with the NCC and you can connect to it by using either the Nebula app (Android or iOS) which does make the process very painless or using the Nebula Control Center which will require a few more steps.
The Dashboard will display blocks of info for every type of device connected including the AP area (which shows the number of Online APs, the Total number of APs and the Heavy Loading) or the AP Client area, but, to monitor and configure the access point, you need to go to the AP area (from the top menu) and, if you click on it, it will summon a small drop-down menu with options grouped into two categories: Monitor and Configure. Under Monitor, you can view all the adopted APs and by clicking on any of them, it will take you to a dedicated page which includes more in-depth details about the device (as well as some Live tools to help you diagnose any connection issue); there’s also the Client list (click on any to view more details about that specific client), the Event log, the Summary report (general AP stats) and more.
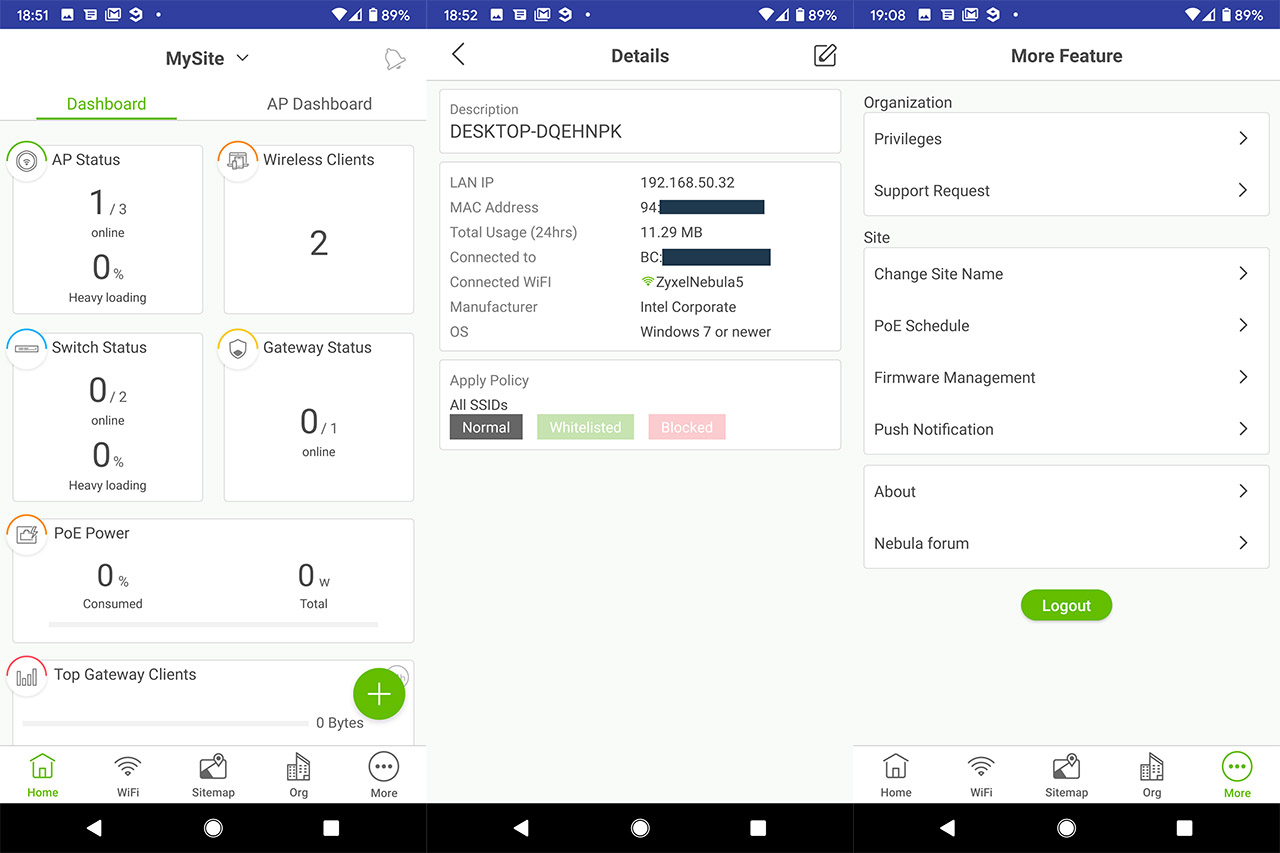
The Configure group of options includes the SSIDs where you can set up general SSID settings for all the APs on the current Site (every new adopted access point will receive these settings); you can also configure the Radio settings (maximum output power, the channel width or the DCS setting), the Port setting (can be set for each individual AP), the Authentication settings (includes the WLAN security, enabling the Captive Portal), the Assisted roaming, the U-APSD, the Walled garden, the Layer 2 isolation or the Intra-BSS traffic blocking), the SSID schedule or the possibility of personalizing the Captive Portal (which is very useful especially for hotels or airports).
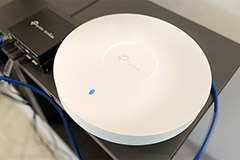
2. TP-Link EAP660 HD WiFi 6 Access Point
![]()
TP-Link has been one of the main providers of affordable consumer-friendly wireless access points and, ever since the WiFi 6 standard was launched, pretty much all manufacturers of SMB-suitable hardware raced to quickly release networking devices that could take advantage of the newer technologies. I am familiar with the EAP series (the EAP245) that was using an early version of Omada and it seems that in the meantime, TP-Link has made some serious advances and it now includes both gateways and switches (besides the WiFi APs), so what better time to showcase these advancements than with a new WiFi access point, specifically the EAP660 HD.
Similarly to most other ceiling wireless access points, the TP-Link EAP660 HD went with a simple design, the case having a circular shape and the entire device is covered by a white matte finish. But, despite keeping everything as minimal as possible, the access point is still very large and substantially thick, measuring 9.6 x 9.6 x 2.5 inches, so it’s going to be very much visible on the ceiling. As I have seen with some Ubiquiti access point over the years (such as the UAP-AC-PRO), the wireless access points that are designed to sit on the ceiling have a tendency to run fairly hot, but it seems that TP-Link has taken the necessary precautions against such behavior. Indeed, the full-plastic case and the multiple openings will help the AP to remain only a bit warm in the middle of the case.
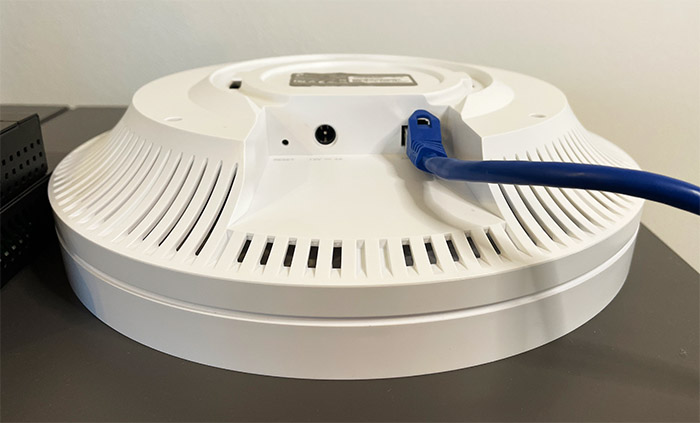
Just like the EAP245, the TP-Link EAP660 HD has a single fairly small LED sitting at the top of the case and it’s supposed to properly show the status of the access point. The LED indicator will quickly flash when the AP is upgrading the firmware, it will become solid when the device is working properly; the LED will be flashing red and blue if the device has experienced an error. If you’re looking for the ports area, you’ll find it at the bottom, in a dedicated section. From the left, there’s a recessed Reset button which, when pressed and held for 5 seconds, returns the AP to factory default settings; further to the right, there’s the Power port and a single 2.5GbE port (to connect to the router – it’s PoE compatible).
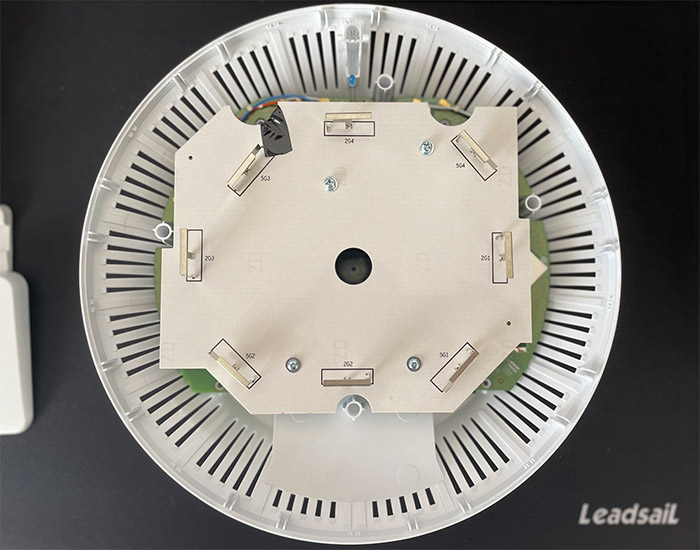
Yes, unfortunately, TP-Link decided to not add an additional Ethernet port for wired clients (since the AP is going to end up on the ceiling or on the wall), so, only wireless clients will be able to connect to the EAP660 HD – unless you use a multi-Gigabit PoE switch (such as the Zyxel XS1930 or the Zyxel MG-108). Inside the case, the EAP660 HD is equipped with a quad-core 2GHz Qualcomm IPQ8072A SoC, backed by 512MB ESMT RAM (2x M15T4G16256A) and 128MB ESMT F59D1G81MB-AZM1P0H9N storage. Also, there’s the Qualcomm Atheros IPQ8072A 802.11b/g/n/ax 4×4:4 chip for the 2.4GHz radio and a Qualcomm Atheros IPQ8072A 802.11a/n/ac/ax 4×4:4 for the 5GHz radio.
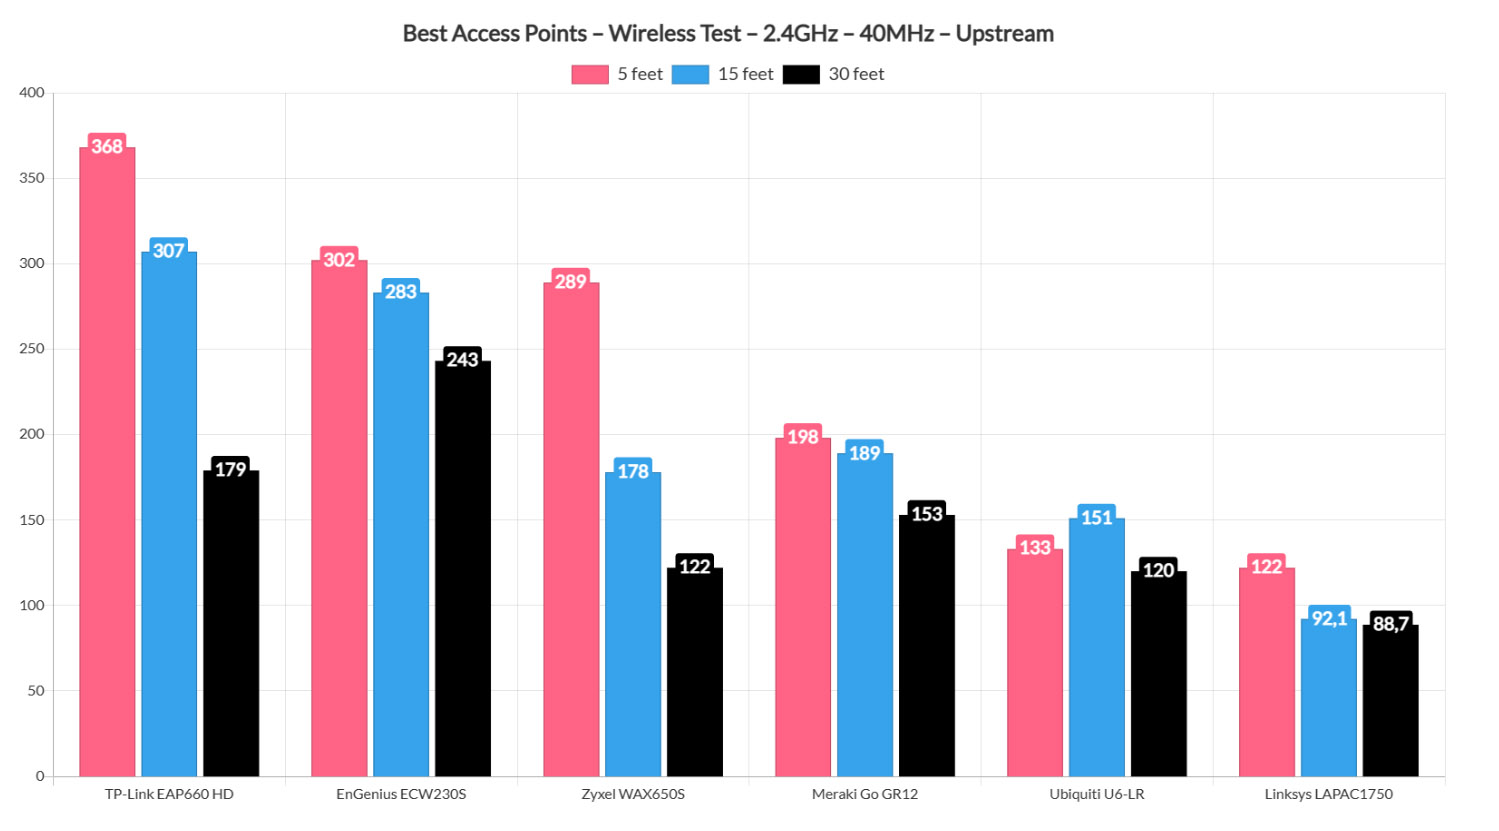
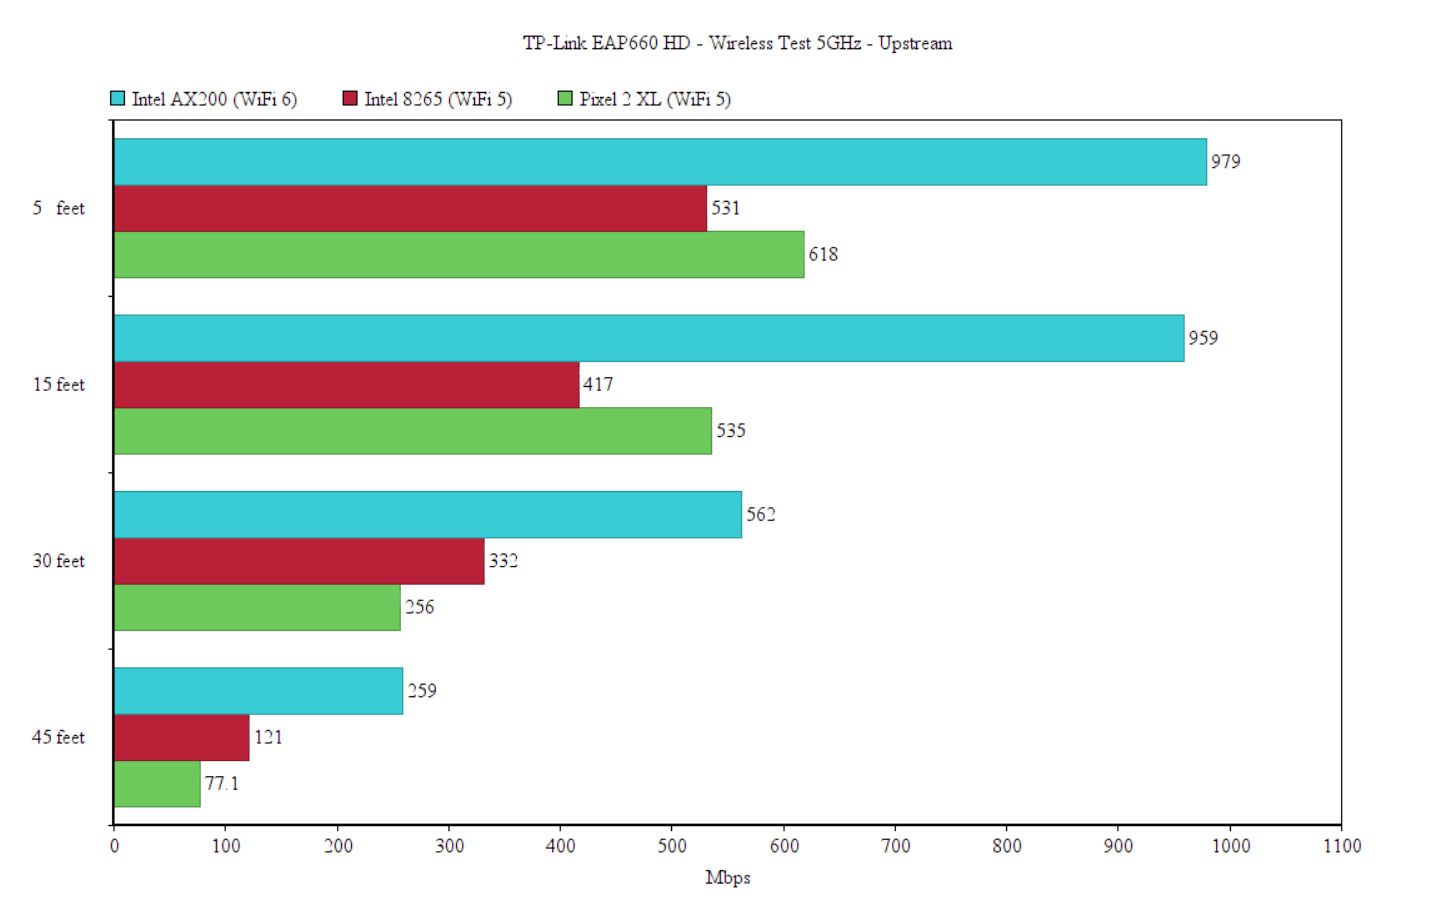
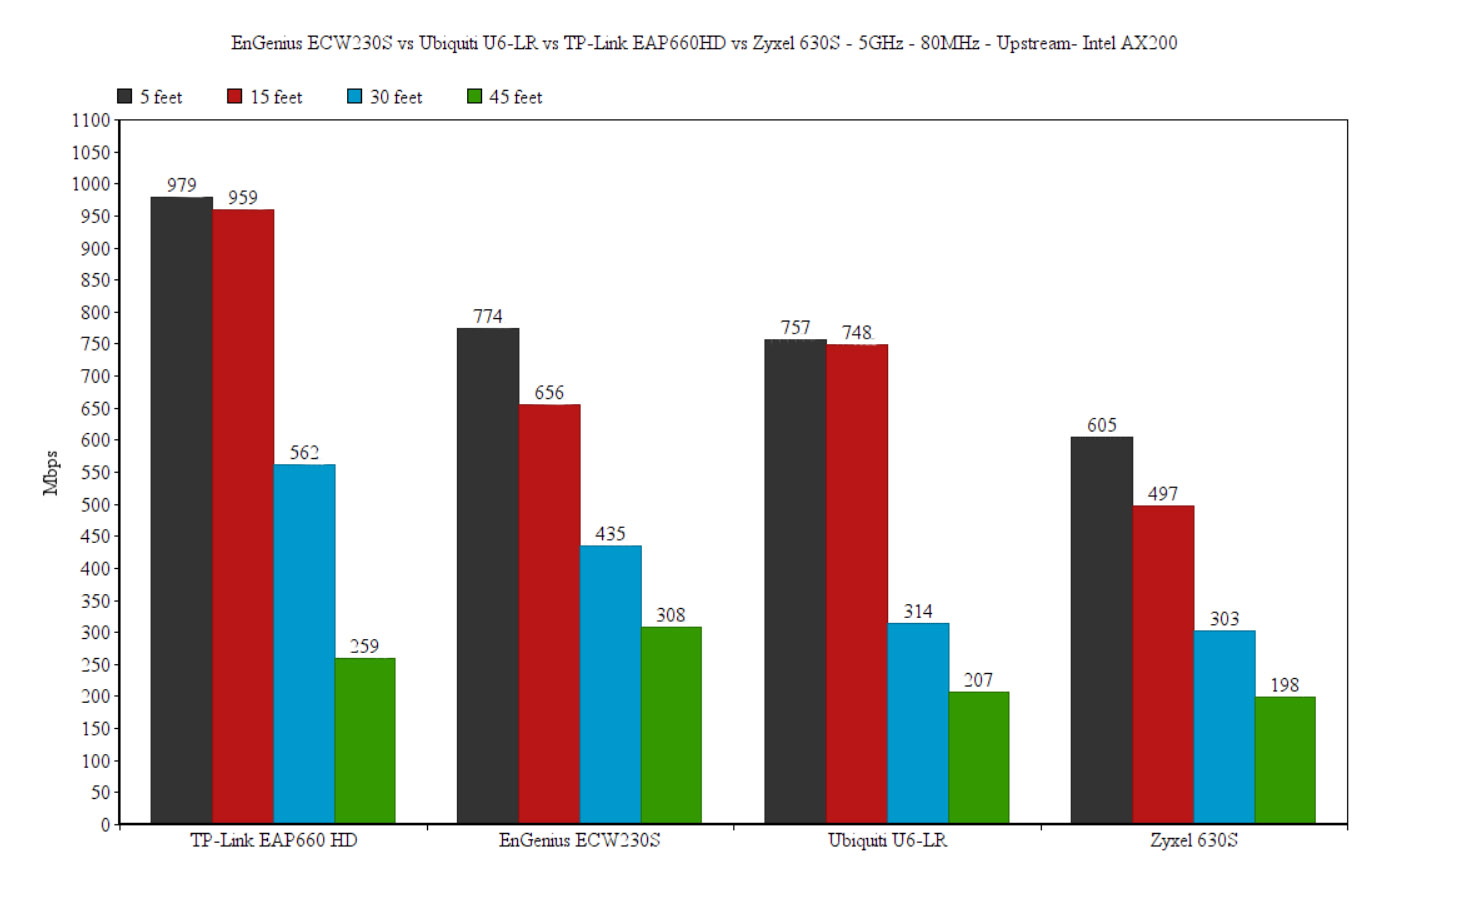
Now that we had a look at the hardware, let’s see what kind of performance this wireless access point can deliver. To do so, I connected a computer to a multi-Gigabit switch, the Zyxel XS1930-12HP which was then connected to the EAP660 HD and then a WiFi 6 client (AX200) was connected to the 5GHz network (80MHz). Upstream, I measured an average of 979Mbps at 5 feet and 562Mbps at 30 feet; from the server to the client, the WiFi 6 access point delivered 882 Mbps at 5 feet and 546 at 30 feet. Afterwards, I connected the wireless client to the 2.4GHz network and, from the client to the server, at 5 feet, I measured an average of 368Mbps and, at 30 feet, the speed went down to 179Mbps. From the server to the client, I measured and average of 337Mbps at 5 feet, while at 30 feet, the throughput decreased to 172Mbps.

The TP-Link EAP660 HD can either be run as a standalone device (the usual choice for home users) or as part of a larger environment by using the Omada controller. To do the former, you need to run an instance of the controller on your hardware (a PC, a Raspberry Pi or using a dedicated device, such as the OC300). The Chinese-based manufacturer has been pushing back against Ubiquiti’s dominance for years and, after some questionable decisions from the latter company, it does seem that TP-Link may be able to persuade some of the users that felt neglected. I am saying that because the Omada controller has the same feel as the UniFi, as well as very similar interface and controls.
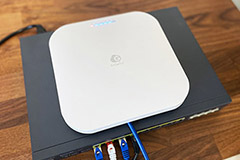
3. EnGenius ECW230S WiFi 6 Access Point
The EnGenius ECW230S is the upgraded version of the ECW230 which has now received extra antennas for WIPS and Zero DFS radios that were needed to make full use of the improved Diagnostic Tools. So, because of all these new features, the EnGenius ECW230S is essentially the best security-focused WiFi 6 access point at the moment, having a clear focus towards detecting rogue APs, every type of interference, as well as making the sys admin life a whole lot easier.
And it also helps with the budget because you no longer need to go to the site as often because the ECW230S allow you to see everything that happens within that network (what the client are doing) in actual real-time. It’s quite fascinating to see how EnGenius managed to add all the powerful components (plus the new antennas), while still keeping the EnGenius ECW230 incredibly compact (especially when compared to one of its competitors, the Zyxel WAX650S).
And it’s also one of the most elegant wireless access points that I have tested, sporting a flat minimalist plastic case covered by a white matte finish. The bottom side is metallic, but the ECW230S will most likely end up on the ceiling and it’s going to look great. Of course, EnGenius has included everything that’s necessary for mounting the device on the wall or ceiling, but since there are no silicone feet, you won’t be able to keep it on the desk.
On the front of the wireless point, there’s a fairly subtle bar of LEDs (which are quite bright, but can be turned off) and, from the left, there’s the Power LED, the LAN LED and the two LEDs for the WiFi networks (2.4GHz and 5GHz). Turn the access point around and you’ll be able to see a carved-in area that contains a recessed Reset button, the 12VDC power port and only one Ethernet port. It makes sense to use only one port for ceiling wireless access points, but it’s still annoying if you want to put it on the wall next to a printer (which may have used a secondary port).
The good news is that it’s a 2.5GbE port that supports 802.3at PoE Ethernet switches or PoE adapters (the same as on the ECW230). I also opened the case to check its components and it does make use of the same quad-core Qualcomm Atheros IPQ8072A chipset (clocked at 2.0GHz) that the ECW230 uses, as well as the 256MB of flash memory, but the RAM got a bump from 512MB to 1GB. For the WiFi, there’s the IPQ8072A chip (QCN5054) for the 5GHz radio and the IPQ8072A chip (QCN5074) for the 2.4GHz radio, so it’s the same as on the ECW230 again.

In terms of wireless performance, the ECW230S did really well and, using a WiFi 6 client (AX200) on the 2.4GHz radio band, I measured an upstream speed of 302 Mbps at 5 feet. Then, it decreased a bit to 283 Mbps at 15 feet and it managed 243 Mbps at 30 feet. Even at 45 feet, the 131Mbps throughput is perfectly usable for most applications. Furthermore, I tested the wireless access point using the 5GHz radio band (80MHz – the maximum channel bandwidth available) and the upstream throughput was 774Mbps at close range, 656Mbps at around 15 feet and a decrease to 435Mbps at 30 feet.
The EnGenius ECW230S allows you to access a very basic web-based configuration utility by entering the IP address of the AP into a browser of your choice, but this is a Cloud-managed access point, so you’ll get far more by adopting the device to the EnGenius Cloud platform. The point of all Cloud platforms is to allow an easy management for more than a single access point, Ethernet switch or gateway, as well as a quick configuration deployment to one device, a group of devices or all at the same time.
So, the ECW230S wireless access point will work great along with other EnGenius products. Of course, GUI is feature-packed, so I will mention a few: there’s the Captive Portal with the Splash Page (as well as various Authentication types, including by voucher or RADIUS), in-depth radio settings and more. But the stars of the show are the AirGuard and the advanced Diagnostic Tools. To get a brief idea about what to expect, well, you get to see the user activity in real-time (Live Clients) and you can also check for interference – the type of interference, also in real-time.
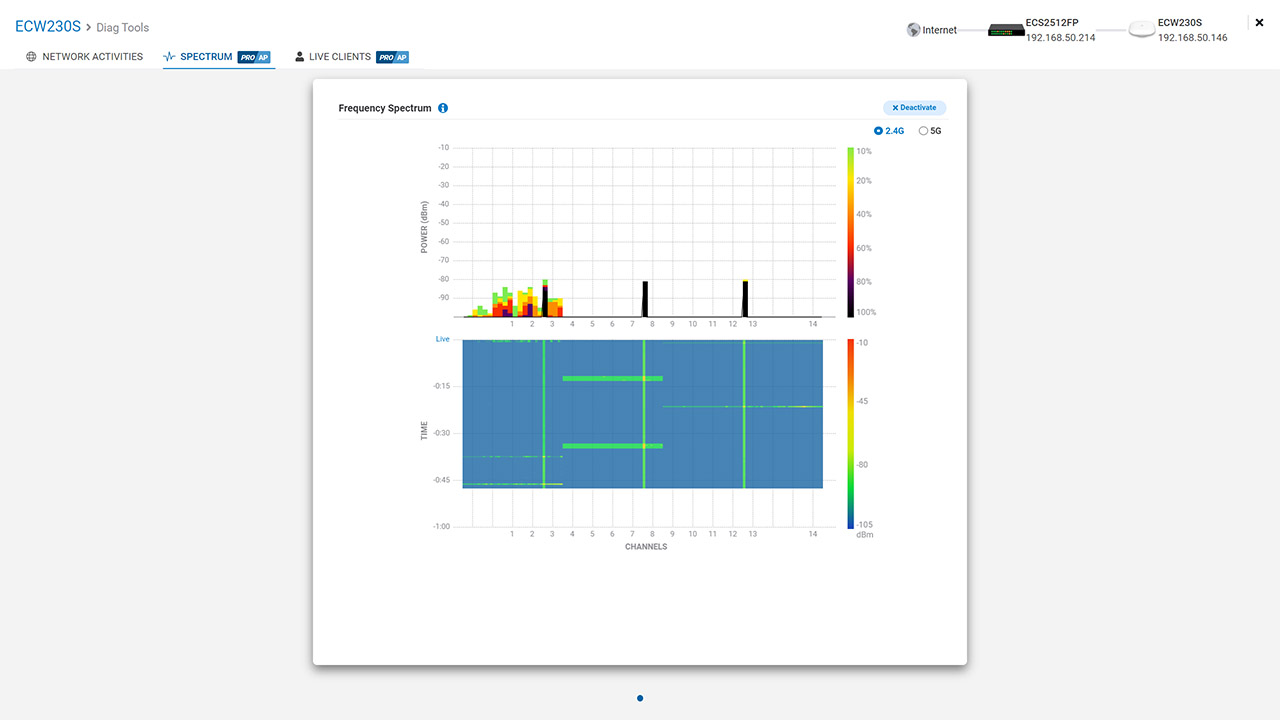
The AirGuard is also incredibly useful for detecting Rogue access points, as well as RF Jamming, Malicious Attacks and more.
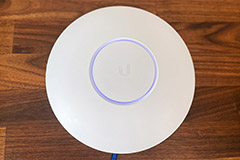
4. Ubiquiti U6-LR Wi-Fi 6 Access Point
![]()
The Ubiquiti U6-LR is currently, one of the best WiFi 6 access points that’s still limited by a Gigabit connection from the new WiFi 6 series. And this shows that Ubiquiti didn’t really care to compete with the other brands yet (the WAX650S has a 5GbE port) and focused more towards making a smooth and fairly inexpensive transition for the SMBs and enterprise clients towards the newer technology without a radical change in the infrastructure.
Whether it was the right choice or not is up to the customers, but the truth is that the U6-LR is a very capable wireless access point, more than able to hold its ground against its main competitors, even if it’s much cheaper. Then again, we’re not going to ignore the phenomenal advancements that EnGenius did in terms of security with its ECW230S and ECW220S.
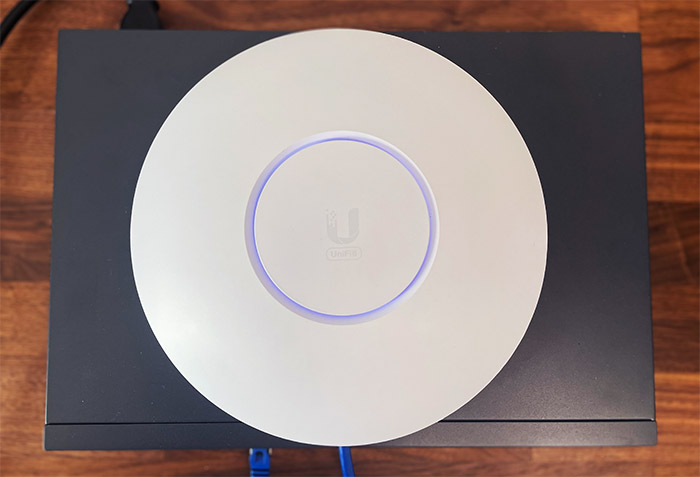
While Ubiquiti made the nanoHD much more compact than the UAP-AC-PRO, this isn’t really a trend that the manufacturer followed, so the Ubiquiti U6-LR is again on the larger side, measuring 8.66 x 1.89 inches.
But the look is pretty much the same as the other APs, so the case has that saucer shape, it’s covered by a white matte finish and at the top, there is a narrow canal that circles around to let the LED to shine through.
The LED is bright and it has the same functions as on the nanoHD: white means that the access point is not yet paired, solid blue means that the AP is added to the network and flashing blue means that the device is searching for the uplink. The plastic case on the UAP-AC-PRO was completely sealed, allowing the user to mount it outdoors and it seems that the U6-LR is built in a similar manner, being IP54-rated. So yes, you can mount the Ubiquiti U6-LR outdoors, but I would avoid putting it into the open since it can’t really compare to the properly rugged access points available on the market.
There are no ventilation cut-outs anywhere on the case of the U6-LR, so water and dust cannot enter the enclosure. Despite that, the wireless access point does not seem to get hot, unlike its predecessors (the UAP-AC-PRO). One design choice that I’m not really fond of is the removal of the secondary LAN port which means that on the bottom of the Ubiquiti U6-LR, you only get a Reset button and a Gigabit PoE+ Ethernet port (802.3af).
Considering that Ubiquiti didn’t give any option to power up the device using a power cable, you either have to use a PoE switch (you can read here a list of the best Ethernet switches on the market) or a PoE adapter. All Ubiquiti wireless access points make use of the UniFi Controller software in order to undergo any configuration changes to the device and to the network. The UniFi has been long regarded as the best controller for SMB equipment and it has created a blueprint which has been followed by many other manufacturers (TP-Link is replicating the experience very well with the Omada controller).
As a quick overview (you can read more by checking out the dedicated review), the interface has a left vertical menu, with the first option being the Dashboard. Here, you can see a graphical representation of the download and upload latency / throughput, the number of devices on the 2.4 and 5Ghz channels, the number of devices, clients and the Deep Packet Inspection. Then, there’s the Map, where you can view or create a graphical topology of your network and the Devices which display a list of all the UniFi devices discovered by the Controller.
Further down, you can see the Clients which display a list of the network clients and allows you to configure them, the Statistics (number of Clients, the Top Access points, a Quick Look over the most active AP and client, as well as Recent Activities) and Insights. I have tested the Ubiquiti U6-LR using a couple of computers, one as the server and the other as the client (I have actually used three different clients, one equipped with an AX200 WiFi 6 adapter, one with an Intel 8265 WiFi 5 adapter and the last was a smartphone, a Pixel 2 XL).
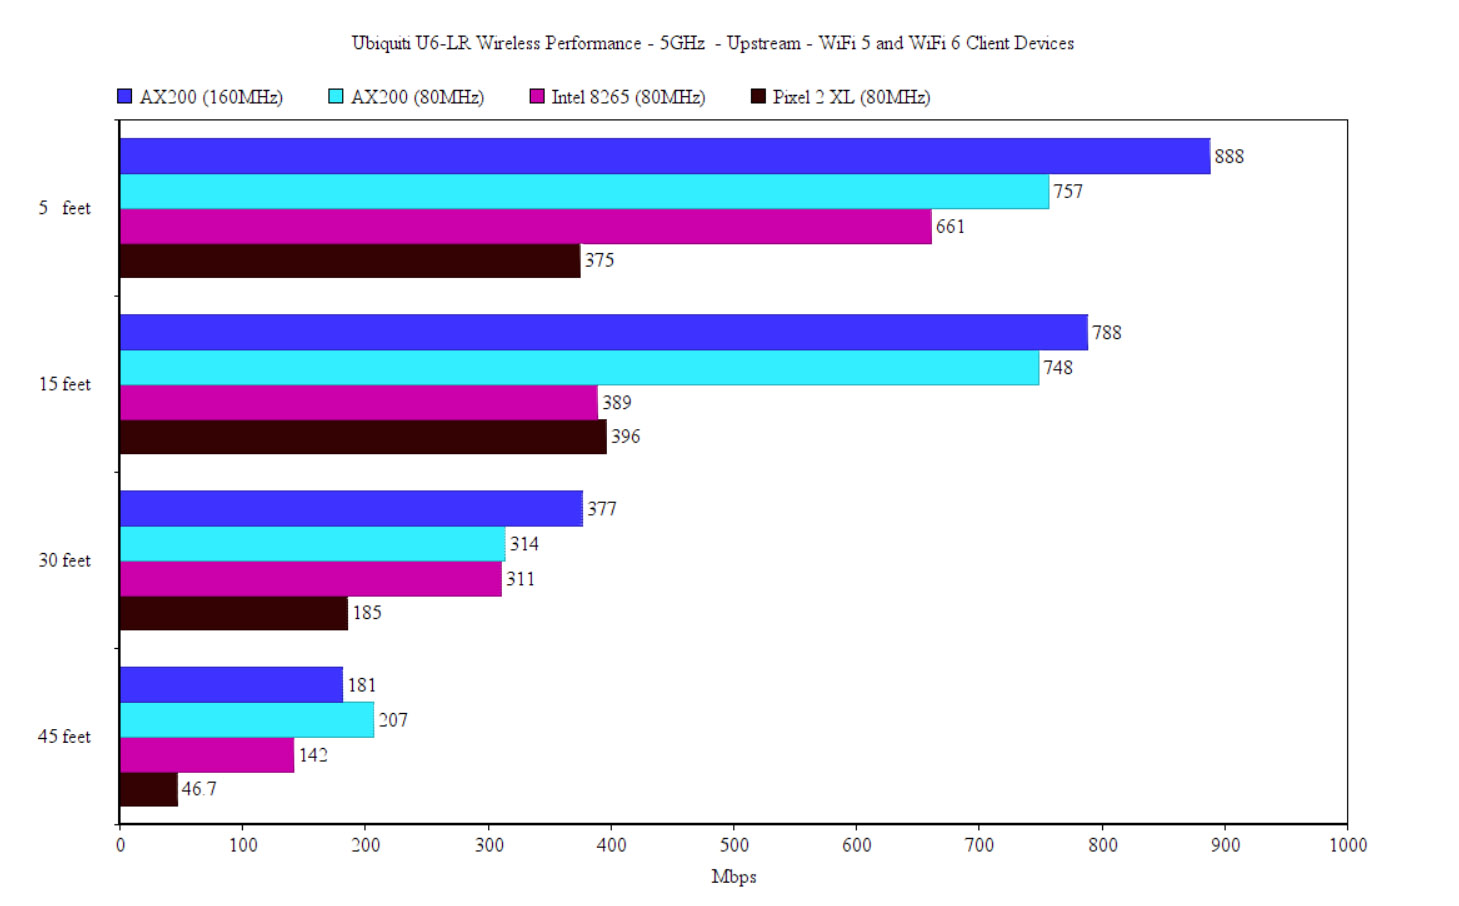
As you can see, from the client to the server, I saw an average of 888 Mbps at 5 feet on the 5GHz network using the 160MHz channel bandwidth and 757Mbps on the 80MHz mode. Using the Intel 8265 client, the throughput at 5 feet was considerably lower at 661 Mbps (80MHz), with the Pixel 2 XL offered a maximum of 375Mbps. At 30 feet, I saw an average speed of 377Mbps using the client equipped with the AX200 client device (on 5GHz, at 160MHz) and an average of 314Mbps using the 80MHz channel bandwidth.
Using the Intel 8265 adapter, the throughput was very similar, scoring an average of 311Mbps, while the Pixel 2 XL couldn’t really catch up, offering only up to 185Mbps. I have tested the Ubiquiti U6-LR a lot more in depth in the dedicated article, where you can also see the signal strength, the long-term speed fluctuations and the downstream performance.
5. Meraki Go GR12 Wireless Access Point Review
![]()
Ubiquiti has been the default manufacturer of SMB-suitable networking devices to offer an accessible alternative to the enterprise-level products, but Cisco didn’t want to miss out on such an important growing market, so it has made available a few new wireless access points (WiFi 6) to compete with the existing players.
But do know that the Meraki Go series, despite being a branch under Cisco, does focus a lot more on user-friendliness and simplicity. Also, other brands such as EnGenius, Ubiquiti, TP-Link and Zyxel do offer Cloud-based controllers which can handle multiple types of devices. But the Meraki Go line is not yet as diverse, so only the APs can be managed and configured using a Cloud application app.
In terms of design, the Meraki Go GR12 follows a minimalist look and it’s one of the few in this list that isn’t a ceiling-mount type.

Indeed, the wireless access point can be mounted on the wall thanks to its dedicated mounting holes or you can just leave the device on the desk since it does have some silicone feet to keep it in place. The case is made of plastic and it’s covered by a white matte finish, and the device is also fairly compact, measuring 7.95 x 5.55 x 1.02 inches. Yes, it’s a rectangular case, so it didn’t follow the common saucer shape.
I suppose it could have added a few LEDs for the status, but the developers have decided that the single LED approach is the better one. When it’s orange, there are issues with the hardware and, when the LED becomes blue, then it has access to the Internet, as well as some connected client devices. Now let’s talk a bit about the heat management. The case of the wireless access point is made of plastic, but the manufacturer has included some metallic pieces inside to dissipate the heat.
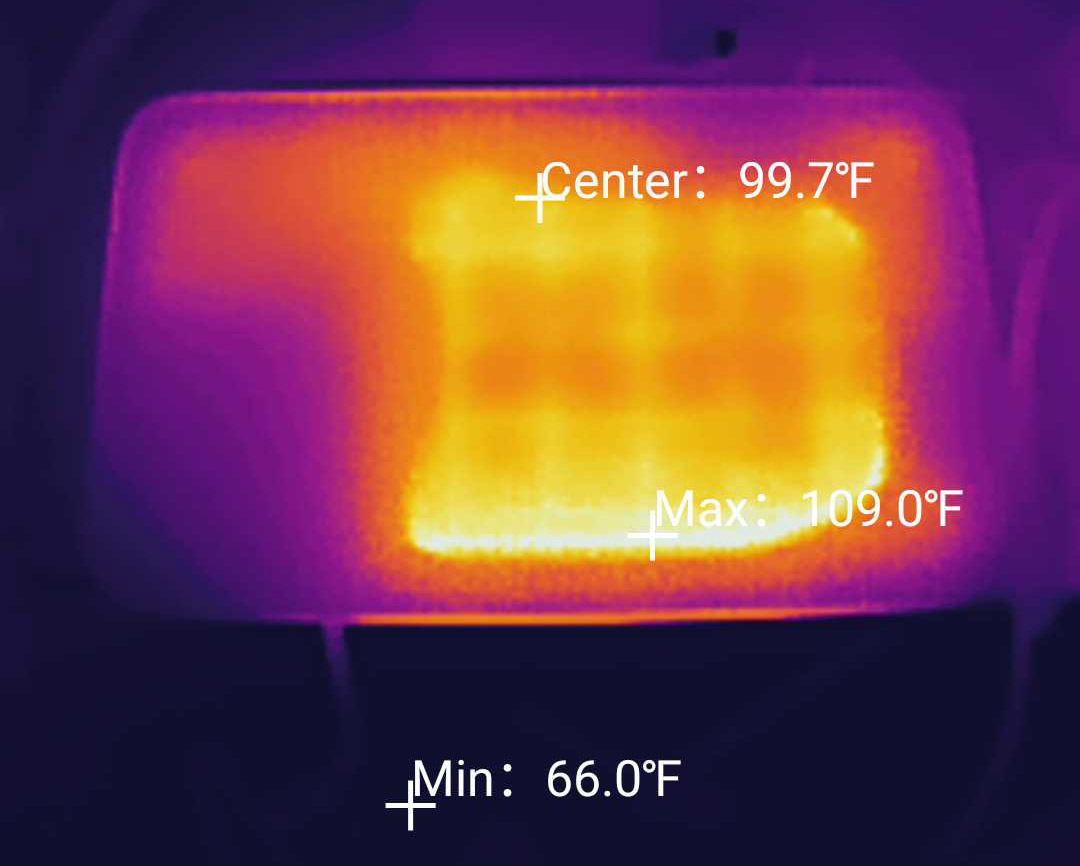
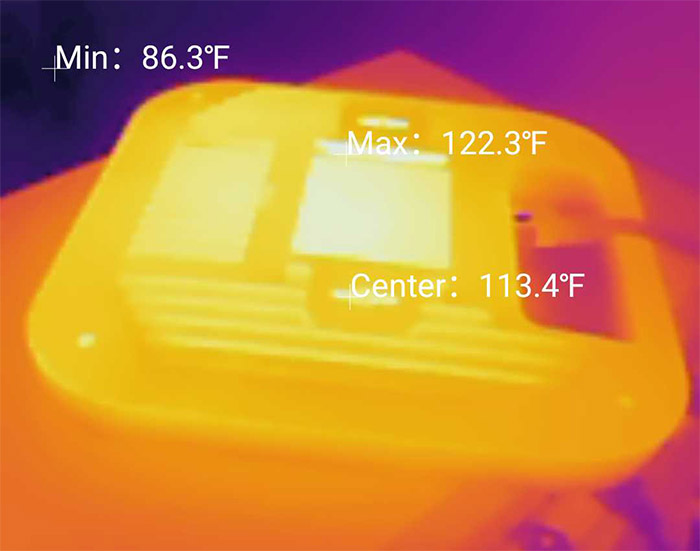
I used a thermal camera to check out the temperature and it showed that the Meraki Go GR12 doesn’t get hotter than the average WiFi 6 AP.
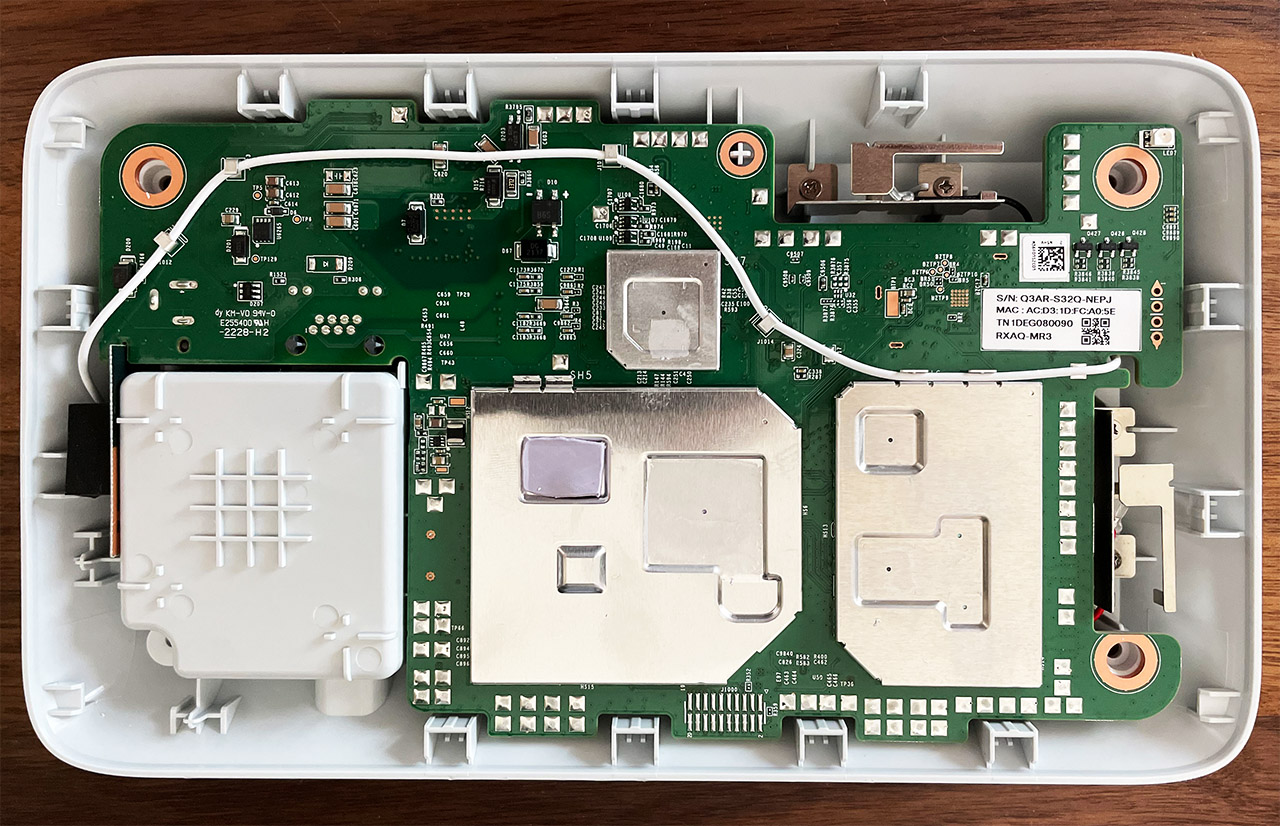
Moving to the bottom of the Meraki Go GR12, we see an info label and next to it, the manufacturer has dedicated an area for the ports: there’s a Power port, followed by a Gigabit Ethernet port (802.3af PoE) and a small recessed Reset button (to return the device to factory default settings).
I have also opened the device to see the main components and the wireless access point uses a quad-core 1GHz Qualcomm IPQ6010 chipset, has 1GB of RAM, 256MB of storage and uses the Qualcomm QCA8081 as the switch chip.
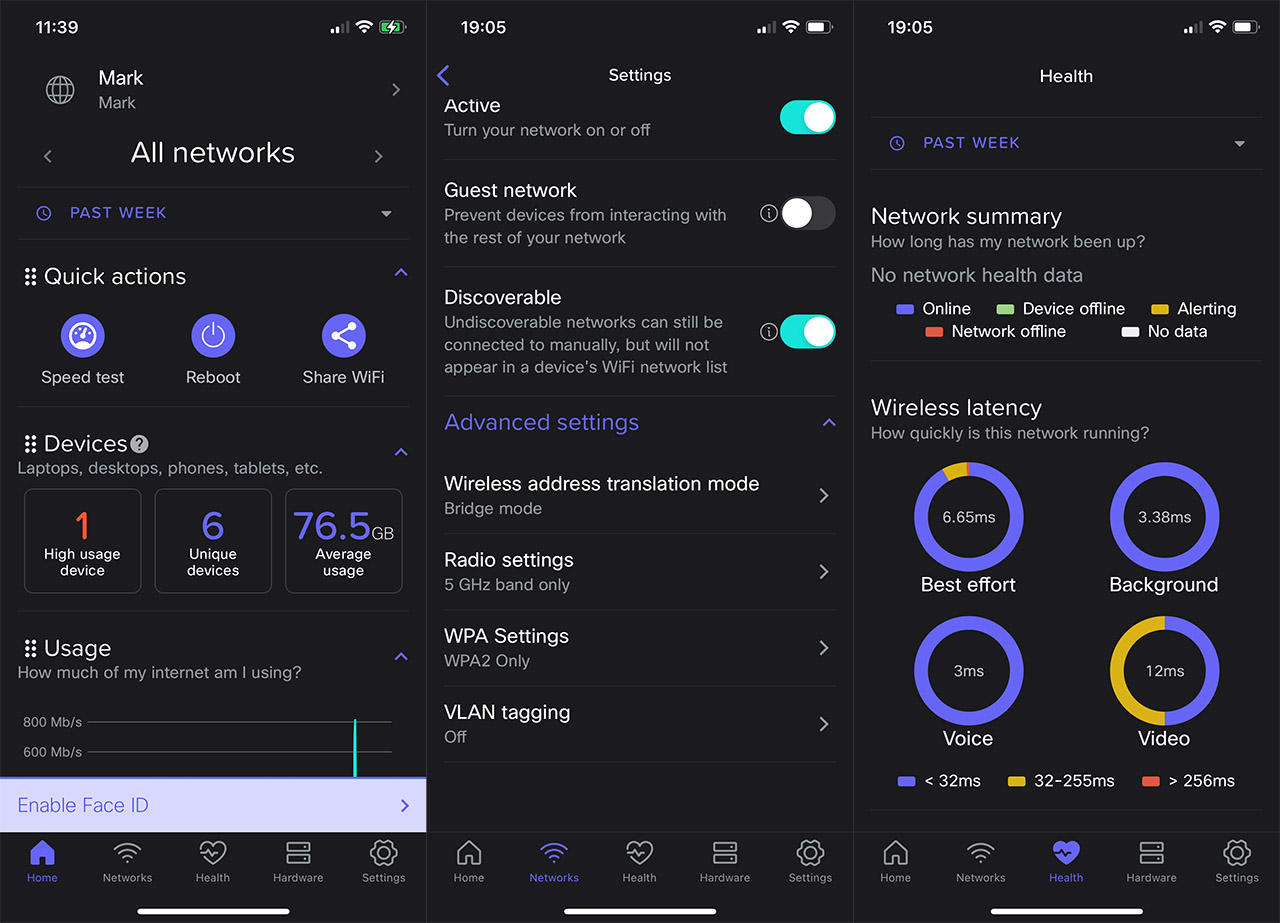
I have mentioned that the Meraki Go GR12 uses an application for monitoring and configuration purposes, but I haven’t mentioned anything about a web-based interface. And there is one available, well, kind of because the layout and the settings are pretty much identical to the mobile app. And yes, both rely on the Cloud to gain access to the interface. The app will show a healthy amount of status information and you can also configure the WiFi networks, although not that many advanced options are available (there is support for WPA3).
I saw that the app would also allow me to set up a Landing page (useful for hotels, hospitals and airports) and, despite the seemingly simplicity, it’s still necessary to adjust the default settings if you want the client devices to communicate between each other. Now let’s have a look at the wireless performance of the Meraki Go GR12.
Since it has a single Ethernet port, I had to rely on a PoE switch (I chose the Zyxel XS1930 multi-Gigabit PoE++ switch) and, after creating two SSIDs, one for the 2.4GHz and the other for the 5GHz connection, I used multiple WiFi clients (both WiFi 5 and WiFi 6) to test the throughput.
That being said, first, I connected the WiFi 6 client to the 2.4GHz WiFi network and, from the client to the server, I measured an average of 198Mbps at 5 feet and an average of 153Mbps at 30 feet; next, from the server to the client, I measured around 172Mbps at 5 feet and an average of 108Mbps at 30 feet.
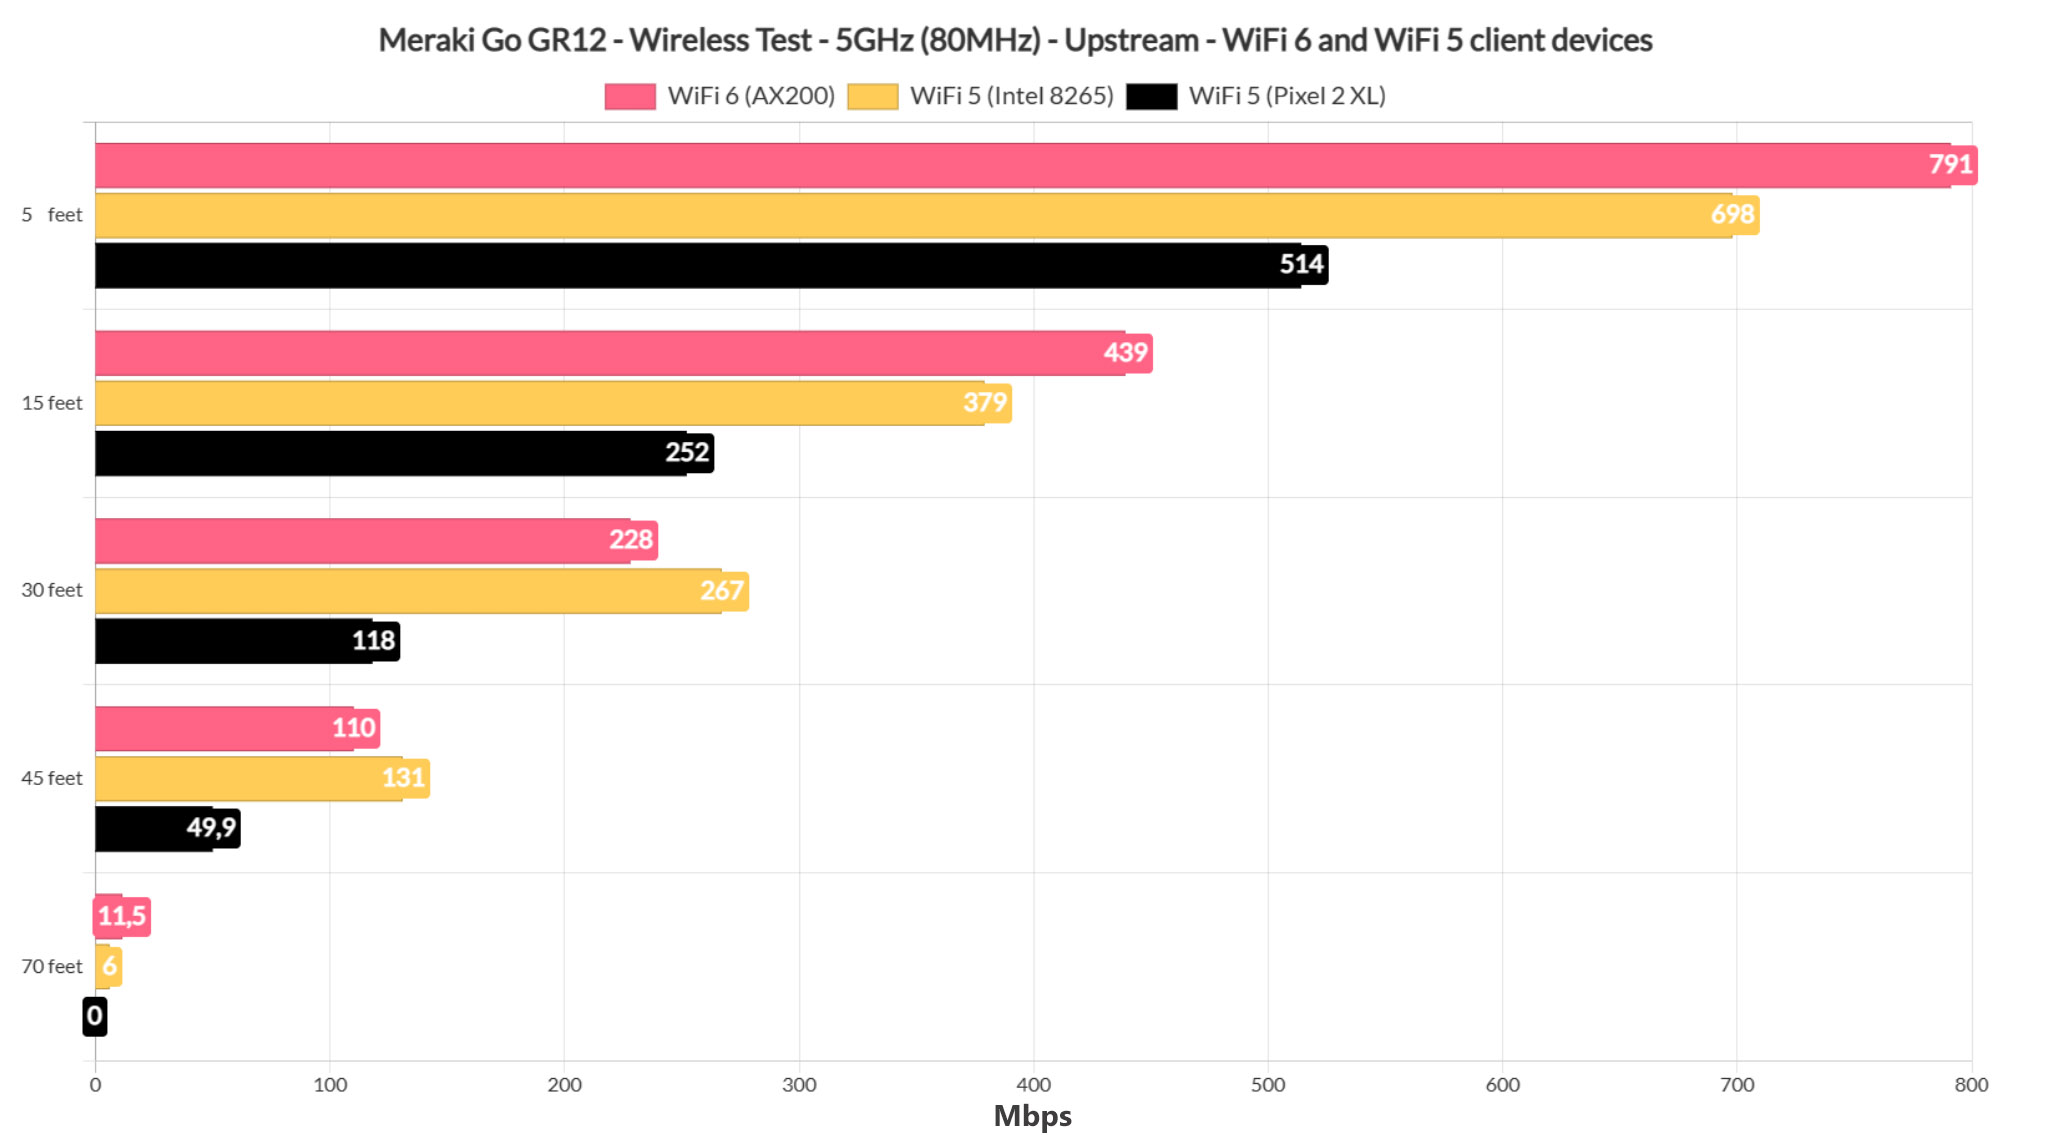
Afterwards, I connected the WiFi 6 client device to the 5GHz WiFi network and, from the client to the server, I measured an average of 791 Mbps at 5 feet, while at 45 feet, the speed decreased to 110 Mbps. From the server to the client, at 5 feet, I got around 438 Mbps and, at 30 feet, I measured an average of 129Mbps.
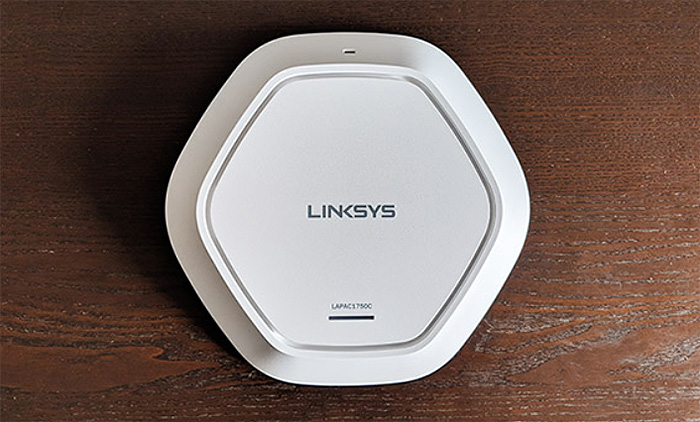
6. Linksys LAPAC1750C WAP
![]()
The Linksys LAPAC1750C is part of the new wireless access points that support the Cloud controller out-of-the-box, but besides this new software, the device is still identical (in terms of hardware) to the five year old LAPAC1750. Despite that, the LAPAC1750C is still suitable for today’s exigence (they rarely change that much in this market), so, it still respects the design trend of compact circular or hexagonal-shaped devices that can be easily positioned anywhere (even on the ceiling). The case of the LAPAC1750C is basically identical to any other from the LAPAC series, so we’re dealing with a hexagonal shape, but not with sharp angles, adopting soft, rounded corners instead (everything covered by a white matte finish). On the top you can find the Linksys logo, along with the model and a small bar for the LED lights just underneath. There’s also a narrow canal surrounding the top of the device and from this place, the case flows from the narrower top side towards a larger footprint.
When compared to the likes of Ubiquiti UAP-AC-PRO or even the Zyxel NWA1123-AC HD, the LAPAC1750C is among the largest I have tested so far, measuring 9.57 x 9.33 x 1.72 inches but it does weigh a bit less than the Zyxel AP (1.12 lbs). The LAPAC1750C is meant to be positioned on the wall or on the ceiling, as it comes with the whole kit for mounting (including a drill layout template), but, if you decide to keep it horizontally on a desk, there are four small round silicone feet that should ensure a reasonable level of stability.
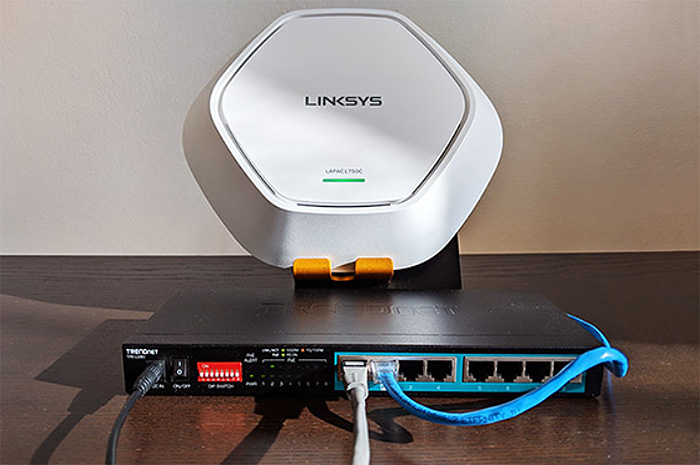
Turn the wireless access point upside down and you’ll be greeted by lots of punctured holes which ensure a proper airflow along with a carved-in area where you can find the ports and connections: there’s a Power port (only use the adapter that came with your AP), a single Ethernet Gigabit port (PoE+) and a red Reset button.
The LED light from the top of the case will glow a solid green if the system is normal and no wireless client is connected (it will blink when the device is booting). The LED indicator will also blink a blue light if there is a firmware upgrade in progress and will be solid blue if at least one wireless client is connected; lastly, the LED indicator will be solid red if the booting process has failed or the firmware update was unsuccessful.
Note: While some other wireless access points come with a PoE injector, Linksys has decided to not include one in the package.
Generally, the access points focus on different things than routers (like multiple SSIDs with multiple VLANs), so it won’t come as a surprise that the LAPAC1750C may not outshine a AC1750 router in terms of wireless performance, even though the access point itself is branded as AC1750. Despite that, the LAPAC1750C Pro is a worthy performer and the test results are really good.
To test the wireless performance, I took two computers, one as a client (ASUS PCE-AC88), the other as a server and, first, I connected them to the 2.4Ghz radio band. This way, from the client to the server, the LAPAC1750C reached an average of 133 Mbps at close range (5 feet) and it slowly decreased to 120 Mbps at 30 feet. From the server to the client, I measured and average throughput of 104.9 Mbps (at 5 feet) and afterwards, I got 94.2 Mbps at 30 feet.
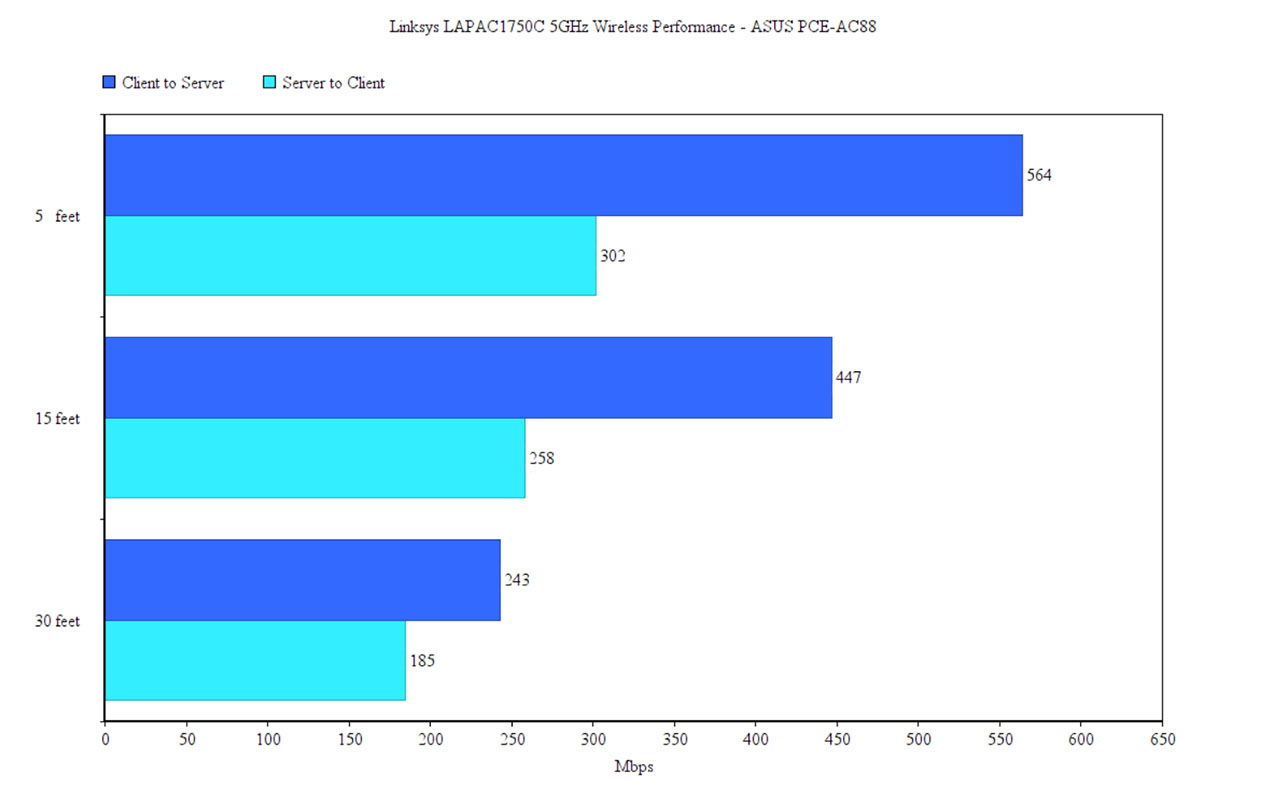
After I connected the computers to the 5GHz network, things were a lot better. At close range, from the client to the server, I measured an average speed of 564 Mbps and then, the speed decreased to 243 at 30 feet. From the server to the client, the access point managed to deliver an average of 302 Mbps and around 185 Mbps at 30 feet.
In terms of wireless performance enhancing features, the LAPAC1750C is quite bare-bones, lacking the MU-MIMO technology which has the ability to serve multiple clients at the same time, instead of letting them compete for the bandwidth, but it does come with support for the 802.11k Roaming technology which negates the need for re-authentication every time the client roams to a new node (Fast Basic Service Set Transition).
The reason of existence of the LAPAC1750C is the centralized management system which allows the creation of access points clusters that can then be managed by a single controller. The Linksys Cloud Controller, as its name suggests, is Cloud-focused, but the manufacturer has made it free for 5 years – you can still use the LAPAC1750C in the offline mode, where you simply enter the IP address of the device and do the necessary configurations. To access the Cloud controller, you’ll need a Linksys account and to simply pair the AP to the software (the process is very simple and painless). Some of the main features that the controller offers are VLAN tagging, Bandwidth Limit, Splash Page (offers a very comprehensive way of creating a splash page: you can modify the styles, the login instructions, the terms of use policy, the authentication type (password-only at this time) and more), Client Isolation, 802.11k and some Tools (which includes a Ping Tool and the Rogue Access Point Detection).
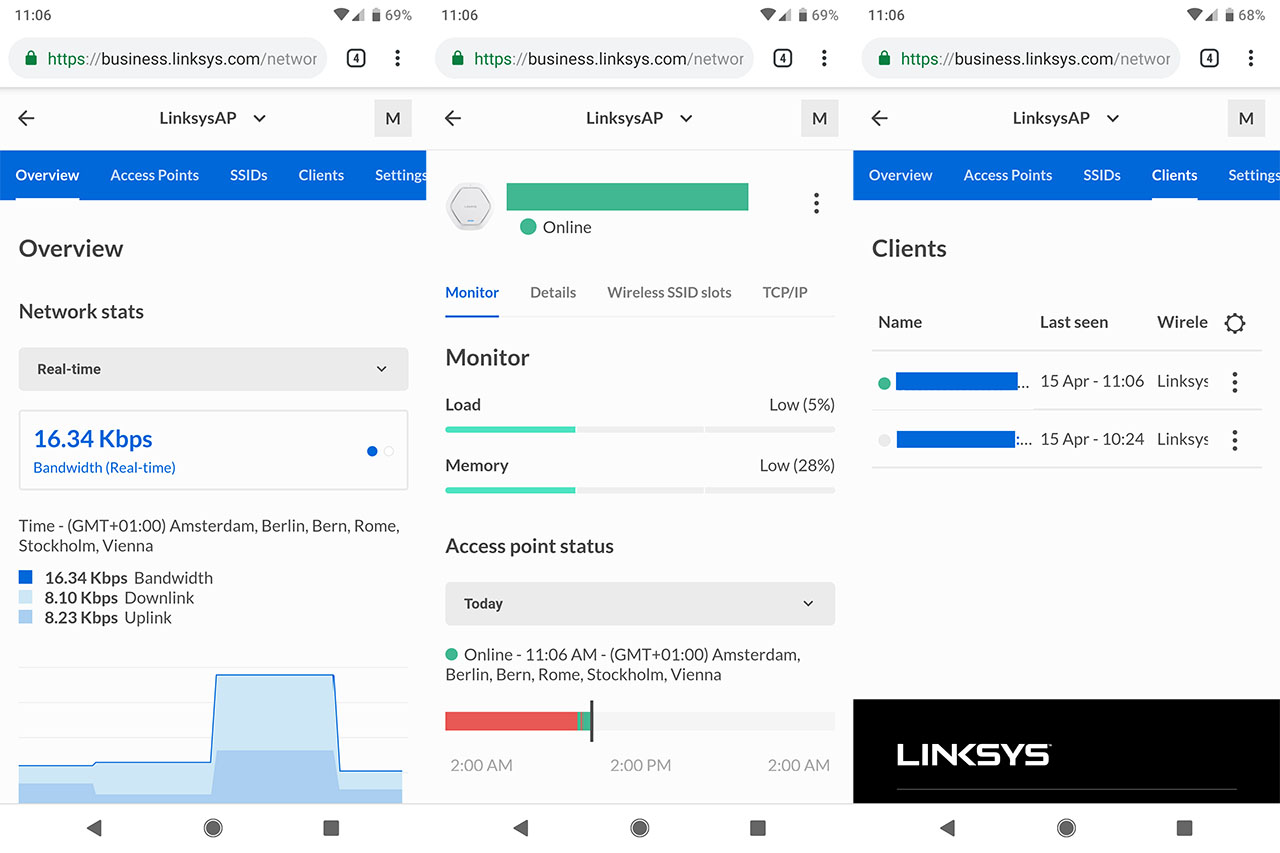
The local web-based utility will only work for one access point at a time (while the controller allows for a mass deployment of APs with fast an easy monitoring and configuration process), but it does have some additional features, such as WDS, Workgroup Bridge, SSID Isolation and RADIUS support for the Splash Page. I do expect that Linksys will make the Controller a more complete solution and I do hope that more types of devices are underway to be added under a single software.
What should you take into account before choosing a wireless access point?
Wireless Performance and Range
Obviously, the most important aspects of a wireless access point is the downlink and uplink throughput and how far can the signal reach. For example, if you use the 2.4GHz radio band, chances are that the signal will go for a long way, but the speed won’t be strong, while if using the 5GHz radio band, the speed will be greatly improved, but don’t expect huge distances to be covered.
Also, you need to take into account the interferences, the number of clients, the surface that needs to be covered and if you need more than a single access point.
The Web Interface/App
This is also a very important aspect, because you need to be able to configure and, if needed control a large network. Ideally, a good interface is easy to navigate, the settings are clear and intuitive and the AP should have as many features as possible for you to fiddle with.
Also, you need to check out whether you can access the interface through an Internet browser or you need to use an app (or both) and if the software allows you to remotely control the network.
Price
Lastly, we have the price to worry about, because you need to know where you stand based on your budget. Usually, the consumer-type access points are cheaper, but they lack a lot of the features of an enterprise-level AP.
You should also keep in mind that some popular products can be overpriced (because of their popularity) and that there could be some rare gems from yet-unknown or rising networking manufacturers that could deliver the same experience at a lower price.
What features should you look for in wireless access points?
PoE
The Power over Internet is quite a simple concept (but extremely important) that allows your access point to receive power through a twisted pair Ethernet cabling (so you get both electrical power and data, using a single cable).
Why is it useful? Many organizations like to place the wireless access points on the ceiling in order to help the wireless clients achieve the best possible range, but they have to rely on extension cords (which have an ugly appearance and require a qualified electrician to install them).
That’s why it’s better to use the PoE system, as you can install it yourself and it protects you devices from underpowering or overload. Some of the access points on the market have a PoE injector included in the package, while other do not (you will have to buy it separately), so be sure to check it out before purchasing, if this is a mandatory feature for your network.
Concurrent dual band
You may be surprised that some access points call themselves dual band, but, despite expectancies, it allows you to choose only one band at a time. A good example is the Linksys WAP300N, which has both the 2.4GHz and the 5GHz radio bands, but you can only use one or the other.
Load-Balancing
I’ve touched the subject of load-balancing when I talked about the more popular dual-band routers on the market and the importance of this feature was clear for any business owner that values a stable network. Is this function also relevant for wireless access points? Absolutely yes.
First of all you need to understand that the load-balancing feature was created to be used with more than one access point. This is because its role is to diminish the network congestion by spreading the sessions among the existing APs in such a way that they share the client load.
So, if you have a large number of clients in a smaller space, instead of overloading a single access point, the load balancing spreads all the connected clients over all the APs, therefore there will be less interruptions and more bandwidth available.
The Man in the Middle (Defence against rogue access points)
A rogue access point is an unauthorized WAP installed (usually with malicious intent) on a secure network. Therefore, the network becomes vulnerable to different types of attacks and can be accessed either from inside the facility or remotely (the more common occurrence).
That is why it is very important that the access point to have a reliable wireless intrusion detection system which audits all the APs on the network on a regular basis to see if they are on the managed list and if they’re connected to the secured network or not.
Beamforming
The Beamforming technology allows your access point to focus the signal towards each client and to concentrate the data transmission towards a specific target, instead of broadcasting it all over the room, therefore minimizing the data waste.
If a few years ago this technology was optional and exotic, nowadays, almost all devices have this feature implemented (still, make sure to check before the purchase). Also, you need to know that every major manufacturer will have its own way of using this technology and it may have a different name and different performance, but the functionality should remain basically the same.
Mesh Networking Support
The mesh network support is one of the most important features to look for when buying an access point because it allows you to add other APs and create a network where all the nodes (APs) cooperate with each other when distributing the data.
An interesting characteristic of a mesh network is that the data is propagated along a path and it travels from one node to the other until it reaches its destination. This way, it has to find the best road and, if needed to reconfigure itself in case of broken paths (using self-healing algorithms).
It also allows for an interrupted experience when travelling into a large building, by automatically switching from AP to AP so you won’t notice any disconnects.
802.11n or 802.11ac?
Future-wise, an investment into Access points that feature the AC standard should be the better choice. If you want to create a network using APs compatible with the 802.11n standard, you don’t have to worry, because, if needed you can replace them in time and the N-access points and AC-access points are compatible with each other and work great with clients of both breeds.
Now, if you are curious about the technical differences between the two standards, let’s just say that the 802.11ac standard delivers up to 3 times faster speeds and, while a N-access point can handle no more than 30-35 clients in order to maintain a reasonable bandwidth for all, an AC-access point has no such limitations.
Lastly, the price could make a difference, because, as expected, the AC technology is way more expensive than the N technology.
Mark is a graduate in Computer Science, having gathered valuable experience over the years working in IT as a programmer. Mark is also the main tech writer for MBReviews.com, covering not only his passion, the networking devices, but also other cool electronic gadgets that you may find useful for your every day life.
Any chance you could test the pro or long range Ubiquity Wifi 6 AP? The nano isnt really in the same class as the rest of these in the list.
Yes, I will test at least one of the Ubiquiti WiFi 6 access points. But it will take some time before I purchase them, since Ubiquiti doesn’t answer my emails (:D).
Good news! I have managed to test the U6-LR and if you’re curious, you can see the full analysis here: https://www.mbreviews.com/ubiquiti-u6-lr-unifi-6-long-range-review/.
I will soon add the access point to this article as well.
This is a big WOW of article!
Thanks to this, I have a more clear idea where to check now, brilliant!
Happy new year!
truly very great articles… you define every thing so simple..and easy … every article this full of informational.. thanx